
Designing and Formatting a Worksheet for Maximum Readability
If you simply enter data into a new worksheet without adjusting any formatting first, every cell will look exactly the same, and anyone reading the worksheet will be forced to work to pick out the important details. Want to make it easier on your audience? Set off different regions of a worksheet by using custom cell formatting—larger, bolder fonts for headings, for example, plus borders around the data area with a double line to mark where the data range ends and the totals begin. Carefully resetting row heights and column widths, wrapping and slanting text, and adding background shading can make the entire sheet easier to follow.
Changing Fonts and Character Attributes
The default worksheet font (10-point Arial) is fine for basic data entry, but for any worksheet more complex than a simple list you'll probably want to adjust fonts to squeeze more data onto printed pages while beefing up titles, totals, and category headings with larger, bolder fonts.
→ If you're entering data in a list, some cells format themselves automatically; for details, see "Speeding Up Repetitive Data Entry with AutoComplete".
If you select a cell or range, you can apply font formatting to the entire contents of the selection. You can also apply different fonts, font sizes, colors, and font attributes to different words or characters in the same cell. In either case, you can use the Font and font size lists on the Formatting toolbar. Open the Format Cells dialog box and click the Font tab (see Figure 22.11) for access to all font formats, including some options you won't find on the toolbar, such as strikethrough and double underline attributes.
Figure 22.11. Options on the Font tab let you format an entire cell or selected words or characters within a cell.

Most of the options on the Font tab of this dialog box are fairly straightforward. One check box deserves some explanation, however. When you add custom font formatting, you automatically clear the Normal Font check box. Check this box again to remove all font formatting from the current cell or selection and restore Excel's default style.
 If you're having trouble restoring default font formatting to a cell, see "Click Twice for Normal" in the "Troubleshooting" section at the end of this chapter.
You'll find countless uses for rich formatting within cells. The range shown in Figure 22.12, for example, uses different font formatting for the product number and name in a list of products. This feature is also a useful way to insert trademark and copyright symbols and other special characters within a cell.
Figure 22.12. Mix and match font formatting within a cell to emphasize one type of data over another.

Note
To enter a manual line break within a cell, position the insertion point at the spot where you want the break to appear and press Alt+Enter. Unfortunately, there's no easy way to copy rich formatting from one cell to another. If you use the Format Painter or the Clipboard to copy formats, only the first font is copied.
An obscure check box on the Alignment tab of the Format Cells dialog box actually has a major effect on formatting. Check the Shrink to Fit box when you want Excel to automatically adjust the font size when the contents of a cell are too wide to fit. This option doesn't change the formatting applied to the cell; it changes the scaling instead, going up or down in 1-point increments. If you enter more text or adjust the width of the column, Excel changes the size of the font automatically so that you can continue to see its contents. Use this option with care—if you format an entire column as Shrink to Fit and then fill it with data that varies in length, the results can look like a ransom note.
Aligning, Wrapping, and Rotating Text and Numbers
When you use the default General format, cells containing text align to the left, and those with numbers align to the right. You can change the alignment of any cell or range by using the Align Left, Center, and Align Right buttons on the Formatting toolbar.
Use the Wrap Text option on the Alignment tab to handle long strings of text that don't fit in a cell. Wrapped text is useful for column headings that are much longer than the data in the column. You can also use wrapped text to create tables, where each cell in a row holds an entire paragraph. Excel wraps text to additional lines automatically, maintaining the column width you specified. To control the location of each break, press Alt+Enter. To use text wrapping, follow these steps:
Select the cell or range that contains the text you want to wrap. Right-click and choose Format Cells.
Click the Alignment tab on the Format Cells dialog box and check the Wrap Text box.
Adjust the vertical alignment if needed. For column headings with long and short entries, for example, choose Center from the Vertical drop-down list. Headings formatted this way seem to "float" instead of sitting on the bottom of the cell. For text in a table, choose the Top format so that each paragraph begins at the same point.
Click OK to apply the new format. Now, instead of disappearing from view when they reach the right edge of the cell, the text you enter begins filling additional lines in the same cell.
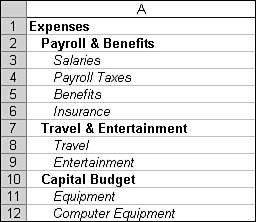
Two other alignment options can help make worksheets easier to read. You can change the orientation of a column heading to any angle, including straight up or down. Slanting column headings can save space and give tables a professional look when you have narrow columns with lengthy titles. To help set off groups of items in a column, indent the cells in second and subsequent levels. (See the before and after worksheets at the end of this chapter for examples of all these alignment options.) This option is especially useful when you want to distinguish subheadings from headings at the beginning of a row.
To indent a cell or range of cells, follow these steps:
Select the cell or range you want to format, right-click, and choose Format Cells.
Click the Alignment tab. In the Text Alignment section, click the Horizontal drop-down list and choose Indent (Left).
Use the Indent spinner to select the indent level for the selection. For each number, Excel adds approximately as much space as a capital M. For the outline levels in column A of Figure 22.13, we used settings of 1 and 2, respectively.
Figure 22.13.
Use the Format Cells dialog box to change the orientation of column headings so that they slant up or down:
After entering the text for the headings, select one or more cells, right-click, and choose Format Cells.
Click the Alignment tab, and then point to the control in the Orientation section of the dialog box and drag it up or down to the desired angle, as shown in Figure 22.14, or use the spinner to specify a precise angle by degrees.
Figure 22.14. Click the line between the word Text and the red square; then drag it up or down to arrange text at a space-saving angle.

Click OK to accept the changes and return to the worksheet.
Tip from 
Word and PowerPoint don't allow you to position headings using any orientation except horizontal or vertical. If you want to add a table with slanted headings to a Word document or PowerPoint presentation, create the table in Excel, and then use Paste Special and choose "Microsoft Excel Worksheet object" to embed the worksheet range, complete with slanted headings.
Vertical headings use little column width, but they can be difficult to read. You have two choices when changing a heading to vertical orientation. Click the skinny box just under the word Orientation to stack letters one over another. This option is most effective with short words in all capitals. You can also change the orientation to 90[dg] to turn the cell on its side, so the contents read from bottom to top.
Using Borders, Boxes, and Colors
You can create a distinctive identity for sections of a worksheet by using borders, boxes, and background colors. Dark backgrounds and white type help worksheet titles stand out. Soft, light background colors make columns of numbers easier to read. Use alternating colors or shading to make it easy for the eye to tell which entries belong in each row, even on a wide worksheet that contains many columns of data.
Tip from 
When preparing a worksheet that you intend to print on a black-and-white printer, test different color combinations. Use the printout to decide which colors are best for you. Sometimes, for example, it's easier to read black type on a light yellow background (which appears gray) than on a background on which you specify a shade of gray.
The Borders, Fill Color, and Font Color buttons on the Formatting toolbar work much as you would expect. After selecting a cell or range, click the arrow to the right of each button to choose a specific option from the drop-down list.
These toolbars don't give you access to every formatting option, however. For maximum control over borders and colors, first select the cells or range you want to format; then right-click and choose Format Cells. Click the Border tab (see Figure 22.15) to add and remove lines around the selection.
Figure 22.15. Use borders to distinguish sections of your worksheet. Note that this range includes three different line styles.

To create custom borders, follow these steps:
Before you add any lines, choose a line style—thick, thin, doubled, dotted, or dashed—from the Style box at the right.
Choose a different border color, if you like, from the Color drop-down list. Colors are most effective with thick lines.
Click the Outline button to add lines in the thickness and color you specified on all four sides of the active cell. If you selected a range, click Outline to draw a box around the range, and click Inside to draw borders around every cell in the selection.
Click any of the buttons in the Border section to add one line at a time, on the left, right, top, or bottom of the cell, or diagonally. Click again to remove the line. The preview area shows which edges currently have borders.
Note
You can also click directly on lines in the preview area to add or remove borders.
You can mix and match line styles and colors, even on different borders of the same cell. Click the line style or change the color, and then click the button in the Border area to change the style.
Click OK to close the Format Cells dialog box and return to the worksheet.
Getting borders just right on a complex worksheet often takes multiple iterations. The trick is figuring out which regions need separate formatting and which have common borders. For example, you might need to select the entire data area first to add a thick border around the outside. Then select the heading rows to adjust their borders, which might be thinner and lighter. Select the data area next, to add, remove, and format interior rules between rows and columns that contain data. Finally, if your data area contains a totals row at the bottom, select that row (or the last row of data) to add a double line between the end of the data range and the totals.
Merging Cells
On a highly structured worksheet, merging cells can help you show the relationship between headings and subheadings. In a list where two or three rows have the same value in the first column, for example, you could merge those cells to make the common nature of those rows truly stand out. You can combine adjacent cells in a row, a column, or any contiguous range.
To quickly merge two or more cells, select the cells and click the Merge and Center button on the Formatting toolbar. Excel displays a dialog box warning you that when you merge cells, you will lose all data except the contents of the top-left cell in the selection. Click OK to continue or Cancel if you want to back out and move the data before you lose it.
→ Merged cells can cause problems when you create scenarios on a worksheet; for details, see "Storing Multiple Scenarios in a Single Workbooks".
To edit text in a merged cell, click in the cell and begin typing. You can also change the alignment of the merged cells to left or right, without changing the merge.
You might encounter problems when you try to cut and paste merged cells, or when you attempt to sort a list that contains a merged cell. To restore the merged cells to their normal position on the grid, click to make the merged cell active, and then click the Merge and Center icon on the Formatting toolbar. You can also use Excel's menus: Right-click and choose Format Cells. Click the Alignment tab and clear the check mark from the Merge Cells box.
Changing Row Height and Column Width
On a new worksheet, every row is exactly 12.75 points high, and every column is 8.43 characters wide. (If the default font for Normal style is a proportional one such as Arial, Excel uses a lowercase x as the character to measure.) As you design a worksheet and fill it with data, however, you'll need to change the size of rows and columns. A column that contains only two-digit numbers doesn't need to be as wide as one that's filled with category headings, for example.
Some of these adjustments happen automatically. If you change the font size of text in a cell, the row automatically changes height to accommodate it. Likewise, when you enter data that's too wide to fit in the default column width, Excel expands the column.
→ For an explanation of how columns expand to accommodate data you enter, see "Avoiding Rounding Errors".
You can also adjust row heights and column widths manually in any of three ways:
Use Excel's AutoFit feature to set column widths and row heights automatically. Double-click the right border of a column heading to adjust column width to fit the widest entry in the column. Double-click the bottom border of a row heading to resize a row to accommodate the tallest character in that row. If you select multiple rows or columns, you can adjust them all at once.
Click and drag any column or row to a new size. Point to the thin line at the right of the column heading or the bottom of a row heading until the pointer changes to a two-headed arrow. Click and drag the column or row to the desired width or height, and release the mouse button.
Tip from 
When you use the mouse to adjust column widths and row heights, ScreenTips show the exact height and width, in characters (for columns) or points (for rows). Curiously, both ScreenTips also show the measurements in pixels—use this scale if you're optimizing a worksheet for viewing in a browser at a specific resolution, say, 800×600 pixels.
To set a precise height or width, use a dialog box. Choose Format, Row, Height and enter any number between 0 and 409 (points). Or choose Format, Column, Width and enter any number between 0 and 255 (characters).
To adjust more than one row or column, select the group of rows or columns first. Then point to the border of any row or column heading in the selection and drag to the desired size. When you release the mouse button, Excel adjusts all selected rows or columns to the height or width of the column you selected. This technique is especially useful when you're putting together a budget worksheet with 12 columns, one for each month. After entering data, select all 12 columns and drag them to the correct width.
Here are some expert tips to help you when working with row heights and column widths:
To hide any row or column, set its height or width to 0 (drag a column heading to the left or a row heading to the bottom, for example). To make a hidden column or row visible, select the columns or rows on either side of the hidden one; then choose Format, Row or Column, and click Unhide.
To resize a column according to the contents of one or more specific cells in that column, make a selection and then choose Format, Column, AutoFit Selection.
To automatically change the size of a group of columns or rows without the mouse, use AutoFit from the menus. Select the rows or columns, and then click Format, Row or Column, and choose AutoFit Selection.
If you've customized column widths and/or row heights and you want to copy this information along with data, copy and paste the entire row or column, not just the individual cells. Use the Column Widths option on the Paste Special dialog box to duplicate the arrangement of columns from one worksheet to another.
To change the standard width for all columns in the current worksheet, choose Format, Column, and then enter the new column width (in characters) in the dialog box. The new width will not apply to columns whose width you have already reset.