Using the Media Gallery
Clip art—reusable drawings, photos, and the like—derives its name from the not-so-distant past, when designers actually clipped images from a book and pasted them into documents. The electronic versions of these tools are easier to use, but the effect is the same: to enliven an informal document. Much depends on the audience you want to reach and the effect you want to achieve.
A dynamite piece of clip art can tell a story worth a thousand words. A really poor piece of clip art hinders communication, leaving people scratching their heads about the possible obtuse meaning of it all.
Gratuitous clip art—that is, clip art that doesn't relate to the topic at hand or otherwise impedes the flow of your documents—distracts your audience and often detracts from the point you're trying to make.
Office comes complete with an application called the Media Gallery, which has ties to the Web where you can download thousands of additional images, sounds, video clips, animated graphics, and the like. The Media Gallery is a fully indexed graphics database that lets you search for images in a wide variety of ways.
At its simplest, you can search for relevant images by category. To open the Media Gallery in Outlook, Word, Excel, PowerPoint, or FrontPage, choose Insert, Picture, Clip Art. You'll go through some preliminary steps to catalog pictures that are already on your hard drive.
You'll probably find it easiest to proceed in this order:
In the Results should be box, choose the media type you're looking for (see Figure 5.9). Click the + buttons to narrow your search to very specific types of media (for example, JPEG files).
Figure 5.9. Start by specifying the types of files you're willing to consider. Generally, this is the easiest criterion to establish at the onset.

Pick the "collections" that you want to scan. As a first stab, you should probably uncheck the box marked Web Collections. Search the Web after you've exhausted your local possibilities.
Type keywords in the Search text box, and click Search.
You're not bound by the built-in keywords. To set your own keywords for a particular clip, follow these steps:
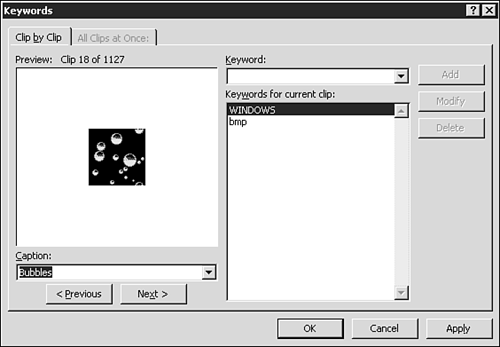
Right-click the clip and choose Edit Keywords. The Keywords dialog box opens(see Figure 5.10).
In the Caption box, type a descriptive name for the clip. It can be virtually any length, and include punctuation marks and other special symbols. The caption text will appear as a ScreenTip when you hover the mouse pointer over the clip in the task pane.
In the Keywords for Current Clip box, add or remove keywords for the particular clip.
Caution
Office helps you maintain consistency in your keywords by use of the drop-down list. If you're careful to use uniform keywords, your efforts will pay off later with more effective searches.
You can also add clip-art images from graphics files on an individual computer or on the company network, with the Gallery providing an option to move or copy a graphic onto a user's PC, or link the Gallery item to the original file. Click Clip Organizer at the bottom of the Insert Clip Art task pane.

