Configuring Common Office Features
In every Office application, you'll find most customization settings on the Options dialog box. Select Tools, Options to adjust these settings. Although the available settings vary widely, you can typically customize the following:
Control the number of files on the recently used file list. The default is four, and the maximum is nine for most Office applications.
Set spelling preferences (Word and PowerPoint), as explained in the following section.
Enter user information, including your name and initials, for use with comments.
Control whether you see and hear animation and sound effects when you use menus and other interface elements. If sound effects annoy you, turn them off here.
Set AutoRecover options (Word, Excel, and PowerPoint) to automatically save snapshots of files in memory at regular intervals so that the program can recover them in the event of a system crash. (This is not a substitute for saving your work regularly!)
Hide or show status bars at the bottom of each program window. These typically display information about the current document, worksheet, presentation, or other data file.
Hide or show rulers, scrollbars, and other interface elements.
→ For a discussion of text entry, editing, and formatting options used throughout Office, see Chapter 4, "Editing and Formatting Text".
Customizing Task Panes
Task panes, a new interface element in Office XP, are small windows that dock within an Office program window to provide easy access to commands and program functions. Task panes fuel search functions, the Office Clipboard, clip art, and file management tasks throughout Office XP.
Despite their widespread use, task panes are mostly fixed and barely customizable. The one and only task pane option lets you make the task pane visible each time you start an Office program without opening a saved document. From the bottom of the New Document, New Workbook, or New Presentation task pane, check the Show at Startup box to enable this option.
Tip from 
Although most task panes can be docked only to the right side of the program window, you can move the pane—point to the pane's title bar and drag it so it floats over the window. You can also change the width of the pane by dragging the left edge; this option is especially useful with the Insert Clip Art task pane.
Customizing Smart Tags
Smart Tags are a welcome addition to the Office XP interface. These tiny button/menu combinations appear automatically after certain types of actions. For instance, Smart Tags appear whenever you use the AutoCorrect or Paste function in any Office program. If the results aren't what you expect, you can use options on the Smart Tag menu to change the way the data appears. Smart Tags assist in error checking in Excel worksheets and are used for layout functions in PowerPoint. They can also automatically identify blocks of text that meet certain criteria. For instance, you can configure Word to automatically recognize addresses and names (as in Figure 2.12), or ask Excel to recognize stock ticker symbols.
Figure 2.12. Word automatically adds a Smart Tag to names in a document. Click the button to add the name to your Outlook Contacts folder, paste in the contact's address, or perform other tasks.

Subtle indicators mark the positions of each Smart Tag in an Office document. In a Word document, a faint purple line under a name means a Smart Tag is buried there. In Excel, triangular indicators in the corner of a cell mark the presence of a Smart Tag. Hover the mouse pointer over the Smart Tag to display an Action Button; click the button to see a list of actions you can take in response to the tag.
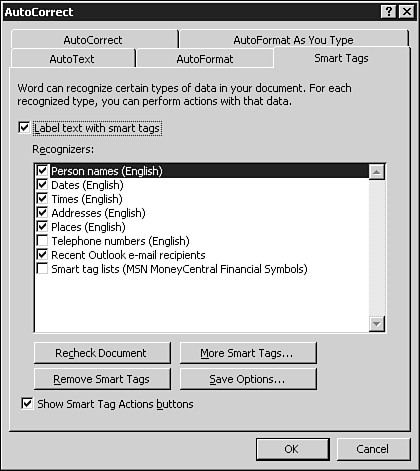
A wide array of options is available for customizing Smart Tags. To adjust these options for any Office program, select Tools, AutoCorrect Options, and click the Smart Tags tab. Figure 2.13, for instance, shows the full range of options available in Word. Using this dialog box, you can specify which types of data will be recognized or turn off Smart Tags completely.
Figure 2.13. If you find Smart Tags more annoying than helpful, clear this check box to turn them off for good.
Tip from 
Because Smart Tags use industry-standard XML, third-party developers can easily create Office-compatible add-ins that work as Smart Tags. Check the Office Update Web site (select Help, Office on the Web) for a selection of available Smart Tags.
Setting Up Spell-Checking Options
All Office applications use a common spell-checking module, based on the exact same dictionaries. When you add words to your custom dictionary, regardless of which Office application you use, your changes are stored in a single text file, which you can easily open and edit.
To adjust spelling options for each application, use the following techniques.
For Word, select Tools, Options, and click the Spelling & Grammar tab. Use the dialog box shown in Figure 2.14 to adjust options.
Figure 2.14. Word's spelling options are by far the richest of any Office program.

Word has the most extensive set of spelling options, including the capability to add supplemental dictionaries for specialized vocabularies, such as those used in a medical or legal practice.
 To tame some of Word's aggressive spell-checking tendencies, see
"Word Changes Text Mysteriously"
in the
"Troubleshooting"
section at the end of this chapter.
To tame some of Word's aggressive spell-checking tendencies, see
"Word Changes Text Mysteriously"
in the
"Troubleshooting"
section at the end of this chapter.
→ For more details on how Word automatically uses suggestions from the spelling-checker, see "Checking Spelling and Grammar".
Excel and Access offer identical Spelling options (see Figure 2.15). In both programs, you can specify the language you want to use, as well as which dictionary file you want to use when adding words.
Figure 2.15. Excel users might want to create separate custom dictionaries to recognize specialized financial terms in worksheets.

PowerPoint's spelling options are far less comprehensive. Select Tools, Options, and click the Spelling and Style tab to display the dialog box shown in Figure 2.16.
Figure 2.16. PowerPoint's spelling options are far less extensive than those in other Office programs.
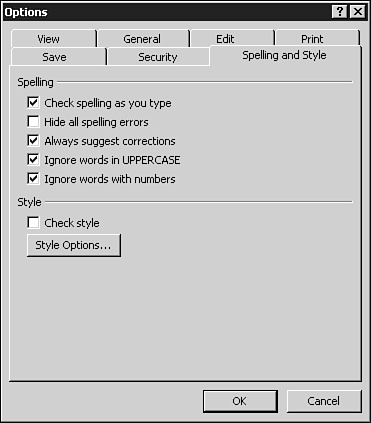
To hide the red squiggly line under spelling errors for a given presentation, check the Hide All Spelling Errors box. To turn off automatic spell-checking completely, clear the check mark next to the Check Spelling As You Type box.
In Outlook, select Tools, Options, and click the Spelling tab to set spelling options. Outlook lets you check spelling on any message you compose, including replies. It doesn't allow on-the-fly spell-checking, however, unless you use Word as your e-mail editor.
All Office spelling tools share the following dictionary files:
A main dictionary, as determined by your language settings; on a system configured for U.S. English, for example, this file is Mssp3en.lex.
A custom dictionary, which stores words you add while spell-checking; the default name for this file is Custom.dic.
Where will you find these dictionary files? The exact location depends on how you installed Office and how you've configured Windows. In most cases, the main dictionary file will be in C:Program FilesCommon FilesMicrosoft SharedProof.
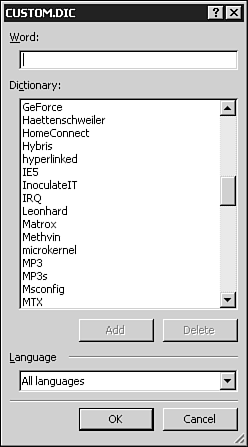
The custom dictionary file, on the other hand, should appear in a personal data folder, such as C:Documents and SettingsUsernameApplication DataMicrosoftProof. Because the custom dictionary file is a simple text file, shared by all applications, you can use any text editor to edit it. Outlook makes this task easy—click the Edit button on the Spelling tab to open the custom dictionary in Notepad. In Office XP, however, Microsoft has added a much simpler interface, which is accessible only from Word. From the Spelling & Grammar dialog box, click the Custom Dictionaries button, select the correct file from the list if necessary, and click Modify. This opens up a neat dialog box where you can add a word at a time, as in Figure 2.17.
Figure 2.17. To edit the Office-wide Custom dictionary, click the Modify button in Word's Spelling & Grammar dialog box.