
The enterprise resource pool is the set of people, equipment, and materials available to be assigned to and carry out the work of projects throughout an organization. The organization can be as compact as a small department or as wide ranging as all employees in all regions of a worldwide corporation. The enterprise resource pool contains fundamental information about resources, such as skill sets and availability, which helps project managers find the right resources for their projects. The enterprise resource pool also contains cost information, which not only helps project managers work within their allotted budgets, but also helps accounting and human resources figure costs from their points of view.
With the enterprise resource pool, high-level visibility of resource availabilities, skills, roles, and utilization is now possible. Project managers as well as upper management can see when additional staff is needed and where there are underutilized resources. They also can view the basic data for all project resources in one place.
Furthermore, project managers can plan for project staffing needs with accurate and current resource information from the entire enterprise, instead of from just their own team or group. The advantages of the multiple project resource pool, such as resource sharing between project managers, are magnified when applied to the entire enterprise.
Resource managers can use the enterprise resource pool to staff, plan, and budget with more accuracy and confidence. They can see resources by skill level and definition, availability, and organizational hierarchy. In addition, they can assist project managers with current and anticipated resource requirements by analyzing the enterprise resource database. Together with the project managers, resource managers can work with generic resources in the enterprise resource pool to perform planning and contingency analyses.
The project server administrator is often the one who sets up and maintains the enterprise resource pool. However, because of the specialized information having to do with resource skills, costs, and availability, other specialists such as a portfolio manager or a human resources representative might be involved in the setup. By default, the project server administrator and portfolio manager are given the permission to add and edit enterprise resource data.
A user with the permission to edit enterprise resource data can do the following:
Create and add users to the enterprise resource pool.
Update information on resources in the enterprise resource pool.
Customize resource fields for use in the enterprise resource pool.
Specify multiple properties for resources in the enterprise resource pool.
Project managers working with enterprise projects connected to the project server cannot use the regular resource pool because it is replaced by the enterprise resource pool. However, the local resource pool features are available to users working with local, nonenterprise projects.
Note
For more information about working with the resource pool, see the section titled Sharing Resources by Using a Resource Pool in Chapter 14.
After you create the enterprise resource pool, project managers can access it and build project teams from it. If you can, add the bulk of your resources at one time. You can always add individual resources as time goes on. Project managers who have been working with their own resources can also import those local resources into the enterprise resource pool. Now in Project 2007, you can add a team resource, such as Accounting or Research. Any individual enterprise resource that’s a member of that team can do the work on tasks assigned to the team resource.
If you want to add several resources at one time to your enterprise resource pool, along with information about each resource, you can use the Project 2007 Resource Sheet. To do this, follow these steps:
Make sure your user profile allows the Edit Enterprise Resource Data permission in your project server.
If you are the project server administrator or portfolio manager, you have this permission by default.
In Office Project Professional 2007, click Tools, Enterprise Options, Open Enterprise Resource Pool.
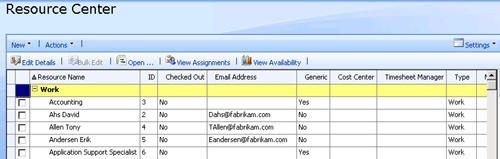
The Checked-Out Enterprise Resources window appears, showing the Resource Center (see Figure 21-7).
Above the table, click the Open button.
Still in the Checked-Out Enterprise Resources window, the Resource Sheet appears. If you have not selected any resources in the Resource Center, the sheet is empty.
Note
When adding a new resource to an existing enterprise resource pool, it might seem odd to see a blank Resource Sheet, especially because you selected the Open Enterprise Resource Pool command.
In reality, however, you never really check out the entire resource pool unless you select all resources and then click the Open button. Typically, you come here to add several new resources or edit information for a select group of resources, while the rest of the resources are still safely checked in.
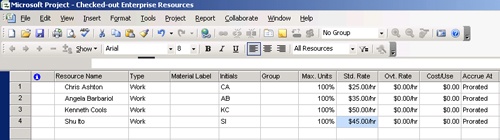
In the Resource Name field, type the name of the resource. Enter any other information in the other fields, such as type, group, maximum units, cost rates, and base calendar.
If you want to add more complete resource information, click the Resource Information button on the Standard toolbar. The Resource Information dialog box appears. Enter information on the various tabs as appropriate to this resource. When finished, click OK.
Note
For more information about the different types of resource information that can be added to the Resource Sheet and Resource Information dialog box, see Chapter 6.
Repeat step 4 for all other resources you want to add (see Figure 21-8).
Whenever you want to save changes, just click Save on the Standard toolbar.
When you’re finished adding resources, and you want to check the enterprise resource pool and its new information in to your project server, click File, Close.
Don’t press the Close (X) button in the upper-right corner, or Microsoft Project will try to close the application as well as any open projects. Clicking File, Close closes only the Checked-Out Enterprise Resources window.
If a prompt asks if you want to save your changes, click Yes.
When you return to Project Web Access and click Resource Center, you’ll see that the new resources are now added to the enterprise resource pool.
Note
Another method for entering multiple resources is to add them from your e-mail program’s address book. In Project Professional 2007, click Insert, New Resource From, Address Book.
Troubleshooting
Your new resources are not added as project server users
Although it might be convenient to quickly enter resources in the Resource Sheet of Project Professional 2007, the drawback is that resources entered in this manner are not added as project server users.
To add these resources as project server users, follow these steps.
In the Resource Center, select the check boxes next to the names of the resources you want to add as users.
Click Edit Details in the toolbar above the table.
The Edit Resource page appears for the first resource.
In the Identification Information section, select the Resource Can Logon To Project Server check box.
Complete the User Authentication, Security Groups, Security Categories, and Global Permissions sections for this resource.
When finished editing the information for the first user, click the Save And Continue button.
The second selected resource appears so you can repeat steps 3-5 for that resource.
If your organization uses Active Directory directory service, you have at your fingertips the easiest method for generating your enterprise resource pool. You can synchronize the Active Directory security groups with those in your project server. In this way, resources from a specific Active Directory group are instantly mapped to the enterprise resource pool. Not only does this add the resources to your project server, but the periodic synchronization helps keep your list of users and resources up to date. If the resource exists in Active Directory, the resource is automatically added to the enterprise resource pool upon the next scheduled Active Directory update to your project server. Any resources that no longer exist in Active Directory are likewise removed from your project server. This is a one-way synchronization, from Active Directory to your project server.
The Active Directory synchronization options are set as part of your project server configuration. These options can be set during initial configuration, or they can be set anytime afterward. To synchronize your project server with Active Directory, follow these steps:
Open the Server Settings page of Project Web Access.
Under Operational Policies, click Active Directory Resource Pool Synchronization.
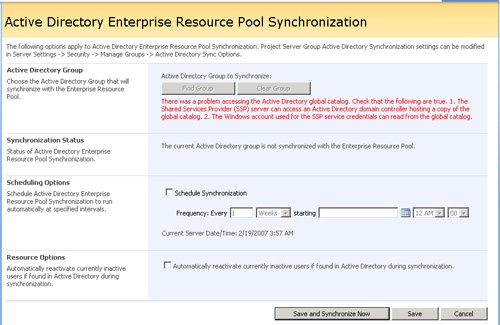
The Active Directory Enterprise Resource Pool Synchronization page appears (see Figure 21-9).
In the Active Directory Group section, select the Active Directory group you want to synchronize with your enterprise resource pool.
In the Scheduling Options section, select the Schedule Synchronization check box. Then specify the frequency at which your project server should be synchronized with your Active Directory, for example, every week or every 2 months. Specify the date when updates should begin and the time of day when updates should be done.
When finished, click Save And Synchronize Now or Save.
Note
Your organization might have information about your enterprise resource pool in another existing system, for example, your human resources or general ledger system. The Project Server Interface (PSI) can be used to develop an application program interface (API) that can interact with that other system to help you create your enterprise resource pool.
Note
For more information, see the section titled Integrating Project Information with Business Processes later in this chapter.
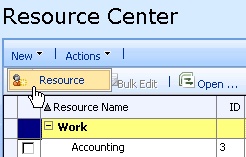
To add an individual resource to the enterprise resource pool, follow these steps:
In the Resource Center, click New, Resource.
The New Resource page appears.
Complete all the sections on the page as they apply to the new resource you’re creating.
If this resource is also to be a user of your project server, be sure that the Resource Can Logon To Project Server check box is selected.
When finished, click Save.
The new resource is saved as a new member of the enterprise resource pool.
Suppose your organization has several resources in the product testing department who are all capable of carrying out the same tasks. The project manager could assign Chris to do one task, Sam to do another, and Maria to do a third. But it might be easier to assign all three tasks to a resource named "Product Testing Team" and let Chris, Sam, and Maria decide among themselves who should do what.
This is the idea behind team resources, new in Project 2007. You can create a resource that represents a group of resources, that is, a team. A project manager can then assign tasks to the team. Resources who are identified as part of that team can assign themselves to a team task, report on it, and complete it.
To create a team resource in Project Web Access, follow these steps:
In the Quick Launch task bar, click Resource Center.
Click New, Resource.
In the Type section, make sure that the Generic check box is cleared.
In the Identification Information section, clear the Resource Can Logon To Project Server check box.
Enter the name of the team resource, for example, Drafters or Writers.
In the Assignment Attributes section, specify the options for leveling, base calendar, default booking type, and availability dates as appropriate to the collective resources who will make up this team. Enter a resource in the Timesheet Manager and Default Assignment Owner boxes.
Complete the fields in the Resource Custom Fields and Group Fields as applicable to this team resource.
In the Team Details section, select the Team Assignment Pool check box. This identifies this resource as a team resource.
When finished, click Save.
The team resource is created as part of your enterprise resource pool in your project server, and project managers can now assign tasks to this team resource.
Note
You can also create team resources in Project Professional. Add the Team Assignment Pool field to the Resource Sheet and change the field to Yes to mark your team resources.
To create the list of teams in your enterprise, you use a "built-in" custom field called Team Name. You create and associate a lookup table to the Team Name field. The lookup table of teams becomes available in the Team Name drop-down list in the Edit Users and Edit Resources pages in Project Web Access.
To create your list of teams for the Team Name field, follow these steps:
On the Server Settings page, under Enterprise Data, click Enterprise Custom Field Definition.
In the Lookup Tables For Custom Fields table, click New Lookup Table.
In the Name field, enter a name for your team lookup table, for example, Team Pools.
Scroll down to the Lookup Table section.
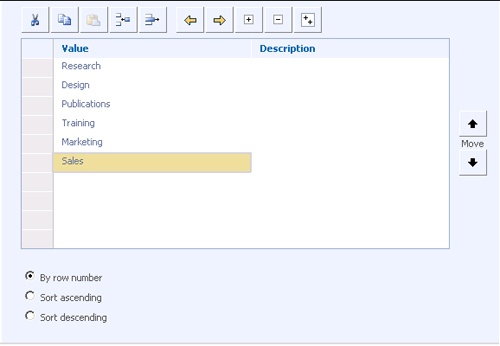
To define a new team, click an available row and then type the name of the team (see Figure 21-10).
To insert a team name between two others, click the team name below where you want to insert a new team and then click the Insert Row button. Type the name of the team.
To edit an existing team name, drag across a team name and then type to make the change you want.
Use the Outdent and Indent buttons to specify the team position in the hierarchy, if applicable.
Use the Move buttons to change the sequence of the team names as necessary.
To delete a team name, click in its row and then click Delete Row.
Click Save.
To associate the Team Name enterprise custom field with your team lookup table, follow these steps:
On the Custom Fields And Lookup Tables page, click Team Name in the Enterprise Custom Fields table.
Team Name is the "built-in" custom field designed for the team resource function.
In the Custom Attributes section, in the Lookup Table box, select the name of your team definition lookup table.
Click Save.
After the team resources have been created and identified as such, you need to identify the resources who belong to each team. To do this in Project Web Access, follow these steps:
In the Resource Center, select the check boxes next to the names of the resources who are to be identified as members of a particular team.
Click Edit Details.
In the Edit Resource page for the first selected resource, scroll down to the Team Details section. In the Team Name box, select the name of the team to which this resource belongs.
Click the Save And Continue button.
The second selected resource appears.
Repeat steps 3–4 for that resource. Continue in this manner until the appropriate resources have been associated with their team resource.
Resources who want to assign themselves to a team task follow these steps:
In the Quick Launch task bar, click My Tasks.
Click Self-Assign Team Tasks.
Any tasks that have been assigned to the team to which you belong are listed in the table on the Team Tasks page.
Select the check box next to the team task to which you want to assign yourself.
Click Assign Task To Me.
Note
For more information about how team members work with tasks and assignments, see the section titled Working on Your Assignments and Updates in Chapter 23.
A number of resources, complete with reliable availability and cost information, might already exist in enterprise and nonenterprise projects. You can easily open those projects and import the resources into the enterprise resource pool using the Import Resource Wizard.
Local resources are flagged with the Local Resource icon in the Indicators field of the Resource Sheet.
Follow these steps to import local (nonenterprise) resources from an existing project to the enterprise resource pool:
Be sure you’re logged in to the project server through Project Professional 2007. It doesn’t matter whether the project containing the local resources is open.
Click Tools, Enterprise Options, Import Resources To Enterprise.
The Open dialog box appears showing a list of projects.
If the resources you want to import are in an enterprise project, click the name of that project and then click Open.
If the resources are in a local project stored on your computer or network, find its general location in the Look In task pane. Browse to the file and then double-click to open it.
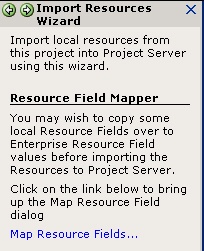
The Import Resources Wizard task pane appears (see Figure 21-11).
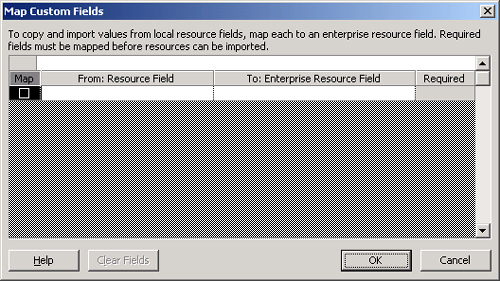
If any custom resource fields in this project also need to be imported with the resources, click the Map Resource Fields link. Map any custom resource fields from the original project to the enterprise resource pool (see Figure 21-12). This ensures that all the necessary information associated with the resource is imported to the enterprise resource pool. When finished, click OK.
Click the Continue To Step 2 link to open the Confirm Resources task pane.
This task pane lists the number of local resources to be imported and the number of import errors that are anticipated. The nature of any errors are listed in the Errors column next to the resource name in the Import Resource sheet.
If there are any resources you do not want to import, click No in the Import field for that resource.
To resolve any errors, double-click the resource name to make the necessary changes in the Resource Information dialog box.
To check for errors again, click the Validate Resources button in the task pane.
When all errors are resolved, click the Save And Finish link.
The resources and their associated calendar, cost, and other information are imported to the project server to become part of your enterprise resource pool.
Once resources are added to the enterprise resource pool, you can edit their resource information by making the necessary changes in the Edit Resource page in Project Web Access.
You can also edit resource information in the Project Professional Resource Sheet by checking the resources out, making the necessary changes, and then checking them in again.
Any resource information—such as base calendar, group name, and resource custom fields—can be edited this way. Some types of resource information are more readily available in the Project Web Access Edit Resource page, and others are more readily available in the Project Professional Resource Sheet or Resource Information dialog box. So depending on the nature of the changes you’re making, you might equally use both methods.
Note
Assignment information is changed in the enterprise project itself, not in the enterprise resource pool.
Resource information cannot be changed casually by project managers. Only those granted the Edit Enterprise Resource Data permission can check out and edit this resource information. By default, the project server administrator and portfolio manager are the only ones granted this permission.
When working with an enterprise resource pool that supports even a handful of projects, you might soon find that your enterprise resource pool is quickly filled with dozens if not hundreds of resources. Because of this, it’s important to be able to deftly find and select the resources you need in the Resource Center without too much scanning and scrolling.
The upper-right corner of the Resource Center contains controls for helping you find the resources you want to modify, as follows:
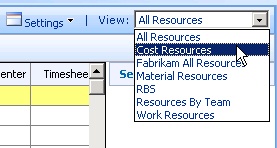
Select a view. Click the arrow in the View box to see a list of resource views. You can create additional views. See the section titled Creating and Managing Views later in this chapter.
Filter for resources. Click Settings, Filter to show filter controls above the toolbar. You can create a custom filter and add it to the Filter box. You can also apply the Auto Filter to filter by a particular value in a field in the resource table.
Group resources. Click Settings, Group. Grouping controls appear above the toolbar. You can group up to three levels by fields. Groups are separated by a colored band in the table.
Search for resources. Click Settings, Search to show the search controls above the toolbar.
Any resources whose check boxes are selected are listed in the Selected Resources box to the right of the resource table. To select all resources listed, click Actions, Select All Resources. To clear all selected resources, click Actions, Clear All Resources.
These controls are fairly standard throughout Project Web Access.
To modify enterprise resource information in Project Web Access, follow these steps:
In the Resource Center, select the check boxes next to the resources whose information you want to change.
If you’re changing the timesheet manager, default assignment owner, or the content of custom fields, click Bulk Edit. Make the changes in the Bulk Edit page, select the corresponding Apply Changes check box, and then click Save.
You only need to make the change once on this page, and the change is applied to all selected resources.
For any other changes, click Edit Details.
In the Edit Resource page for the first resource, make your changes.
Click the Save And Continue button.
Repeat steps 4–5 for the second resource. Continue in this manner until you have changed the resource information for all selected resources.
When you finish the last resource, click Save.
If you prefer, or if it’s easier given the accessibility of certain resource information fields, you can change resource information in Project Professional. To do this, follow these steps:
In Project Web Access, select the check boxes next to the resources whose information you want to change and then click the Open button on the toolbar.
Alternatively, if you’re already working in Project Professional, click Tools, Enterprise Options, Open Enterprise Resource Pool. Select the check boxes next to the resources whose information you want to change and then click the Open button on the toolbar.
Either way, the selected resources are checked out and listed in a Resource Sheet in Project Professional.
On the Resource Sheet, make the changes you want to the enterprise resource.
If you need to work with additional resource information, double-click the resource name to open the Resource Information dialog box. Enter information on the various tabs as appropriate to this resource. When finished, click OK.
Whenever you want to save changes, just click Save on the Standard toolbar.
When you’re finished modifying the resource information, and you want to check the enterprise resources back into your project server, click File, Close.
If a prompt asks if you want to save your changes, click Yes.
If an enterprise resource is checked out by another user, and you need to check the resource back into the enterprise resource pool (usually because of some extenuating circumstance), you can force a resource check-in as follows:
In the Project Web Access Quick Launch task bar, click Server Settings.
Under Database Administration, click Force Check-In Enterprise Objects.
In the Select The Type Of Object You Want To Force Check-In box, click Enterprise Resources.
All resources that are currently checked out are listed in the table.
Select the check boxes for the resources you want to check in and then click Check-In.
Although you can either delete or just deactivate a project server user, you can only deactivate resources because even obsolete resources are probably associated with assignments and actuals that are best retained for your archival project data. You can deactivate a resource by using the Edit Resources page in Project Web Access or by checking out the enterprise resource in Project Professional.
To deactivate a resource with Project Web Access, follow these steps:
In the Project Web Access Resource Center, select the check box next to the name of the resource you want to deactivate.
Click Edit Details.
In the Identification Information section, in the Account Status box, click Inactive.
Click Save.
The selected resource is deactivated. The deactivated user cannot log on to the project server, and other users cannot send updates, tasks, or requests to the deactivated user. By default, the resource is still listed in the resource table, but its active flag has been changed from Yes to No. If you want, you can create a filter or autofilter that does not show inactivated users.
Note
When you deactivate a resource who is also a project server user, the person is also deactivated as a project server user.
If you need to, you can retain a deactivated resource as an active user, as in the case when a resource stops working on project tasks but is still a project stakeholder. To do this, click Server Settings and then, under Security, click Manage Users. In the table, click the name of the inactive user/resource to open the Edit User page. In the Identification Information section, change the Account Status field to Active. Then clear the User Can Be Assigned As A Resource check box.
To deactivate resources by checking them out in Project Professional, follow these steps:
In Project Web Access, select the check box next to the resource who you want to deactivate and then click the Open button on the toolbar.
In the Resource Sheet in Project Professional 2007, double-click the resource name to open the Resource Information dialog box.
On the General tab, select the Inactive check box and then click OK.
Click Save on the Standard toolbar.
When you’re ready to check the deactivated resource back in to your project server, click File, Close.
Note
If you really must, you can still completely remove a resource, for example, to delete resources mistakenly added. To do this, click Server Settings in the Project Web Access Quick Launch task bar. Under Database Administration, click Delete Enterprise Objects. In the first section, select the Resources And Users option. Select the check boxes for the resources you need to delete. Click Delete and then click OK. If these resources own any projects, they will be assigned to your account.