
The Resource Center is the key location for executives and resource managers who need to keep a close eye on the performance of resources in the organization. In the Resource Center, you can review resource skills and other identifying attributes, their current assignments, their current or future workload allocation, and their current or future availability for additional work.
You can see the entire enterprise resource pool and then examine details for an individual resource. To see the enterprise resource pool, follow these steps:
On the Quick Launch task bar, click Resource Center.
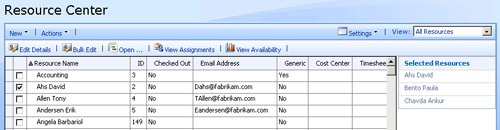
The Resource Center appears, showing the enterprise resource pool. Each resource occupies a single row showing basic resource information in fields throughout the row (see Figure 24-12).
Arrange the table to see the information you want.
In the View box, click the view that shows the information you want. The project server administrator or portfolio manager can create and add different resource views to the Resource Center.
You can also sort, filter, or group information to see it the way you need it. Scroll through the table to see more information.
To see detailed information for any enterprise resource, follow these steps:
In the Resource Center, select the check box next to the name of the resource for which you want to see details.
If you want to see details for multiple resources one after another, select the check boxes for all of them. Their names appear in the Selected Resources pane on the right side of the page.
Click Edit Details.
Scroll through the Edit Resource page, which shows the resource’s contact information, assignment attributes, and availability dates, as well as the contents of any custom fields that have been designed.
By default, executive privileges do not include the ability to edit resource information. However, if you need that capability, talk with your project server administrator.
If you selected multiple resources, when you’re finished with the first resource, click the Save And Continue button.
The Edit Resource page for your second selected resource appears. Continue in this manner until you get to the last resource. On the page for the last resource, click Cancel.
The Resource Center showing the enterprise resources appears again.
To see the resources assigned to specific projects, use the Project Center, as follows:
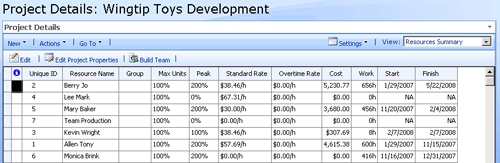
In the Project Center, click the project name to open the Project Details page.
In the View list, click the Resource Summary view or other view that shows the resources that are working on this project (see Figure 24-13).
To review resource assignments, follow these steps:
In the Resource Center, select the check box next to the name of the resource whose assignments you want to see.
If you want to see assignments for multiple resources at once, select the check boxes for all of them.
Click View Assignments.
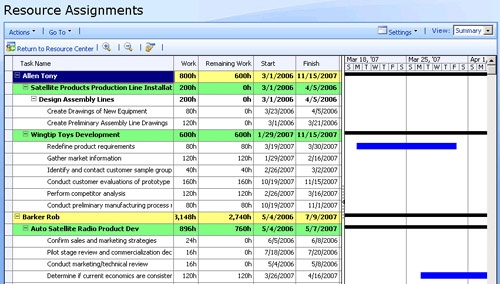
The Resource Assignments page appears (see Figure 24-14). In a Gantt chart format, the assignments for the selected resources are listed, grouped by resource name and then by project name.
Scroll through the table and the chart to view the information you want.
When finished, click Return To Resource Center.
To review resource availability, follow these steps:
In the Resource Center, select the check box next to the name of the resource whose availability you want to see.
If you want to see availability for multiple resources, select the check boxes for all of them.
Click View Availability.
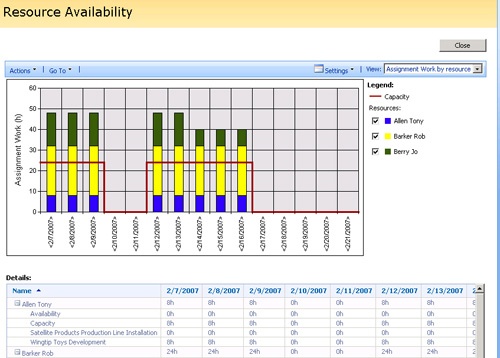
The Resource Availability page appears. The availability, as measured by work amounts over time, is drawn in a column chart for each selected resource (see Figure 24-15). Availability and capacity information are shown for each resource in a table below the chart.
If you want to hide a resource’s availability information, clear the check box next to the resource’s name in the legend. Select the check box to show the availability information again.
Click the View box for other ways to see resource availability, including Assignment Work By Project, Remaining Availability, and Work.
When finished, click Close.
The Resource Center appears again.
With a resource plan, project managers and resource managers can estimate potential resource requirements associated with proposals or activity plans. A resource plan can also define the general use of resources if they’re being used as part of a small task-only project described by an activity plan. You can review resource plans if you want to see how resources are being used for other nonproject activities.
Note
For more information about resource plans, see the section titled Creating a Resource Plan for a Proposal or Activity Plan in Chapter 22.
Note
By default, executive privileges do not include the ability to create or edit resource plans. However, if you need that capability, talk with your project server administrator.
To see a resource plan, follow these steps:
On the Quick Launch task bar, under Projects, click Proposals And Activities.
On the Proposals And Activities page, click somewhere in the row of a proposal or activity plan to select it. Don’t click its name, or the proposal or activity plan will open.
Click Resource Plan.
The resource plan for the selected proposal or activity plan appears.
When finished, click Close.
Suppose you want project managers or portfolio managers on your staff to submit narrative status reports to you every Monday morning so that you can be prepared with information for your Monday afternoon executive cabinet meeting. You can create and submit a status report format with the topics you need, for example, "Major Accomplishments," "Upcoming Milestones," and "Potential Problems."
In their home page Reminders section, your staff members are notified to submit their status reports on time. Their responses are compiled into a single report that you can then print or export to a Microsoft Office Word document.
To set up a narrative status report format, follow these steps:
In Project Web Access, under Resources, click Status Reports.
Under Requests, click New, New Request.
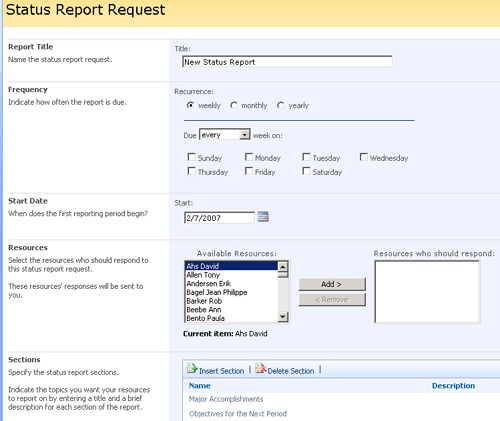
The Status Report Request page appears (see Figure 24-16).
Work through the page to specify the design and frequency of your status report.
In the Resources area, select the individuals who are to receive this status report request and who will be responsible for submitting the status reports.
In the Sections area, specify the headings under which your resources will report. To add a new heading, click Insert Section. A new row opens up. Click in the row and type the heading you want. To remove a heading, click it and then click Delete Section.
When finished, click Send.
The status report request, details and schedule are submitted to the selected resources. They will see reminders on their home page about status reports coming due. Their Status Reports page will present the name of the status report.
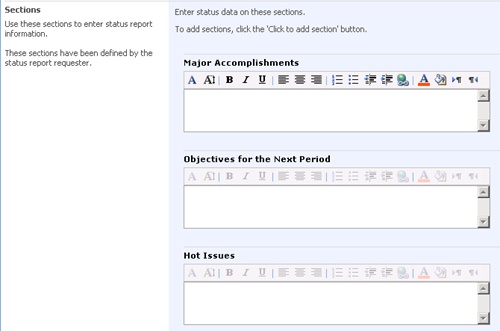
When it’s time for your resources to submit status reports, they’ll click the name of your status report and complete the page. The page includes a box for each of the sections you identified in your request (see Figure 24-17).
Resources can add extra sections and send unrequested status reports outside the normal schedule if they want.
You request the status report only once—when you first set it up with a specified time period and frequency. Resources see automated reminders on their Project Web Access home page whenever a status report is coming due.
The project server automatically merges the status reports from all resources for a given time period. To review the combined status reports, follow these steps:
In Project Web Access, under Resources, click Status Reports.
Under Requests, click the name of the status report whose responses you want to review.
The View Responses page appears.
To specify the time period of status reports you want to see, set the dates in the View Status Reports From boxes and then click Apply.
Under Group Merged Reports By, select whether you want the merged report to be grouped by resource name or response date.
Click the Open button.
The merged status report appears. The responses from each resource are grouped under the section headings you identified.
If you want to include the status report in an Microsoft Office Word document for printing or for inclusion in a project status report, click Export To Word.
Click Yes in the ActiveX control alert that appears.
The report is formatted and exported to Word. You can save it or print it from there.
Just as you might need members of your staff to submit status reports to you, you might need to submit a status report periodically to your manager. During the designated time periods, you write your status reports and submit them to the project server. When everyone’s status reports are in, your manager can review the compiled status report.
After your manager first sets up the status report, you’ll see an automated reminder notification on your Project Web Access home page whenever a status report is coming due.
To create and submit your status report, follow these steps:
On the Quick Launch task bar, under Resources, click Status Reports.
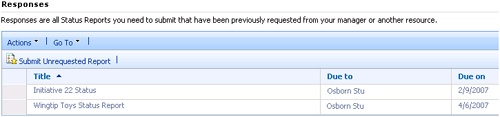
The Status Reports page appears, showing a table of status reports for different projects (see Figure 24-18).
In the table, click the name of the status report you want to write.
The Status Report Response page appears.
Change fields in the To and Period sections if needed.
In the Sections area, type your status report in the boxes provided.
The headings of the boxes reflect the topics that your manager wants all resources to report on for each status report.
If you want to add another section of information, click the Click To Add Section button. Type a title for the section and then click OK. In the new box, enter your additional information.
If you just want to save your report and update the project server later, click Save.
Clicking Save is useful if you’re not quite finished with your status report, or if it’s not time to submit the report yet. It’s a good idea to enter status information whenever you have a significant accomplishment or encounter a possible blocking problem. Then when the status report comes due, you’ll have most of your information in place already.
When you’re ready to submit your status report to the project server and your manager, click Send.
Your status report is submitted to the project server. The project server automatically merges your status report with those from the other resources for the same time period.
You can also send a status report that’s separate from the normal status report format or to a different resource. You can specify your own status report title, the resources who should receive the status report, and which sections it should contain. To do this, on the Status Reports page, click Submit Unrequested Report. Complete the fields on the Unrequested Status Report page. In the Sections area, click the Click To Add Section button. Type a title for the section and then click OK. In the new box, enter your additional information.