
Custom forms are simply dialog boxes containing Microsoft Project fields for data entry. Don’t confuse custom forms with built-in form views such as the Task Entry view. Form views are built into Microsoft Project and show a set of predetermined fields. On the other hand, custom forms are dialog boxes in which you control the fields of information that appear on the form, where they appear, and whether they are editable or only viewable.
Before you dive into creating custom forms, keep in mind that entering field values in a table within a view is fast and easy. In a table, you can copy values to several tasks or resources at the same time by using the fill handle to drag values down the columns, as described on page 03xx. To enter the fields you want in a table, you might have to display a different table, insert the fields you want into the current table, or create a custom table with only the fields you want to enter.
The advantage of a custom form is that it presents only the information you want to enter, which comes in handy when you’re not comfortable editing data directly in tables, or you delegate data entry to someone who doesn’t use Microsoft Project regularly. When you choose values in the form fields, Microsoft Project takes care of assigning the values to the correct fields.
To use a custom form, you first select the tasks or resources you want to edit with the form. Then you open the form and enter values into the fields. When you click OK on the form, Microsoft Project applies the changes to the selected tasks or resources, and the form closes.
You can create a new custom form or copy an existing form and then edit it. With custom forms, you have the power to add fields, text, and buttons where you want them and group items within group boxes to visually separate them within the form.
Follow these steps to create a new form:
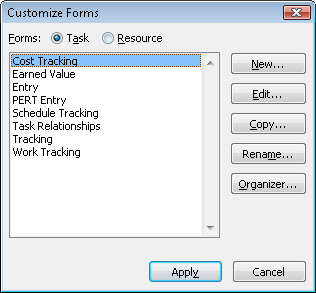
Click Tools, Customize, Forms.
The Customize Forms dialog box appears (see Figure 26-7).
To create a new custom form, click New.
To use an existing form as a template, click the form in the list and then click Copy. In the list of forms, the copy appears, which you can edit.
In the Define Custom Form dialog box, type a new name for the form. If you want to open the form with a keyboard shortcut, type the letter in the Key box.
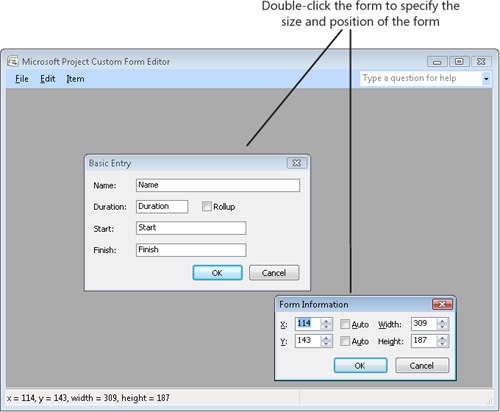
When you click OK, the Custom Form Editor opens (see Figure 26-8).
To change the size of the form, drag a corner or one of its edges until the form is the size you want.
To change where the form appears when it loads, drag the title bar of the new form to the onscreen location you prefer.
If you want to specify an exact size and location for the form, double-click the form. In the Form Information dialog box, enter values in the X and Y boxes to specify the form’s location. Enter values in the width and height boxes to specify the form’s size.
To save your new form, click File, Save. To return to Microsoft Project, click File, Exit.
Custom forms display fields that you can fill in to enter information about the selected tasks or resources. By default, you can view or edit any of the fields in a form. However, you can also restrict a field so that you can view it but not edit it.
To add a field to a form, follow these steps:
In the Microsoft Project Custom Form Editor window, click Item, Fields.
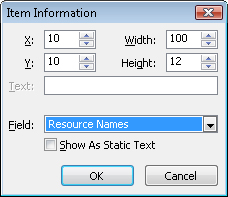
The Item Information dialog box appears (see Figure 26-9).
To specify the location of the field, enter values in the X and Y boxes.
To specify the size of the field box, enter values in the Width and Height boxes.
In the Field box, click the field that you want to appear in the box.
To quickly locate the field you want, click the down arrow and then type the first character or two of the field name.
To prevent users from editing the field, select the Show As Static Text check box. A value appears in the field, but users can’t edit those values.
Click OK.
The field box appears in the form as specified. Make any adjustments you want to the size and position of the field box.
Repeat this procedure for all field boxes you want to add to your custom form.
Entering data in the correct fields is difficult if you can’t tell which field is which. You can add text to label the fields or display other information that makes the form easier to complete. To add text to a form, do the following:
In the Custom Form Editor window, click Item, Text.
A new blank text box appears as a dashed rectangle within the form you are editing.
Double-click the text box to display the Item Information dialog box.
In the Text box, type the text you want to appear on the form and then click OK.
The text appears in the form. If necessary, drag the text to the position you want.
Follow these steps to modify text:
A new form includes OK and Cancel buttons by default. Because these are the only two buttons you can include in a custom form, the only time you need to add buttons is if you removed one of them earlier. To replace a button you removed, follow these steps:
In the Custom Form Editor window, click Item, Button.
The New Button dialog box appears.
Select the option for the button that you want to add to the form.
You can add only an OK or Cancel button.
Click OK in the New Button dialog box to add the button to the form.
Drag the button where you want it to appear in the form.
If a form contains a lot of fields, you can make the form more readable by grouping related fields. You can add a group box to the form and then move the items you want to group into it.
To add a group box to a form, do the following:
In the Custom Form Editor window, click Item, Group Box.
The group box appears in the custom form.
Drag the group box to the location you want in the form.
To resize the group box, drag one of its edges or corners.
To change the text that appears at the top of the group box, double-click the group box. In the Item Information dialog box, type the new label in the Text box.
Move any other items you want into the group box.
Follow these steps to edit an existing form in Microsoft Project:
Click Tools, Customize, Forms.
The Customize Forms dialog box appears.
Click the name of the form you want to edit and then click Edit.
Make the changes you want in the Custom Form Editor window, as described in the section titled Creating Forms earlier in this chapter and the sidebar titled Troubleshooting earlier in this chapter.
When finished, click File, Save.
Click File, Exit to close the Custom Form Editor window and return to Microsoft Project and the Customize Forms dialog box.
Do the following to rename an existing form:
The Custom Forms toolbar includes an icon for every custom form. However, for a custom form you plan to use frequently, it’s more convenient to add a button to a toolbar or assign a shortcut key to open it.
To open a custom form from the Microsoft Project menus, follow these steps:
Select the tasks or resources you want to edit.
To open a custom form, you can choose View, Toolbars, Custom Forms and then click the icon for the form (see Figure 26-10).
If the toolbar doesn’t include an icon for the form, click Tools, Customize, Forms. The Customize Forms dialog box appears. Click the name of the form you want to display and then click Apply.
To add a form as a toolbar button, follow these steps:
Click Tools, Customize, Toolbars.
The Customize dialog box appears.
Click the Commands tab. Click the All Forms category.
Drag the form you want to add from the command list to the toolbar.
Note
For more information about adding buttons to toolbars, see the section titled Adding and Removing Buttons on a Toolbar earlier in this chapter. For information on defining a keyboard shortcut for a form, see the section titled Creating and Customizing Forms earlier in this chapter.