Microsoft Office Project 2007 is loaded with features that help project managers pilot their projects to successful completion. Built-in menus, toolbars, and keyboard shortcuts provide easy access to commands commonly used by many project managers. Sometimes, the commands that you use frequently are not the ones on the built-in menus, or your favorites are scattered across several toolbars. As you use Office Project 2007 and begin to recognize commands you call on most often, you can customize menus and toolbars to gather your favorites in one place. If the keyboard is your tool of choice, you can also assign keyboard shortcuts to access commands without reaching for the mouse.
Microsoft Project also provides forms for entering data into fields. Although table views in Microsoft Project offer many convenient methods of data entry, forms provide more structure to the fields you fill in—perfect for folks who don’t use Microsoft Project every day. Some forms, such as the Task Form and Task Details Form are off-limits—you can’t change them. However, you can copy or alter some predefined forms to suit your data entry requirements or build your own.
Note
Although the interface for Microsoft Office programs—such as Microsoft Office Word and Microsoft Office Excel—has changed dramatically in the 2007 release, in Project 2007, the menu and toolbar interface looks comfortingly similar to its 2003 siblings.
Toolbars don’t take up much space, but displaying several of them to see your shortlist of favorite commands consumes screen area that could be used for the Gantt Chart or other project information. By customizing existing toolbars or creating your own, you can both assemble your favorite commands in one place and minimize the space that open toolbars consume.
Note
You can squeeze both the Standard and Formatting toolbars along a single line to conserve space. This is the default. If some of the commands you want don’t appear when these toolbars share a row, on the right end of the toolbar, click the Toolbar Options arrow and then click the toolbar button you want.
If you would rather see your toolbars on two rows, which consequently give you more buttons showing at a time, right-click either toolbar and then click Customize. In the Customize dialog box, click the Options tab. Clear the Show Standard And Formatting Toolbars On Two Rows check box.
If a built-in toolbar has most of what you need, customizing it is easier than creating your own. For example, you might add a few buttons to the Standard toolbar from the Resource Management and Tracking toolbars. In addition to adding, removing, or rearranging toolbar buttons, you can specify how toolbars display their commands and the appearance of buttons.
To add a button to an existing toolbar, follow these steps:
If the toolbar you want to customize is not visible, click View, Toolbars and then click the name of the toolbar.
To open the Customize dialog box, click Tools, Customize, Toolbars.
Click the Commands tab.
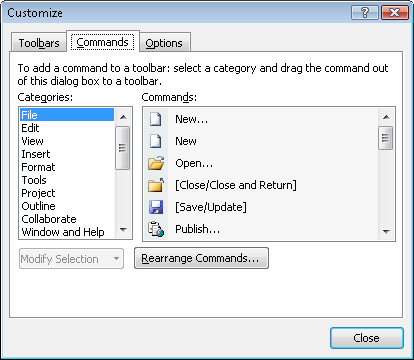
Categories of commands, such as File, Format, and Tracking, appear on the left side of the dialog box. The commands that belong to the selected category appear on the right side of the dialog box (see Figure 26-1).
Click the category of the command you want to add.
If you don’t know the category to which it belongs, select a generic or all-inclusive category, such as All Commands or All Macros.
Drag the command you want to add from the command list to the toolbar. The mouse pointer changes to an I-beam to indicate where the command will appear in the toolbar. Move the mouse pointer until the I-beam is in the location you want and then release the mouse button.
Note
A toolbar can offer even more commands when it contains a drop-down menu. To add a built-in menu to a toolbar, open the Customize dialog box and click the Commands tab. In the Categories box, click Built-In Menus and then drag the menu you want from the Commands box to its new position on the toolbar.
To add a custom menu to a toolbar, click New Menu in the Categories box and drag the New Menu entry from the Commands box to the toolbar. Right-click the new menu on the toolbar, type a name in the Name box on the shortcut menu, and then press Enter. After naming the menu, you can drag commands or menus to it. Right-click a menu entry to modify the button images and text.
To remove a button from a toolbar, do the following:
If the toolbar you want to customize is not visible, click View, Toolbars and then click the name of the toolbar you want to customize.
In the Customize dialog box that appears, click Tools, Customize, Toolbars.
On the toolbar, right-click the command you want to remove and then click Delete on the shortcut menu.
The command is removed only from the toolbar. It’s still available in the Customize dialog box.
Quickly Customize Toolbars
You don’t always need the Customize dialog box to customize toolbars. If you want to hide or display buttons that appear on a toolbar by default, click the Toolbar Options button, point to Add Or Remove Buttons, and then point to the name of the toolbar you want to customize. A list of all the buttons associated with the toolbar appears (see Figure 26-2).
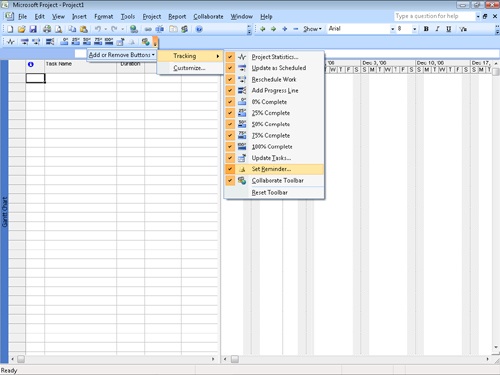
Figure 26-2. Click the Toolbar Options button on a toolbar to add or remove buttons on that toolbar.
The commands on the shortcut menu of toolbar buttons have the following characteristics:
Commands that are preceded by a check mark currently appear in the toolbar.
Commands that do not have a check mark are hidden.
Commands that are dimmed are not on the toolbar by default.
Clicking a command in the list toggles the command between hidden and visible. If you add a button to a toolbar, you can remove it only by using the Customize dialog box.
To rearrange the buttons on a toolbar, follow these steps:
Click View, Toolbars and then click the toolbar’s name to display the toolbar whose buttons you want to rearrange.
Click Tools, Customize, Toolbars.
The Customize dialog box appears, which is the only result you need for rearranging—it doesn’t matter which tab is showing.
On the toolbar, drag the button you want to move until the I-beam is in the location you want. Then release the mouse button.
When you right-click a toolbar button while the Customize dialog box is open, a shortcut menu with commands for changing the contents and properties of a toolbar appears. The commands on this shortcut menu include the following:
Reset. For a button on a built-in toolbar, this command restores the original button, command associated with the button, and settings.
Delete. Removes the button.
Name. Displays a box in which you can type the name that appears in the ToolTip for the button.
Copy Button Image. Copies the selected button image to the Clipboard so that you can paste it to another button.
Paste Button Image. Pastes the image on the Clipboard to the selected button. In addition to images from other buttons, you can paste graphics from other applications.
Reset Button Image. Restores the button image to the default.
Edit Button Image. Opens the Button Editor dialog box, in which you can edit the image.
Change Button Image. Displays a menu of predefined images that you can choose for the image.
Default Style. Displays only a button image on a toolbar and the button image and text on a menu.
Text Only (Always). Displays only text for the command on toolbars and menus.
Text Only (In Menus). Displays a button image on a toolbar and only text on menus.
Image And Text. Displays a button image and text on toolbars and menus.
Assign Macro. Opens the Customize Tool dialog box in which you can select a command for the button.
If your favorite commands are scattered across several built-in toolbars, creating a custom toolbar might be the best solution. You can also use the Organizer to copy an existing toolbar to use as a template.
To create a new toolbar, follow these steps:
Click Tools, Customize, Toolbars.
The Customize dialog box appears.
Click the Toolbars tab and then click New.
In the New Toolbar dialog box, type the name of the toolbar you’re creating.
Click OK.
In the Customize dialog box, the toolbar name appears in the toolbars list, and the empty toolbar appears on the screen (see Figure 26-3).
In the Customize dialog box, click the Commands tab.
Click the category of the command you want to add.
Drag the command you want to add from the command list to its location on the new toolbar.
The icon for the command appears on the toolbar.
Repeat steps 6–7 for all the command buttons you want to add to your new toolbar (see Figure 26-4).
The commands on a single toolbar can be from different categories.

The Organizer is helpful if you want to make a copy of a toolbar so that you can modify it to meet your needs. Because Microsoft Project saves toolbars and menus in the global template by default, you must copy the toolbar to your active project, rename it, and then copy the new toolbar back into the global template for editing.
Note
For more information about the global template, see Chapter 28.
To use an existing toolbar as a template for a new toolbar, do the following:
Click Tools, Organizer.
In the Organizer dialog box, click the Toolbars tab.
Elements in the global template appear on the left side of the dialog box.
In the list for the global template, click the name of the toolbar you want to use as a template.
Click Copy to copy the toolbar to your active project.
In the list for your active project, click the toolbar you just copied and then click Rename.
In the Rename dialog box, type a unique name for the toolbar and click OK.
To make it easy to identify custom toolbars, add a special identifier to the toolbar name, such as preceding the name with C_ or your initials. To ensure that your custom toolbars appear at the beginning of any toolbar list, preface the name with A.
With the copied toolbar still selected, click Copy again to copy the renamed toolbar back to the global template.
In the list for your active project, click the toolbar and then click Delete so that the toolbar appears only in the global template list.
To change your new toolbar, follow the steps in the section titled Customizing Toolbars earlier in this chapter.
You can’t delete built-in toolbars, only custom toolbars that you created. Follow these steps to delete a user-defined toolbar:
You can modify the images that appear on toolbar buttons, whether to differentiate Print buttons for different printers or simply to satisfy your creative nature. You can move the image around within the boundaries of the button or change the colors of the cells that make up the image.
Do the following to modify a button image:
Right-click a toolbar and then click Customize.
The Customize dialog box appears.
Right-click the button you want to edit and then click Edit Button Image.
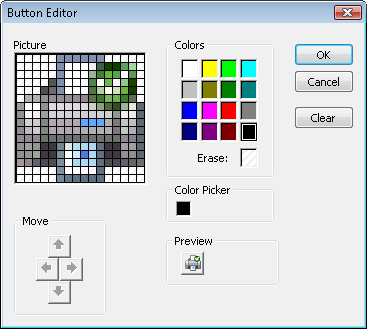
The Button Editor dialog box appears (see Figure 26-5).
To choose a color to paint in the image, click a color in the Colors area. If you want to erase colored boxes in the image, click the Erase box.
In the Picture area, change the cell colors by clicking individual cells or dragging the mouse pointer over several cells.
As you change the image, the Picture area shows what the image looks like.
To move the image within the Picture area, click a directional arrow in the Move area.
If the image fills the Picture area in one or more directions, the directional arrows in those directions are dimmed.