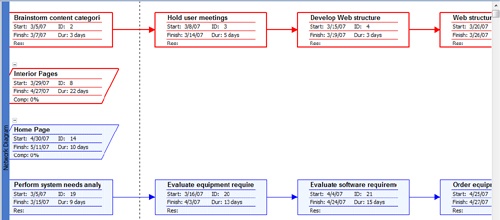
At this point, your tasks all have what you hope are realistic durations. What is not realistic is that each task looks like it’s starting on the project start date (see Figure 5-9).
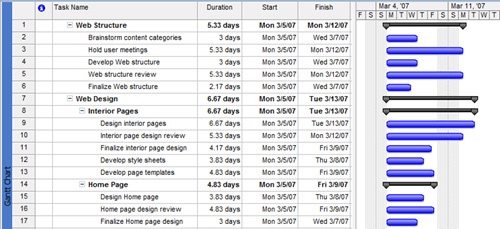
Figure 5-9. Until you set up task dependencies, all tasks are shown as starting on the project start date.
Although many tasks in a project are likely to begin on the project start date, most other tasks cannot begin until another task has finished. Sometimes, several tasks are dependent upon the completion of one task; sometimes, several tasks must finish before a single later task can begin.
So, the next step in creating your schedule is to link tasks that are dependent upon each other. You can link the previous, or predecessor task, to its succeeding, or successor task, and thereby set up the task dependency between the two.
When you have your task dependencies combined with your durations in place, your project plan truly starts to look like a real schedule. You can begin to see possible start dates and finish dates, not only for the individual tasks, but also for major phases, milestones, and the project as a whole. When you create a link between two tasks, Microsoft Project calculates the successor’s start and finish dates based on the predecessor’s start or finish date, the dependency type, the successor’s duration, and any associated resource assignments. There’s still more information and refinement to be done, but you’re getting closer to a schedule that starts to reflect reality.
The most typical link is the finish-to-start task dependency. With this link, the predecessor task must finish before the successor task can begin. To link tasks with the finish-to-start task dependency, follow these steps:
Display the Gantt Chart. You can set task dependencies in any task sheet, but you can see the effects of the links immediately in the Gantt Chart.
In the task sheet, select the two tasks you want to link. Drag from the predecessor to the successor task if they are right next to each other. If they are not adjacent tasks, click the predecessor, hold down the Ctrl key, and then click the successor.
On the Standard toolbar, click Link Tasks. The tasks are linked in the chart portion of the Gantt Chart. In addition, the Predecessor field of the successor task lists the task number for its predecessor (see Figure 5-10).

Tips and Techniques for Linking Tasks
You can link multiple tasks at one time, as long as they all have the same type of task dependency. Select all the tasks that are to be linked, either by dragging across adjacent tasks or by clicking nonadjacent tasks while holding down the Ctrl key. On the Standard toolbar, click Link Tasks.
You can have multiple links to and from a single task. One task might be the predecessor for several other tasks. Likewise, one task might be the successor for several tasks. There’s no difference in how you set the links. Select the two tasks and click Link Tasks on the Standard toolbar. Or select the successor and then set the predecessor and link type on the Predecessors tab in the Task Information dialog box.
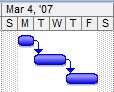
In the chart portion of a Gantt chart, drag from the middle of the predecessor Gantt bar to the middle of the successor Gantt bar. Before you drag, be sure that you see a crosshair mouse pointer. As you drag to the successor, the mouse pointer changes to the link icon. This method creates a finish-to-start task dependency between them.


Note
When you edit the scheduling of a task—for example, its duration or a task dependency—you might affect other tasks that are linked with a task dependency to this task. When this happens, by default, the changed cells are temporarily filled with a background color so you can immediately see how your edit changed the scheduling for other tasks. This change highlighting changes or disappears when you make the next scheduling edit.
Note
For more information about change highlighting, see the section titled Highlighting the Ripple Effects of Schedule Changes later in this chapter.
Inside Out: Link in or out of order
When you drag across a series of tasks and then click Link Tasks, the tasks are linked in order from the task higher in the task list (lower Task ID number) to the task lower in the task list (higher Task ID number). It doesn’t matter whether you drag from top to bottom or bottom to top—the resulting links are the same. This is also true if you select adjacent tasks using the Shift key—the order of selection does not matter.
However, if you hold down Ctrl and click each task, the tasks are linked in precisely the order in which you selected each individual task. Using this method, you can make a task lower in the list and the predecessor of a task higher in the list.

Although the finish-to-start task dependency is the most common, there are a total of four types of dependencies that help you model your task relationships. These dependency types are as follows:
Finish-to-Start (FS). As soon as the predecessor task finishes, the successor task can start.
Finish-to-Finish (FF). As soon as the predecessor task finishes, the successor task can finish.
Start-to-Start (SS). As soon as the predecessor task starts, the successor task can start.
Start-to-Finish (SF). As soon as the predecessor task starts, the successor task can finish. This type of link is rarely used, but still available if you need it.
Note
You can use the Project Guide to help you set task dependencies. On the Project Guide toolbar, click Tasks. In the Project Guide pane, click the Schedule Tasks link. Read the information and use the controls provided to link tasks. When finished, click the Done link.
Note
By default, when you move a task from one location to another in your task sheet or when you insert a new task, that task is automatically linked like its surrounding tasks. You can control this setting. Click Tools, Options and then click the Schedule tab. Select or clear the Autolink Inserted Or Moved Tasks check box.
You’ve already seen that to quickly apply a Finish-To-Start task dependency, all you have to do is select the tasks in the task sheet and then click the Link Tasks button. But what about applying one of the other types of task dependencies?
You can still work directly in the Gantt Chart—you just need to take it a step further. After linking the tasks, double-click the task link line in the chart portion of the Gantt Chart. The Task Dependency dialog box appears, as shown in Figure 5-11. In the Type box, change the dependency type and then click OK.
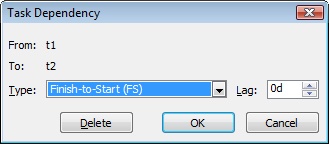
Figure 5-11. Double-click the task link line to open the Task Dependency dialog box and change the dependency type.
Another alternative, which doesn’t require such a steady hand with the mouse, is to set up a task dependency using the Task Information dialog box. To do this, follow these steps:
Display the Gantt Chart or other task sheet view.
Click the task that is to become the successor in the dependency you will be setting.
On the Standard toolbar, click Task Information.
You can also simply double-click a task to open the Task Information dialog box.
Click the Predecessors tab.
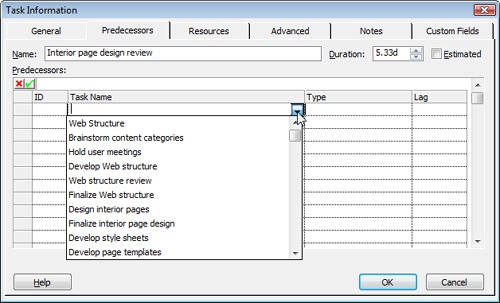
Click the first blank row in the Task Name field and then click the down arrow. The list of tasks in the project appears (see Figure 5-12).
Click the task that is to be the predecessor to the current task.
Click the Type field and then select the type of task dependency: Finish-to-Start (FS), Start-to-Start (SS), Finish-to-Finish (FF), or Start-to-Finish (SF).
Click OK.
Note
Not only can you link tasks within one project, you can link tasks in different projects. For more information, see Chapter 15.
Suppose you have a pair of tasks with a finish-to-start link. And then you realize that the successor really can’t start when the predecessor is finished—there needs to be some additional delay. This is usually the case when something needs to happen between the two tasks that isn’t another task.
For example, suppose the "Order equipment" task is the predecessor to the "Install equipment" task. Although the equipment cannot be installed until after the equipment is ordered, it still cannot be installed immediately after ordering. Some lag time is needed to allow for the equipment to be shipped and delivered. In such a case, the successor needs to be delayed, and you can enter lag time in the schedule to accurately reflect this condition.
Lag time can be expressed as a percentage of the predecessor, for example, 75%. Or it can be a specific time period, for example, 16h or 3ed.

To enter lag time for a linked task, follow these steps:
Display the Gantt Chart or other view with a task sheet.
Select the successor task that is to have the lag time.
On the Standard toolbar, click Task Information and then click the Predecessors tab.
In the Lag field for the existing Predecessor, type the amount of lag time you want for the successor. Use a positive number and enter the lag time as a percentage or duration amount.
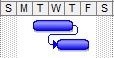
One way to make your project schedule more efficient is to overlap linked tasks where possible. Suppose you have a task that isn’t scheduled to begin until a previous task is finished. You realize that the predecessor doesn’t actually have to be finished—the successor can really begin when the predecessor is only 50 percent complete. The successor essentially gets a 50 percent head start, hence the term lead time. For example, "Construct walls" is the predecessor to "Plaster walls." Although plastering cannot be done until the walls are constructed, the final wall does not need to be constructed before plastering of the first wall can begin. You can set an amount of lead time for the "Plaster walls" task.
Lead time is expressed as a negative value. If you think of it as reducing time in the schedule, the minus sign makes sense. Lead time can be expressed as a percentage of the predecessor, for example, -25%. Or, it can be a specific time period, for example, -4d or -1ew.
To enter lead time for a linked task, follow these steps:
Display the Gantt Chart or other view with a task sheet.
Select the successor task that is to have the lead time.
On the Standard toolbar, click Task Information.
In the Task Information dialog box, click the Predecessors tab.
In the Lag field for the existing Predecessor, type the amount of lead time you want for the successor. Use a negative number and enter the lead time as a percentage or duration amount.
Note
Although it might seem strange to use the Lag field to enter lead time, "lag time" and "lead time" are essentially the same idea. They express the amount of time that should pass before the successor task should start (or finish). Lag time adds time between the performance of predecessor and successor tasks, and so is expressed as a positive number. Lead time subtracts time between the performance of predecessor and successor tasks, hence the negative number.
To change or remove an existing task dependency, follow these steps:
Display the Gantt Chart or other view with a task sheet.
Select the successor task whose link you want to change.
On the Standard toolbar, click Task Information and then click the Predecessors tab.
Click in the Type field for the predecessor you want to change and then select the type of task dependency you want it to be: Finish-to-Start (FS), Start-to-Start (SS), Finish-to-Finish (FF), Start-to- Finish (SF), or None. If you select None, the link is removed entirely.
Caution!
Removing a link from a task can move the scheduling of the task way back to the project start date. Always check the new start and finish dates on a task when you have removed a link or changed the link type to be sure the task is being scheduled the way you expect.
Note
As with setting dependency types or entering lead or lag time, you can use the Predecessors field in the sheet portion of the Gantt Chart to change or remove a link. You can also double-click the link line in the chart portion of the Gantt Chart to use the Task Dependency dialog box to do the same thing.
Troubleshooting
You’re trying to remove just the predecessor link from a task, but the successor link is removed at the same time
When you click a task and then click Unlink Tasks, all links are removed: predecessor, successor, and any multiples. As a result, the scheduling of this task returns to the project start date or a start date entered as a constraint.
To remove just a single predecessor, click the task and then click Task Information on the Standard toolbar. In the Task Information dialog box, click the Predecessors tab. Click the task name of the predecessor you want to delete and then press the Delete key.
Note
In Microsoft Office Project 2007, you can now undo multiple edits. To undo recent edits, click Undo on the Standard toolbar. Each time you click Undo, the previous edit is undone in the reverse order it was done. You can also press Ctrl+Z or click Edit, Undo to reverse the last edit.
To redo an edit that you’ve undone, click Redo on the Standard toolbar. You can also press Ctrl+Y or click Edit, Redo to redo undone edits.
When needed, the following views can give you a closer look at the task dependencies in your project:
The Gantt Chart shows task dependencies with link lines between the Gantt bars. In fact, all Gantt views show task dependencies this way.
The Network Diagram shows each task as an individual node with link lines between them. The Descriptive Network Diagram shows the same, but the nodes are larger and provide more detail.
The Relationship Diagram shows the predecessors and successors of a single selected task. This view is particularly useful for a large project or any project with complex linking.
The Task Details Form, Task Form, and Task Name Form can show predecessors and successors of a single selected task as part of a combination view. For example, you can display the Gantt Chart in the upper pane and one of the task forms in the lower pane. In fact, the Task Entry view is the built-in combination view of Gantt Chart and Task Form. By default, these forms show assigned resource information in the left grid and the predecessor information in the right grid. To show predecessor and successor information in the form, first click the form pane. Click Format, Details and then click Predecessors & Successors.