Now let's implement the screen to view a conversation or list of messages. We will try to model the screen after the built-in text message application on iOS. To do so, we will also cover the basics of how to create custom table view cells.
To start, we'll need a new MessagesController class, so perform the following steps:
- Double-click on the
MainStoryboard.storyboardfile to open it in Xcode. - Add a new Table View Controller to the storyboard.
- Select your view controller and click on the Identity Inspector tab. It is the third tab from the left, located on the right-hand side of the screen.
- Under the Custom Class section, enter
MessagesControllerinto the Class field. - Create a segue from
ConversationsControllertoMessagesControllerby right-clicking and dragging the blue line from the bar button to the next controller. - Select the push segue from the pop up that appears. Name the segue
OnConversationby using Attributes Inspector. - Now create two Table View Cell onto the table view in
MessagesController. You may reuse the existing one created by default. - Using the Custom Class section, enter
MyMessageCellandTheirMessageCellrespectively into the Class field for each cell. - Switch to the Attributes Inspector and set Identifier to
MyCellandTheirCell. - Save the storyboard file and return to Xamarin Studio.
Xamarin Studio will generate three files: MessagesController.cs, MyMessageCell.cs, and TheirMessageCell.cs. You might decide to keep things organized by creating a Views folder and moving the cells into it. Likewise, you can move the controller to a Controllers folder.
Now let's implement a base class for both cells to inherit from:
public class BaseMessageCell : UITableViewCell
{
  public BaseMessageCell(IntPtr handle) : base(handle)
  {
  }
  public virtual void Update(Message message)
  {
  }
}
We will override the Update method later and take the appropriate action for each cell type. We need this class to make things easier while interacting with both types of cells from UITableViewSource.
Now open MessagesController.cs and implement UITableViewSource inside a nested class as follows:
class TableSource : UITableViewSource
{
  const string MyCellName = "MyCell";
  const string TheirCellName = "TheirCell";
  readonly MessageViewModel messageViewModel =ServiceContainer.Resolve<MessageViewModel>();
  readonly ISettings settings =ServiceContainer.Resolve<ISettings>();
  public override int RowsInSection(UITableView tableview, int section)
  {
    return messageViewModel.Messages == null ?0 : messageViewModel.Messages.Length;
  }
  public override UITableViewCell GetCell(UITableView tableView, NSIndexPath indexPath)
  {
    var message = messageViewModel.Messages [indexPath.Row];
    bool isMyMessage = message.UserId == settings.User.Id;
    var cell = tableView.DequeueReusableCell(isMyMessage ?MyCellName : TheirCellName) as BaseMessageCell;
    cell.Update(message);
    return cell;
  }
}
We added some logic to check if a message is from a current user to decide on the appropriate table cell identifier. Since we have a base class for both cells, we can cast to BaseMessageCell and use its Update method.
Now let's make the required changes to our MessagesController as follows:
readonly MessageViewModel messageViewModel =ServiceContainer.Resolve<MessageViewModel>();
public override void ViewDidLoad()
{
  base.ViewDidLoad();
  TableView.Source = new TableSource(this);
}
public async override void ViewWillAppear(bool animated)
{
  base.ViewWillAppear(animated);

  Title = messageViewModel.Conversation.Username;
  try
  {
    await messageViewModel.GetMessages();
    TableView.ReloadData();
  }
  catch (Exception exc)
  {
    new UIAlertView("Oops!", exc.Message, null, "Ok").Show();
  }
}
The only thing new here is where we set the Title property to the username of the conversation.
To complete our custom cells, we will need to make more changes in Xcode by performing the following steps:
- Double-click on the
MainStoryboard.storyboardfile to open it in Xcode. - Drag a new Label onto both the custom cells.
- Use some creativity to style both labels. I chose to make the text in
MyMessageCellblue andTheirMessageCellgreen. I set Alignment on the label to the right aligned inTheirMessageCell. - Make an outlet for the label in both cells, and name it
message. You will need to make sure you select the appropriateMyMessageCell.handTheirMessageCell.hfile for each of the cell in Xcode. - Save the storyboard file and return to Xamarin Studio.
Now add the following Update method to both MyMessageCell.cs and TheirMessageCell.cs:
public partial class MyMessageCell : BaseMessageCell
{
  public MyMessageCell (IntPtr handle) : base (handle)
  {
  }
  public override void Update(Message message)
  {
    this.message.Text = message.Text;
  }
}
It is a bit strange to have duplicated the code for each cell, but it is the simplest approach to take advantage of the outlets Xamarin Studio generated based on the storyboard file. You could also have chosen to use the same class for both cells (even with a different layout in Xcode); however, you then lose the ability to have different code in each cell.
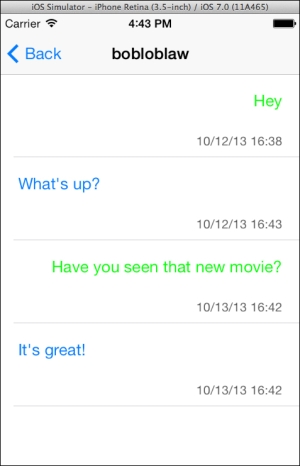
If you run the application now, you will be able to view the messages list. The following screenshot shows my version in which I chose to add a date and time to the messages as well: