
To begin writing the iOS version of XamChat, create a new Single View Application under the iOS section of the New Project dialog. Name the project XamChat.iOS or some other appropriate name of your choice. The project template will automatically create a controller with an unfamiliar name; go ahead and delete it. We will create our own controllers as we go.
In this chapter, we will cover the following:
- The basics of an iOS application
- The use of UINavigationController
- Implementing a login screen
- Segues and UITableView
- Adding a friends list
- Adding a list of messages
- Composing messages
Before we start developing our app, let's review the main settings of the application. Apple uses a file named Info.plist to store important information about any iOS app. These settings are used when an iOS application is installed on a device by the Apple App Store. Begin development on any new iOS application by editing this file.
Xamarin Studio provides a useful menu to modify values in the Info.plist file, as shown in the following screenshot:
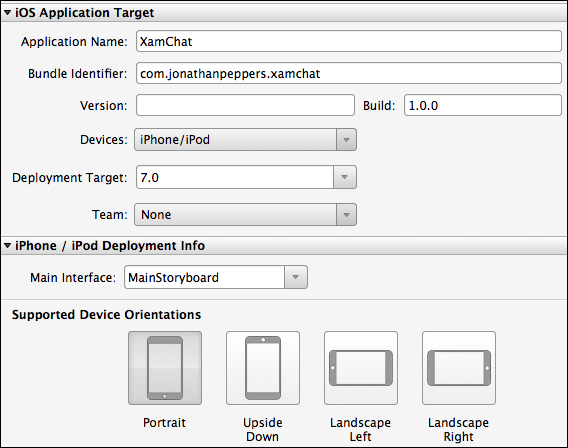
The most important settings are as follows:
- Application Name: This is the title below an app's icon in iOS. Note that this is not the same as the official name of your app in the iOS App Store.
- Bundle Identifier: This is your app's bundle identifier or bundle ID. It is a unique name to identify your application. The convention is to use reverse domain naming style beginning with your company name, such as
com.packt.xamchat. - Version: This is a version number for your application such as
1.0.0. - Devices: In this you can select iPhone/iPod, iPad, or Universal (all devices) for your application.
- Deployment Target: This is the minimum iOS version your application runs on.
- Main Interface: This is the main storyboard file for your app.
- Supported Device Orientations: These are the different positions your application will be able to rotate to and support.
There are other settings for app icons, splash screens, and so on. You can also toggle between the Advanced or Source tabs to configure additional settings that Xamarin does not provide a user-friendly menu for.
Configure the following settings for our application:
- Application Name:
XamChat - Bundle Identifier:
com.yourcompanyname.xamchat; make sure you name future apps beginning withcom.yourcompanyname - Version: This can be any version number you prefer; it should not be left blank
- Devices: iPhone/iPod
- Deployment Target: 7.0
- Supported Device Orientations: Only select Portrait
You can find some additional settings for Xamarin iOS applications if you right-click on your project and select Options, as shown in the following screenshot. It is a good idea to know what is available for iOS-specific projects in Xamarin Studio.

Let's discuss some of the following most important options:
- iOS Build
- SDK version: This is the version of the iOS SDK to compile your application with. It is generally best to use Default.
- Linker behavior: Xamarin has implemented a feature called linking. The linker will strip any code that will never be called within your assemblies. This keeps your application small and allows them to ship a stripped-down version of the core Mono framework with your app. In most cases, it is best to use the Link SDK assemblies only option. We will cover linking in the next chapter.
- Optimize PNG files for iOS: Apple uses a custom PNG format to speed up the loading of PNGs within your app. You can turn this off to speed up builds, or if you plan on optimizing the images yourself.
- Enable debugging: Turning this on allows Xamarin to include extra information with your app to enable debugging from Xamarin Studio.
- Additional mtouch arguments: This field is for passing extra command-line arguments to the Xamarin compiler for iOS. You can check the complete list of these arguments at http://iosapi.xamarin.com.
- iOS Build | Advanced
- Supported architectures: Here, the options are ARMv7, ARMv7s, and a FAT version that includes both. These are instruction sets that different iOS device processors support. If you really care about performance, you might consider selecting the option to support both; however, this will make your application larger.
- Use LLVM optimizing compiler: Checking this compiles code in such a way that is smaller and runs faster, but takes longer to compile. LLVM stands for Low Level Virtual Machine.
- Enable generic value type sharing: This is an option specific to Mono that draws better performance from C# generics with value types. It has the downside of making the application slightly larger, but I would recommend leaving it on.
- Use SGen generational garbage collector: This uses the new Mono garbage collector in your app. I would recommend turning this on if you really need good performance with the garbage collector (GC) or are working on an app that needs to be responsive in real time, such as a game.
- iOS Bundle Signing
- Identity: This is the certificate to identify the app's creator for deploying the application to devices. We'll cover more on this in later chapters.
- Provisioning profile: This is a specific profile that deploys the app to a device. This works in tandem with Identity, but also declares the distribution method, the devices that can install the app, and other specific declarations for the app such as iCloud or push notifications.
- iOS Application: These settings are identical to what you see in the
Info.plistfile.
For this application, you can leave all these options at their defaults. When making a real iOS application on your own, you should consider changing many of these as per your application's needs.