For the final piece of our application, we need to implement custom functionality that Apple doesn't provide with their APIs. We need to add a text field with a button that appears to be attached to the bottom of the table view. Most of this will require writing code and wiring up a lot of events.
Let's begin by adding some new member variables to our MessagesController class as follows:
UIToolbar toolbar;
UITextField message;
UIBarButtonItem send;
NSObject willShowObserver, willHideObserver;
We will place the text field and bar buttons inside the toolbar, as in the following code. The NSObject fields will be an example of iOS's event system called
notifications. We'll see how those are used shortly.
public override void ViewDidLoad()
{
  base.ViewDidLoad();
  //Text Field
  message = new UITextField(new RectangleF(0, 0, 240, 32))
  {
    BorderStyle = UITextBorderStyle.RoundedRect,ReturnKeyType = UIReturnKeyType.Send,ShouldReturn = _ =>
    {
      Send();
      return false;
    },
  };

  //Bar button item
  send = new UIBarButtonItem("Send", UIBarButtonItemStyle.Plain,(sender, e) => Send());
  //Toolbar
  toolbar = new UIToolbar(new RectangleF(0, TableView.Frame.Height - 44,TableView.Frame.Width, 44));
  toolbar.Items = new UIBarButtonItem[]
  {
    new UIBarButtonItem(message),
    send
  };
  NavigationController.View.AddSubview(toolbar);
  TableView.Source = new TableSource();
  TableView.TableFooterView = new UIView(new RectangleF(0, 0, TableView.Frame.Width, 44))
  {
    BackgroundColor = UIColor.Clear,
  };
}
Much of this work is basic UI setup. It is not something we can do inside Xcode, because it is a custom UI in this case. We create a text field, bar button item, and toolbar from C# and add them to our navigation controller's view. This will display the toolbar at the top of the table view, no matter where it is scrolled to. Another trick we used was to add a footer view to the table view, which is of the same height as the toolbar. This will simplify some animations that we'll set up later.
Now we will need to modify ViewWillAppear as follows:
public async override void ViewWillAppear(bool animated)
{
  base.ViewWillAppear(animated);
  Title = messageViewModel.Conversation.Username;
  //Keyboard notifications
  willShowObserver = UIKeyboard.Notifications.ObserveWillShow((sender, e) => OnKeyboardNotification(e));
  willHideObserver = UIKeyboard.Notifications.ObserveWillHide((sender, e) => OnKeyboardNotification(e));
  //IsBusy
  messageViewModel.IsBusyChanged += OnIsBusyChanged;
  try
  {
    await messageViewModel.GetMessages();
    TableView.ReloadData();
    message.BecomeFirstResponder();
  }
  catch (Exception exc)
  {
    new UIAlertView("Oops!", exc.Message, null, "Ok").Show();
  }
}
Most of these changes are straightforward, but notice our use of iOS notifications. Xamarin has provided a C# friendly way to subscribe to notifications. There is a static nested class named Notifications inside various UIKit classes that provide notifications. Otherwise, you would have to use the NSNotificationCenter class, which is not as easy to use. To unsubscribe from these events, we merely need to dispose NSObject that is returned.
So let's add an override for ViewWillDisapper to clean up these events as follows:
public override void ViewWillDisappear(bool animated)
{
  base.ViewWillDisappear(animated);
  //Unsubcribe notifications
  if (willShowObserver != null)
  {
    willShowObserver.Dispose();
    willShowObserver = null;
  }
  if (willHideObserver != null)
  {
    willHideObserver.Dispose();
    willHideObserver = null;
  }
  //IsBusy
  messageViewModel.IsBusyChanged -= OnIsBusyChanged;
}
Next, let's set up our methods for these events as follows:
void OnIsBusyChanged (object sender, EventArgs e)
{
  message.Enabled =send.Enabled = !messageViewModel.IsBusy;
}

void ScrollToEnd()
{
  TableView.ContentOffset = new PointF(0, TableView.ContentSize.Height –TableView.Frame.Height);
}

void OnKeyboardNotification (UIKeyboardEventArgs e)
{
  //Check if the keyboard is becoming visible
  bool willShow = e.Notification.Name ==UIKeyboard.WillShowNotification;
  //Start an animation, using values from the keyboard
  UIView.BeginAnimations("AnimateForKeyboard");
  UIView.SetAnimationDuration(e.AnimationDuration);
  UIView.SetAnimationCurve(e.AnimationCurve);
  //Calculate keyboard height, etc.
  if (willShow)
  {
    var keyboardFrame = e.FrameEnd;
    var frame = TableView.Frame;
    frame.Height -= keyboardFrame.Height;
    TableView.Frame = frame;
    frame = toolbar.Frame;
    frame.Y -= keyboardFrame.Height;
    toolbar.Frame = frame;
  }
  else
  {
    var keyboardFrame = e.FrameBegin;
    var frame = TableView.Frame;
    frame.Height += keyboardFrame.Height;
    TableView.Frame = frame;
    frame = toolbar.Frame;
    frame.Y += keyboardFrame.Height;
    toolbar.Frame = frame;
  }
  //Commit the animation
  UIView.CommitAnimations();
  ScrollToEnd();
}
That is quite a bit of code, but not too difficult. OnIsBusyChanged is used to disable some of our views while it is loading. ScrollToEnd is a quick method to scroll the table view to the end. We need this for the sake of usability. Some math is required because Apple does not provide a built-in method for this.
On the other hand, OnKeyboardNotification has quite a lot going on. We used the built-in animation system for iOS to set up an animation when the keyboard appears or hides. We use this to move views around for the on-screen keyboard. Using the animation system is quite easy; call UIView.BeginAnimations, modify some views, and then finish up with UIView.CommitAnimations. We also used a few more values from the keyboard to time our animation identically with the keyboard's animations.
Last but not least, we need to implement a function for sending a new message as follows:
async void Send()
{
//Just hide the keyboard if they didn't type anything
if (string.IsNullOrEmpty(message.Text))
{
message.ResignFirstResponder();
return;
}
//Set the text, send the message
messageViewModel.Text = message.Text;
await messageViewModel.SendMessage();
//Clear the text field & view model
message.Text =messageViewModel.Text = string.Empty;
//Reload the table
TableView.ReloadData();
//Hide the keyboard
message.ResignFirstResponder();
//Scroll to end, to see the new message
ScrollToEnd();
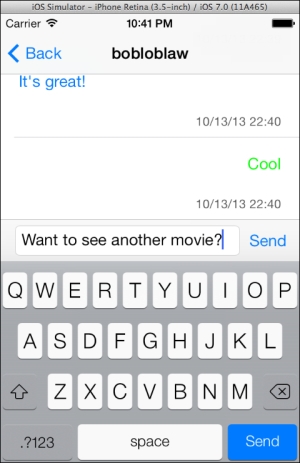
}This code is also fairly straightforward. After sending the message, we merely need to reload the table, hide the keyboard, and then make sure we scroll to the bottom to see the new message, as shown in the following screenshot. Using the async keyword makes this easy.