Implementing push notifications with Azure Mobile Services on iOS is very simple to set up from your Azure account's perspective. The most complicated part is working through Apple's process of creating certificates and provisioning profiles in order to configure your iOS application. Before continuing, make sure you have a valid iOS Developer Program account, as you will not be able to send push notifications without it. If you are unfamiliar with the concept of push notifications, take a look at Apple's documentation at http://tinyurl.com/XamarinAPNS.
To send push notifications, you need to set up the following:
- An explicit App ID registered with Apple
- A provisioning profile targeting that App ID
- A certificate for your server to trigger the push notification
Apple provides both a development and production certificate, which you can use to send push notifications from your server.
Let's begin by navigating to http://developer.apple.com/account, and carry out the following steps:
- Click on the Identifiers link.
- Click on the plus button in the top-right corner of the window.
- Enter a description, such as
XamChat, for the bundle ID. - Enter your bundle ID under the Explicit App ID section. This should match the bundle ID you set up in your
Info.plistfile, for example,com.yourcompanyname.xamchat. - Under App Services, be sure to check Push Notifications.
- Now, click on Continue.
- Review your final settings and hit Submit.
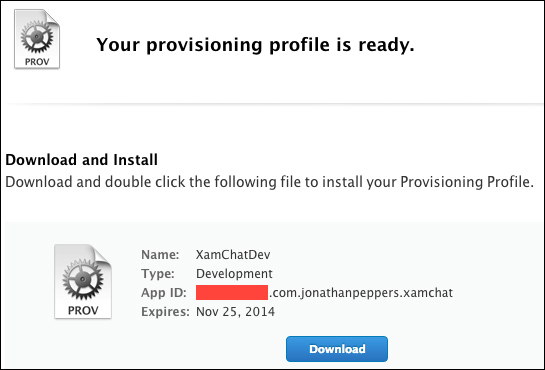
This will create an explicit app ID similar to what we can see in the following screenshot, which we can use for sending push notifications:

For push notifications, we have to use a profile with an explicit App ID that is not a development certificate. Now let's set up a provisioning profile:
- Click on the Development link under Provisioning Profiles in the right-hand side navigation.
- Click on the plus button in the top-right corner.
- Check iOS App Development and click on Continue.
- Select the App ID we just created and click on Continue.
- Select the developer and click on Continue.
- Select the devices you will be using and click on Continue.
- Enter a name for the profile and click on Generate.
- Download the profile and install it, or open Xcode and use the sync button in Preferences | Accounts.
When finished successfully, you should arrive at a web page that looks like the following:
Next, we perform the following steps to set up the certificate our server needs:
- Click on the Development link under Certificates in the right-hand side navigation.
- Click on the plus button in the top-right corner.
- Enable Apple Push Notifications service SSL (Sandbox) and click on Continue.
- Select your App ID as before and click on Continue.
- Create a new certificate signing request as per Apple's instructions. You may also refer to Chapter 7, Deploying and Testing on Devices, or locate the
*.certSigningRequestfile created in this chapter. - Next, click on Continue.
- Upload the signing request file and click on Generate.
- Next, click on Download.
- Open the file to import the certificate into Keychain.
- Locate the certificate in Keychain. It will be titled Apple Development iOS Push Services and will contain your bundle ID.
- Right-click on the certificate and export it somewhere on your filesystem. Enter a password that you would remember.
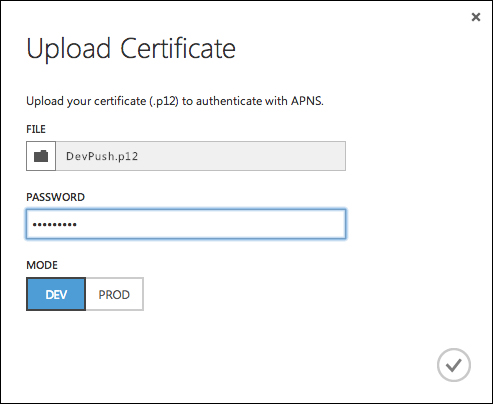
This will create the certificate we need to send push notifications to our users from Azure Mobile Services. All that remains is to return to the Azure Management Portal and upload the certificate from the Push tab under Apple Push Notification Settings, as seen in the following screenshot:
This final step concludes the configuration we need from Apple's side.
Next, let's return to our XamChat.iOS project in Xamarin Studio to make the necessary changes on the client side for push notifications. We will need to add a few new classes to our shared code to start with.
Open IWebService.cs and add the following new method:
Task RegisterPush(string userId, string deviceToken);
Next, let's implement this method in FakeWebService.cs (just so it compiles) as follows:
public async Task RegisterPush( string userId, string deviceToken)
{
  await Sleep();
}
Now, let's add a new class named Device.cs in the Core/Azure folder:
public class Device
{
  public string Id { get; set;}

  public string UserId { get; set; }

  public string DeviceToken { get; set; }
}
Finally, we can implement the real method in AzureWebService.cs as follows:
public async Task RegisterPush( string userId, string deviceToken)
{
  await client.GetTable<Device>().InsertAsync(new Device {
      UserId = userId,
      DeviceToken = deviceToken
    });
}
As for changes in our ViewModels, we need to add one more new method to LoginViewModel.cs:
public async Task RegisterPush(string deviceToken)
{
  if (settings.User == null)
    throw new Exception("User is null");

  await service.RegisterPush(settings.User.Id, deviceToken);
}
And then we need to add a small modification to MessageViewModel.cs. Add the following line when creating a new Message object in the SendMessage method:
ToId = Conversation.UserId,
This modification concludes what we need to add to our shared code. We will reuse this new functionality when we add push notifications to Android, so go ahead and take the time to link in the new Device.cs file in your XamChat.Droid project to enable you to build your entire solution.
Now, let's add the iOS platform-specific code we need. Add the following methods to your AppDelegate.cs file:
public async override void RegisteredForRemoteNotifications(UIApplication application, NSData deviceToken)
{
  var loginViewModel = ServiceContainer.Resolve<LoginViewModel>();
  try
  {
    string token = deviceToken.Description;
    token = token.Substring(1, token.Length - 2);
    await loginViewModel.RegisterPush(token);
  }
  catch (Exception exc)
  {
    Console.WriteLine("Error registering push: " + exc);
  }
}

public override void FailedToRegisterForRemoteNotifications(UIApplication application, NSError error)
{
  Console.WriteLine("Error registering push: " + error.LocalizedDescription);
}
We implemented a couple of important methods in the preceding code snippet. RegisteredForRemoteNotifications will occur when Apple successfully returns a device token from its servers. It is returned within angle brackets, so we do a little work to trim those off and pass the device token through the LoginViewModel to Azure Mobile Services. We also implemented FailedToRegisterForRemoteNotifications just to report any errors that might occur throughout the process.
One last thing to do is to actually make a call to register for remote notifications. Open LoginController.cs and add the following line of code directly after the successful call to login:
UIApplication.SharedApplication.RegisterForRemoteNotificationTypes( UIRemoteNotificationType.Alert | UIRemoteNotificationType.Badge | UIRemoteNotificationType.Sound);
You could also call the method on start up; however, in our situation we need a valid user ID to store in the Device table in Azure.
Now let's switch to the Azure Management Portal and make the remaining changes on the server side. Under the Data tab, create a new table named Device with the default settings.
Next, we need to modify the insert script so that duplicate device tokens are not inserted:
function insert(item, user, request)
{
  var devicesTable = tables.getTable('device'),
  devicesTable.where({ userId: item.UserId, deviceToken: item.DeviceToken }).read({ success: function (devices)
    {
      if (devices.length > 0)
      {
        request.respond(statusCodes.OK, devices[0]);
      }
      else
      {
        request.execute();
      }
    }
  });
}
Last but not least, we need to modify the insert script for the Message table to send push notifications to the user the message was sent to, as follows:
function insert(item, user, request) {
request.execute();
var devicesTable = tables.getTable('device'),
devicesTable.where({ userId : item.ToId }).read({
success: function(devices) {
devices.forEach(function(device) {
var text = item.Username + ": " + item.Text;
push.apns.send(device.DeviceToken, {
alert: text,
badge: 1,
payload: {
message: text
}
});
});
}
});
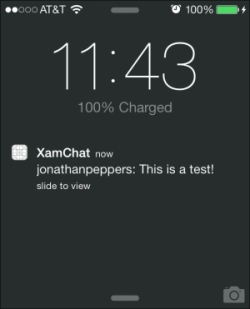
}After executing the request, we retrieve a list of devices from the database and send out a push notification for each one. To test push notifications, deploy the application and log in with the secondary user (if using our examples: chucknorris). After logging in, you can just background the app with the home button. Next, log in with the primary user on your iOS simulator and send a message. You should receive a push notification as shown in the following screenshot: