
Since our plain white application is quite boring, let's modify the view layer of our application with some controls. To do this, we will modify the MainStoryboard.storyboard file in your project in Xcode. At the time of writing this book, Xamarin Studio will launch and communicate with Xcode to modify iOS layout files. An iOS design tool in Xamarin Studio is currently in development and will function very similarly to Xcode.
Let's add some controls to our app by performing the following steps:
- Open the project you created earlier in this chapter in Xamarin Studio.
- Double-click on the
MainStoryboard.storyboardfile. - Xcode will launch and you will see the layout for the single controller in your application.
- In the tree structure on the left, you'll see that your controller contains a single view in its layout hierarchy.
- In the bottom-right corner, you'll notice a toolbox containing several types of objects that you can drag-and-drop onto the view associated with the controller.
- In the search box, search for
UILabeland drag the label onto the view at a location of your choice. - Click on the label to select it and then click on it again to edit the text of the label to anything you wish.
- Likewise, search for
UIButtonand drag the button onto the view somewhere above or below the label. You may edit the text on the button in the same way as you did on the label, if you wish. - Save the storyboard file by pressing command + S.
- Switch back to Xamarin Studio and run the application.
Your application should start looking a lot more like a real app as seen in the following screenshot:

Now you might be wondering about adding user interaction options to the app at this point. In Xcode, we can make an outlet that will make each view visible from C#. An outlet is a reference to a view in a storyboard or XIB file that will be filled out with an instance of the view at runtime. You can compare this concept to naming a control in other technologies such as ASP.NET, WebForms, or WPF (Windows Presentation Foundation). A Xamarin Studio behind-the-scenes tool will create a property in a partial class, which gives you access to the label and button from your controller. Additionally, you can wire an action from a storyboard or XIB file, which is a method that will be called when an event occurs. Xamarin Studio exposes Xcode actions as partial methods to be implemented in your classes. It is generally cleaner from a C# developer's perspective to just use the C# event, but it is neat to have both options.
Let's add some interactions to the app as follows:
- Switch back to Xamarin Studio.
- Double-click on the
MainStoryboard.storyboardfile again. - In the top-right corner, you'll notice a toggle menu labeled Editor; click on the button that looks like a tuxedo.
- A split view will appear with your layout on the left and an
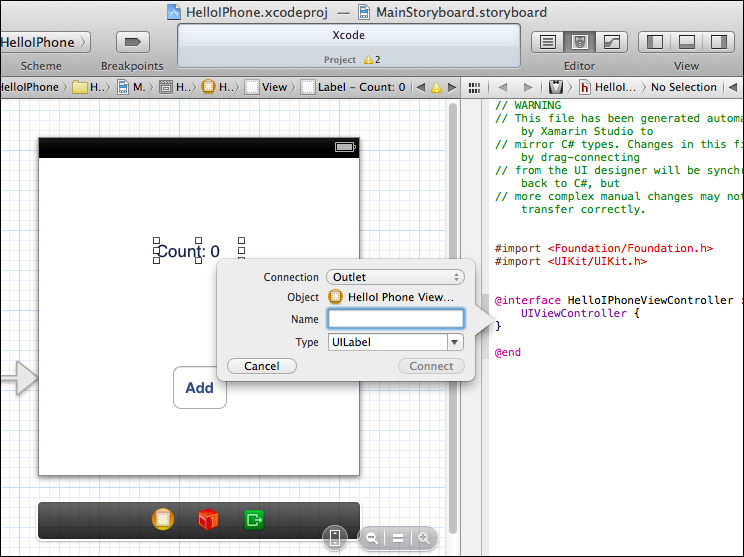
Objective-Cheader file on the right. In future, you can click on the button to the left of the tuxedo to go back to the other view. - Right-click and hold on the label and drag it to the header file below the
@interacedeclaration and release it. A blue line attached to your mouse pointer appears as you do this and an indicator will appear in the header file to tell you when you can release it. - In the outlet popup, you can see the Name field. Pick a name for the label's outlet, for example,
label. - Click on Connect, you will see
IBOutlet UILabel *label;appear in the header file. - Repeat this process for the button, selecting a name such as
button. - Save the header and storyboard files by pressing command + S.
- Switch back to Xamarin Studio and run the application.
If you get lost in Xcode, don't fret. It is a very different experience compared to Visual Studio if you are used to Microsoft tools. Apple is big on minimalistic interfaces, so it can be difficult to pick up their workflow without a detailed explanation. Coming from a WPF and WinForms background, I initially had trouble figuring out how to use Xcode's interface myself.
Here is what the first outlet dialog should look like:
Now that we have two outlets defined, two new properties will be available from your controller. Expand the *ViewController.cs file in your solution and open the *ViewController.designer.cs file. You will see your properties defined as follows:
[Outlet]
MonoTouch.UIKit.UILabel label { get; set; }

[Outlet]
MonoTouch.UIKit.UIButton button { get; set; }
It is not a good idea to modify this file since Xamarin Studio may rebuild it if you make further changes in Xcode. Nevertheless, it is good practice to learn how things actually work behind the scenes.
Open your *ViewController.cs file and let's enter the following code in your controller's ViewDidLoad method:
public override void ViewDidLoad()
{
  base.ViewDidLoad();

  int count = 0;
  button.TouchUpInside += (sender, e) =>
  label.Text = string.Format("Count: {0}", ++count);
}
Tip
Downloading the example code
You can download the example code files for all Packt books you have purchased from your account at http://www.packtpub.com. If you purchased this book elsewhere, you can visit http://www.packtpub.com/support and register to have the files e-mailed directly to you.
When ViewDidLoad is called for the first time, your controller's view is loaded. This happens once in the lifetime of your controller. We subscribed to the TouchUpInside event, which is fired when the button is clicked; iOS does not have a click event that is commonly used on Windows platforms. We also used C#'s convenient lambda expression syntax to update the label when the event is fired.
Run your application and you will be able to interact with your button and increment the value displayed in the label, as shown in the following screenshot:

Next, we need to make a transition from one controller to another. To do this, iOS has a concept called segue, which is basically some kind of animation that switches from one controller to the next. There are several types of segues, but the most common segue slides a new controller from the left or bottom of the screen.
Now let's add a second controller to the application as follows:
- Return to your project in Xamarin Studio.
- Double-click on the
MainStoryboard.storyboardfile. - Drag a new controller from the object library in the bottom-left corner next to the first controller.
- Click on the controller to select it.
- In the property pane on the top-right corner, click on the identity inspector tab (third tab from the left).
- Under the Custom Class section, enter a name such as
SecondControllerfor the controller into the Class field. - Now let's add a segue for transition from the first controller to this one. Right-click and hold on the button from the original controller to your new controller. A blue line will appear followed by a small pop-up menu.
- Select modal from the pop-up menu.
- Save the storyboard files by pressing command + S.
- Switch back to Xamarin Studio and run the application.
Since we've set up a modal segue from the first controller's button, your second controller will appear while clicking it. However, there isn't a way to exit the new controller yet. If you return to Xamarin Studio, you'll notice that a SecondController.cs file and SecondController.designer.cs file have automatically been created for you.
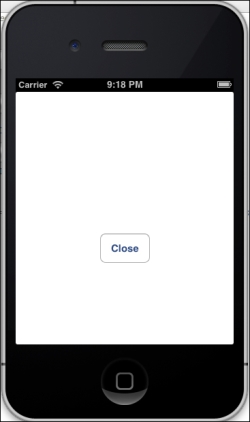
Let's add a button to your second controller as follows:
- Return to Xamarin Studio.
- Double-click on the
MainStoryboard.storyboardfile. - Drag a button from the object library onto the second controller.
- Set the title of the button to
Close. - Under the Editor menu, click on the button that looks like a tuxedo.
- Right-click and hold on the button and drag it to your header file to create a new outlet and name it
Close. - Save the header and storyboard file by pressing command + S.
- Switch back to Xamarin Studio.
- Open the
SecondController.csfile and add the following method:public override void ViewDidLoad() { base.ViewDidLoad(); close.TouchUpInside +=(sender, e) => DismissViewController(true, null); }
If you compile and run your application, clicking on the button will increment the value on the label and display the modal second controller. You can then close the second controller by tapping on Close. Notice the neat sliding animation; iOS automatically applies these kinds of transition effects, which are very easy to customize on iOS.
Since we have gone over the basics of laying out controls in Xcode and interacting with outlets in C#, let's go over the standard lifecycle of an iOS application. The primary location for handling application-level events is in the AppDelegate class.
If you open your AppDelegate.cs file, you can override the following methods:
FinishedLaunching: This is the first entry point for the application, which should returntrue.DidEnterBackground: This means the user clicked on the home button on their device or another instance, such as a phone call, came to the foreground. You should perform any action needed to save the user's progress or state of the UI as the iOS may kill your application once pushed to the background. While your application is in the background, the user could be navigating through the home screen or opening other apps. Your application is effectively paused in memory until resumed by the user.WillEnterForeground: This means the user has reopened your application from the background. You might need to perform other actions here such as refreshing the data on the screen and so on.OnResignActivation: This happens if the operating system displays a system pop up on top of your application. Examples of this are calendar reminders or the menu the user can swipe down from the top of the screen.OnActivated: This happens immediately after theOnResignActivationmethod is executed as the user returns to your app.ReceiveMemoryWarning: This is a warning from the operating system to free up the memory in your application. It is not commonly required with Xamarin because of C#'s garbage collector, but if there are any heavy objects such as images throughout your app, this is a good place to dispose them. If enough memory cannot be freed, the operating system could terminate your application.HandleOpenUrl: This is called if you implement a URL scheme, which is the iOS equivalent of file extension associations on a desktop platform. If you register your app to open different types of files or URLs, this method will be called.
Likewise, in your *ViewController.cs file, you can override the following methods on your controller:
ViewDidLoad: This occurs when the view associated with your controller is loaded. It will occur only once on devices running iOS 6 or higher.ViewWillAppear: This occurs prior to your view appearing on the screen. If there are any views that need to be refreshed while navigating throughout your app, this is generally the best place to do it.ViewDidAppear: This occurs after the completion of any transition animations and your view is displayed on the screen. In some uncommon situations, you might need to perform actions here instead of inViewWillAppear.ViewWillDisappear: This method is called prior to your view being hidden. You might need to perform some clean-up operations here.ViewDidDisappear: This occurs after any transition animations are completed for displaying a different controller on the screen. Just like the methods for appearing, this occurs afterViewWillDisappear.
Apart from these methods, there are other methods but many are deprecated for iOS 6 and above. Familiarize yourself with Apple's documentation at http://developer.apple.com/library/ios. It is very helpful to read the documentation on each class and method when trying to understand how Apple's APIs work. Learning how to read (not necessarily code) Objective-C is also a useful skill to learn so that you are able to convert Objective-C examples to C# when developing iOS applications.