
Since all the code we've written so far is not dependent on the user interface, we can easily write unit tests against our classes. This step is generally taken after the first implementation of a ViewModel class. Proponents of Test Driven Development (TDD) would recommend writing tests first and implementing things afterward, so choose which method is best for you. In either case, it is a good idea to write tests against your shared code before you start using them from the View layer, so you catch bugs before they hold up your development on the UI.
Xamarin projects take advantage of an open source testing framework called NUnit. It was originally derived from a Java testing framework called JUnit, and is the de facto standard for unit testing C# applications. Xamarin Studio provides several project templates for writing tests with NUnit.
Let's set up a new project for unit tests by performing the following steps:
- Add a new NUnit Library project to your solution, found under the C# section.
- Name the project as
XamChat.Teststo keep things consistent. - Next, let's set the library to a Mono/.NET 4.5 project under the project options, then Build | General | Target Framework.
- Right-click on the project references and choose Edit References.
- Under the Projects tab, add a reference to XamChat.Core.
- Now, open the
Test.csfile and notice the following required attributes that make up a unit test using NUnit:using NUnit.Framework;: This attribute is the main statement to be used to work with NUnit[TestFixture]: This decorates a class to indicate that the class has a list of methods for running tests[Test]: This decorates a method to indicate a test
In addition to the required C# attributes, there are several others that are useful for writing tests and they are as follows:
[TestFixtureSetUp]: This decorates a method that runs before all the tests contained within a text fixture class.[SetUp]: This decorates a method that runs before each test in a test fixture class.[TearDown]: This decorates a method that runs after each test in a test fixture class.[TestFixtureTearDown]: This decorates a method that runs after all the tests in a text fixture class have been completed.[ExpectedException]: This decorates a method that is intended to throw an exception. It is useful to test cases that are supposed to fail.[Category]: This decorates a test method and can be used to organize different tests; for example, you might categorize fast and slow tests.
The next concept to learn about writing tests with NUnit is learning how to write assertions. An assertion is a method that will throw an exception if a certain value is not true. It will cause a test to fail and give a descriptive explanation as to what happened. NUnit has a couple of different sets of APIs for assertions; however, we will use the more readable and fluent version of the APIs.
The basic syntax of fluent-style API is using the Assert.That method. The following example shows the use of the method:
Assert.That(myVariable, Is.EqualTo(0));
Likewise, you can assert the opposite:
Assert.That(myVariable, Is.Not.EqualTo(0));
Or any of the following:
Assert.That(myVariable, Is.GreaterThan(0));Assert.That(myBooleanVariable, Is.True);Assert.That(myObject, Is.Not.Null);
Feel free to explore the APIs. With code completion in Xamarin Studio, you should be able to discover useful static members or methods on the Is class to use within your tests.
Before we begin writing specific tests for our application, let's write a static class and method to create a global setup to be used throughout our tests; you can rewrite Test.cs as follows:
public static class Test
{
  public static void SetUp()
  {
    ServiceContainer.Register<IWebService>(() =>new FakeWebService {SleepDuration = 0, });
    ServiceContainer.Register<ISettings>(() =>new FakeSettings());
  }
}
We'll use this method throughout our tests to set up fake services in our Model layer. Additionally, this replaces the existing services so that our tests execute against new instances of these classes. This is a good practice in unit testing to guarantee that no old data is left behind from a previous test. Also notice that we set SleepDuration to 0. This will make our tests run very quickly.
Begin by creating a ViewModels folder in your test's project and adding a class named LoginViewModelTests as follows:
public class LoginViewModelTests
{
  LoginViewModel loginViewModel;
  ISettings settings;

  [SetUp]
  public void SetUp()
  {
    Test.SetUp();

    settings = ServiceContainer.Resolve<ISettings>();
    loginViewModel = new LoginViewModel();
  }

  [Test]
  public void LoginSuccessfully()
  {
    loginViewModel.Username = "testuser";
    loginViewModel.Password = "password";

    loginViewModel.Login().Wait();

    Assert.That(settings.User, Is.Not.Null);
  }
}
Notice our use of a SetUp method. We recreate the objects used in every test to make sure that no old data is left over from the previous test runs. Another point to note is that there is currently no support for async/await in NUnit (although it will be supported in NUnit 2.6.2). To work around this, we call the Wait method directly on any methods that return Task or Task<T>.
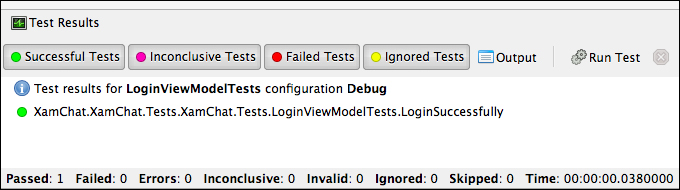
To run the test, use the NUnit menu found docked to the right of Xamarin Studio by default. Go ahead and run the test by using the Run Test button that has a gear icon; you should get a successful result similar to what is shown in the following screenshot:

You can also view the Test Results pane, which will show extended details if a test fails, as shown in the following screenshot:
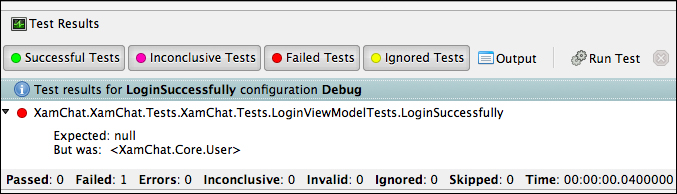
To see what happens when a test fails, go ahead and modify your test to assert against an incorrect value as follows:
//Change Is.Not.Null to Is.Null
Assert.That(settings.User, Is.Null);
You will get a very descriptive error in the Test Results pane as shown in the following screenshot:
Now let's implement another test for the LoginViewModel class; let's make sure we get the appropriate outcome if the username and password is blank. The test is implemented as follows:
[Test]
public void LoginWithNoUsernameOrPassword()
{
  //Throws an exception
  loginViewModel.Login.Wait();
}
If we run the test as is, we will get an exception and the test will fail. Since we expect an exception to occur, we can decorate the method to make the test pass only if an exception occurs as follows:
[Test, ExpectedException(typeof(AggregateException))]
More tests are included with the sample code along with this book. It is recommended to write tests against each public operation on each ViewModel class. Additionally, write tests for any validation or other important business logic. I would also recommend writing tests against the Model layer; however, it is not needed in our project yet since we only have fake implementations.