You might be asking yourself at this point, how do I set up my solution in Xamarin Studio to handle shared code and also have platform-specific projects? Xamarin.iOS applications can only reference Xamarin.iOS class libraries; so, setting up a solution can be problematic. There are actually three main strategies for setting up a cross-platform solution, each with its own advantages and disadvantages.
Options for cross-platform solutions are as follows:
- File Linking: For this option, you would start with either a plain .NET 4.0 or .NET 4.5 class library containing all the shared code. You would then have a new project for each platform you want your app to run on. Each platform-specific project would have a subdirectory with all of the files linked in from the first class library. To set this up, add the existing files to the project, and select the Add a link to the file option. Any unit tests can run against the original class library. The advantages and disadvantages of file linking are as follows:
- Advantages: This approach is very flexible. You can choose to link or not link certain files and can also use preprocessor directives such as
#if IPHONE. You can also reference different libraries on Android versus iOS. - Disadvantages: You have to manage a file's existence in three projects: core library, iOS, and Android. This can be a hassle if it is a large application or if many people are working on it.
- Advantages: This approach is very flexible. You can choose to link or not link certain files and can also use preprocessor directives such as
- Cloned Project Files: It is very similar to file linking, the main difference being that you have a class library for each platform in addition to the main project. By placing the iOS and Android projects in the same directory as the main project, the files can be added without linking. You can easily add files by right-clicking on the solution and selecting Display Options | Show All Files. Unit tests can run against the original class library or the platform-specific versions.
- Advantages: This approach is just as flexible as file linking, but you don't have to manually link any files. You can still use preprocessor directives and reference different libraries on each platform.
- Disadvantages: You still have to manage a file's existence in three projects. There is additionally some manual file arranging required to set this up. You also end up with an extra project to manage on each platform.
- Portable Class Libraries: This is the most optimal option; you begin the solution by making a portable class library (PCL) project for all your shared code. This is a special project type that allows multiple platforms to reference the same project, allowing you to use the smallest subset of C# and the .NET framework available in each platform. Each platform-specific project would reference this library directly, as well as any unit test projects.
- Advantages: All your shared code is in one project, and all platforms use the same library. This is the cleanest and preferred approach for most cross-platform applications.
- Disadvantages: You cannot use preprocessor directives or reference different libraries on each platform. Use of the dependency injection is the recommended way around this. You also could be limited to a subset of .NET depending on how many platforms you are targeting. This option has also been in beta or experimental version for some time. At the time of writing this book, PCLs are well on their way to become officially supported.
To understand each option completely and what situations call for, let's define a solution structure for each cross-platform solution. Let's use the product search example from earlier in the chapter and set up a solution for each approach.
To begin with file linking, perform the following steps:
- Open Xamarin Studio and start a new solution.
- Select a new Library project under the general C# section.
- Name the project
ProductSearch.Core, and name the solutionProductSearch. - Right-click on the newly created project and select Options.
- Under Build | General, set the Target Framework option to .NET Framework 4.5.
- Add the
Product,ProductRepository, andProductViewModelclasses to the project used earlier in this chapter. You will need to addusing System.Threading.Tasks;andusing System.Linq;where needed. - Click on Build | Build All from the menu at the top to be sure that everything builds properly.
- Now, let's create a new iOS project by right-clicking on the solution and selecting Add | Add New Project. Create a new project by navigating to iOS | iPhone Storyboard | Single View Application and name it
ProductSearch.iOS. - Create a new Android project by right-clicking on the solution and selecting Add | Add New Project. Create a new project by navigating to Android | Android Application and name it
ProductSearch.Droid. - Add a new folder named
Coreto both the iOS and Android projects. - Right-click on the new folder for the iOS project and select Add | Add Files from Folder. Select the root directory for the
ProductSearch.Coreproject. - Check the three C# files in the root of the project. An Add File to Folder dialog will appear.
- Select Add a link to the file and make sure the Use the same action for all selected files checkbox is selected.
- Repeat this process for the Android project.
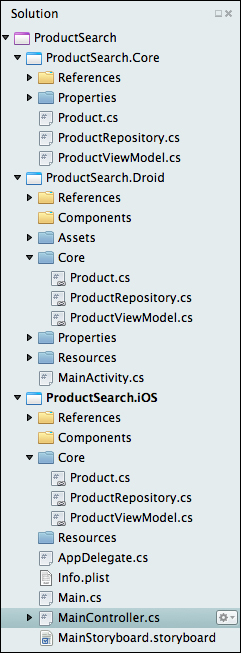
- Click on Build | Build All from the menu at the top to double-check everything, and you have successfully set up a cross-platform solution with file linking.
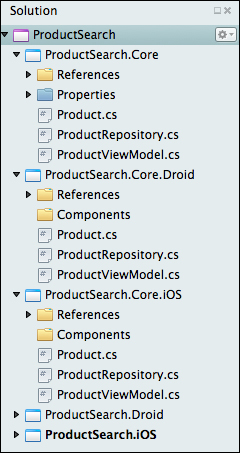
When all is done, you will have a solution tree that looks something like what you can see in the following screenshot:
You should consider using this technique when you have to reference different libraries on each platform. You might consider using this option if you are using ReactiveUI, MonoGame, or other frameworks that require you to reference a different library on iOS versus Android.
Setting up a solution with the cloned project files approach is similar to file linking, except that you will have to create an additional class library for each platform. To do this, create an Android library project and an iOS library project in the same directory: ProductSearch.Core. You will have to create the projects and move them to the proper folder manually, then re-add them to the solution. Right-click on the solution and select Display Options | Show All Files to add the required C# files to these two projects. Your main iOS and Android projects can reference these projects directly.
Your project will look like what is shown in the following screenshot, with ProductSearch.iOS referencing ProductSearch.Core.iOS, and ProductSearch.Droid referencing ProductSearch.Core.Droid: