
To begin writing the Android version of XamChat, open the solution provided in the previous chapters and create a new Android Application project. Name the project XamChat.Droid or some other appropriate name of your choice.
In this chapter, we will cover:
- The Android manifest
- Writing a login screen for XamChat
- Android's ListView and BaseAdapter
- Adding a friends list
- Adding a list of messages
All Android applications the have an XML file called the Android Manifest, which declares basic information about the app, and is named AndroidManifest.xml. This is very similar to the Info.plist file on iOS, but Android puts much more emphasis on its importance. A default project doesn't have a manifest, so begin creating one by going to Project Options | Android Application and clicking on Add Android Manifest. Several new settings for your application will appear.
The most important settings are as follows:
- Application name: This is the title of your application, which is displayed below the icon. It is not the same as the name selected on Google Play.
- Package name: This is just like on iOS; it's your app's bundle identifier or bundle ID. It is a unique name to identify your application. The convention is to use the reverse domain style with your company name at the beginning, for example,
com.packt.xamchat. It must begin with a lower case letter and contain at least one.character within. - Application icon: This is the icon displayed for your app on Android's home screen.
- Version number: This is a one-digit number that represents the version of your application. Raising this number indicates a newer version on Google Play.
- Version name: This is a user-friendly version string for your app, for example, 1.0.0.
- Minimum Android version: This is the minimum version of Android that your application supports.
- Target Android version: This is the version of the Android SDK your application is compiled against. Using higher numbers gives you access to new APIs; however, you might need to do some checks to prevent calling these APIs on older devices.
- Install Location: This defines the different locations your Android application can be installed to: auto (user settings), external (SD card), or internal (device internal memory).
These settings are shown as follows:
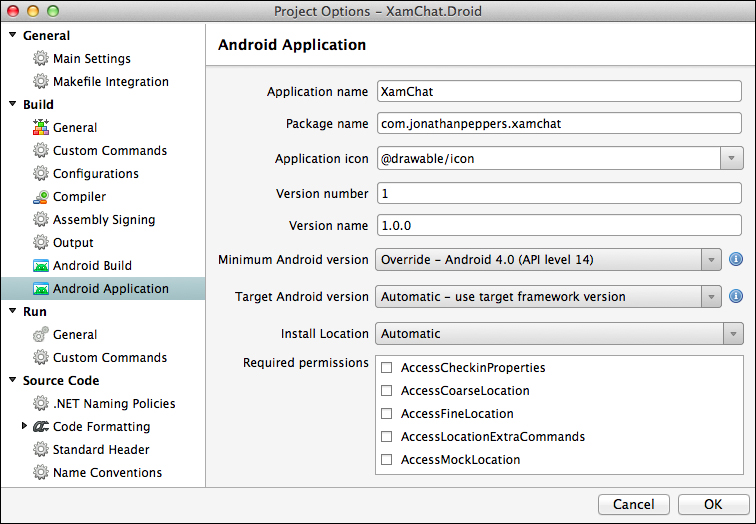
In addition to these settings, there is a set of checkboxes labeled Required permissions. These are displayed to users on Google Play prior to the application being installed. This is Android's way of enforcing a level of security, giving users a way to see what kinds of access an app will have to make changes to their device.
The following are some commonly used manifest permissions:
- Camera: This provides access to the device camera
- Internet: This provides access to make web requests over the internet
- ReadContacts: This provides access to read the device's contacts library
- ReadExternalStorage: This provides access to read the SD card
- WriteContacts: This provides access to modify the device's contacts library
- WriteExternalStorage: This provides access to write to the SD card
In addition to these settings, a manual change to Android Manifest will be required many times. In this case, you can edit the manifest file as you would a standard XML file in Xamarin Studio. For a complete list of valid XML elements and attributes, visit http://developer.android.com/guide/topics/manifest/manifest-intro.html.
Now let's fill out the following settings for our application:
- Application name:
XamChat - Package name:
com.yourcompanyname.xamchat; make sure to name future apps beginning withcom.yourcompanyname - Version number: Just start with the number
1 - Version: This can be any string, but it is recommended to use something resembling a version number
- Minimum Android version: Select Android 4.0.3 (API Level 15)
- Required permissions: Select Internet; we will be using it later
At this point, we need to add all of our code from the shared library to the project using the file-linking strategy. Create a new folder in the XamChat.Droid project named Core. Right-click, then click on Add | Add Files From Folder and add all the files from the XamChat.Core project. You will now be able to access all the shared code that was written in Chapter 4, XamChat – a Cross-platform App. Additionally, any changes we make to the core code will be made to the original files to keep everything in sync.
Go to the Resources directory, and in the values folder open Strings.xml; this is where all the text throughout your Android app should be stored. This is an Android convention that will make it very easy to add multiple languages to your application.
Let's change our strings to the following:
<?xml version="1.0" encoding="utf-8"?>
<resources>
  <string name="ApplicationName">XamChat</string>
  <string name="ErrorTitle">Oops!</string>
  <string name="Loading">Loading</string>
</resources>
We'll use these values later in the chapter; feel free to add new ones in cases where you display text to the user.
Now let's implement our main application class; add a new Android Class from the New File dialog. This is the same as the standard class template, but it adds several Android-using statements to the top of the file that imports the Android APIs to be used within your code. Create a new Application class where we can register everything in our ServiceContainer as follows:
[Application(Theme = "@android:style/Theme.Holo.Light")]
public class Application : Android.App.Application
{
  public Application(IntPtr javaReference, JniHandleOwnership transfer)
    : base(javaReference, transfer)
  {

  }

  public override void OnCreate()
  {
    base.OnCreate();

    //ViewModels
    ServiceContainer.Register<LoginViewModel>(
      () => new LoginViewModel());
    ServiceContainer.Register<FriendViewModel>(
      () => new FriendViewModel());
    ServiceContainer.Register<MessageViewModel>(
      () => new MessageViewModel());
    ServiceContainer.Register<RegisterViewModel>(
      () => new RegisterViewModel());

    //Models
    ServiceContainer.Register<ISettings>(
      () => new FakeSettings());
    ServiceContainer.Register<IWebService>(
      () => new FakeWebService());
  }
}
We used the built-in Android theme, Theme.Holo.Light, just because it is a neat theme that matches the default style we used on iOS.
Now let's implement a simple base class for all the activities throughout our app. Create an Activities folder in the XamChat.Droid project and a new file named BaseActivity.cs with the following contents:
[Activity]
public class BaseActivity<TViewModel> : Activity
  where TViewModel : BaseViewModel
{
  protected readonly TViewModel viewModel;
  protected ProgressDialog progress;

  public BaseActivity()
  {
    viewModel = ServiceContainer.Resolve(typeof(TViewModel)) as
      TViewModel;
  }

  protected override void OnCreate(Bundle bundle)
  {
    base.OnCreate(bundle);

    progress = new ProgressDialog(this);
    progress.SetCancelable(false);progress.SetTitle(Resource.String.Loading);
  }

  protected override void OnResume()
  {
    base.OnResume();
    viewModel.IsBusyChanged += OnIsBusyChanged;
  }

  protected override void OnPause()
  {
    base.OnPause();
    viewModel.IsBusyChanged -= OnIsBusyChanged;
  }
  void OnIsBusyChanged (object sender, EventArgs e)
  {
    if (viewModel.IsBusy)
      progress.Show();
    else
      progress.Hide();
  }
}
We did several things here to simplify the development of our other activities. First, we made this class generic, and made a protected variable named viewModel to store a view model of a specific type. Note that we did not use generics on controllers in iOS due to platform limitations (see more on Xamarin's documentation website at http://docs.xamarin.com/guides/ios/advanced_topics/limitations/). We also implemented IsBusyChanged, and displayed a simple ProgressBar function with the Loading string from the Strings.xml file to indicate network activity.
Let's add one more method for displaying errors to the user as follows:
protected void DisplayError(Exception exc)
{
  string error = exc.Message;
  new AlertDialog.Builder(this)
    .SetTitle(Resource.String.ErrorTitle)
    .SetMessage(error)
    .SetPositiveButton(Android.Resource.String.Ok,
      (IDialogInterfaceOnClickListener)null)
    .Show();
}
This method will display a pop-up dialog indicating that something went wrong. Notice we also used ErrorTitle and the built-in Android resource for an Ok string.
This will complete the core setup for our Android application. From here, we can move on to implement the UI for the screens throughout our app.