
Before creating Android views, it is important to know the different layouts or view group types available in Android. iOS does not have an equivalent for some of these because iOS has a very small variation of screen sizes on its devices. Since Android has virtually infinite screen sizes and densities, the Android SDK has a lot of built-in support for auto-sizing and layout for views.
The following are the common types of layout:
ViewGroup: This is the base class for a view that contains a collection of child views. You normally won't use this class directly.LinearLayout: This is a layout that positions its child views in rows or columns (but not both). You can also set weights on each child to have them span different percentages of the available space.RelativeLayout: This is a layout that gives much more flexibility on the position of its children. You can position child views relative to each other so that they are above, below, to the left, or to the right of one another.FrameLayout: This layout positions its child views directly on top of one another in the z order on the screen. This layout is best used for cases where you have a large child view that needs other views on top of it and perhaps docked to one side.ListView: This displays views vertically in a list with the help of an adapter class that determines the number of child views. It also has support for its children to be selected.GridView: This displays views in rows and columns within a grid. It also requires the use of an adapter class to supply the number of children.
Before we begin writing the login screen, delete the Main.axml and MainActivity.cs files that were created from the Android project template. Next, create an Android layout file named Login.axml in the layout folder of the Resources directory in your project.
Now we can start adding functionalities to our Android layout as follows:
- Double-click on the new layout file to open the Android designer.
- Drag two Plain Text views onto the layout found in the Text Fields section.
- In the Id field, enter
@+id/usernameand@+id/passwordrespectively. - For the password field, set its Input Type property to
textPassword. - Drag a Button onto the layout and set its Text property to
Login. - Set the button's Id property to
@+id/login.
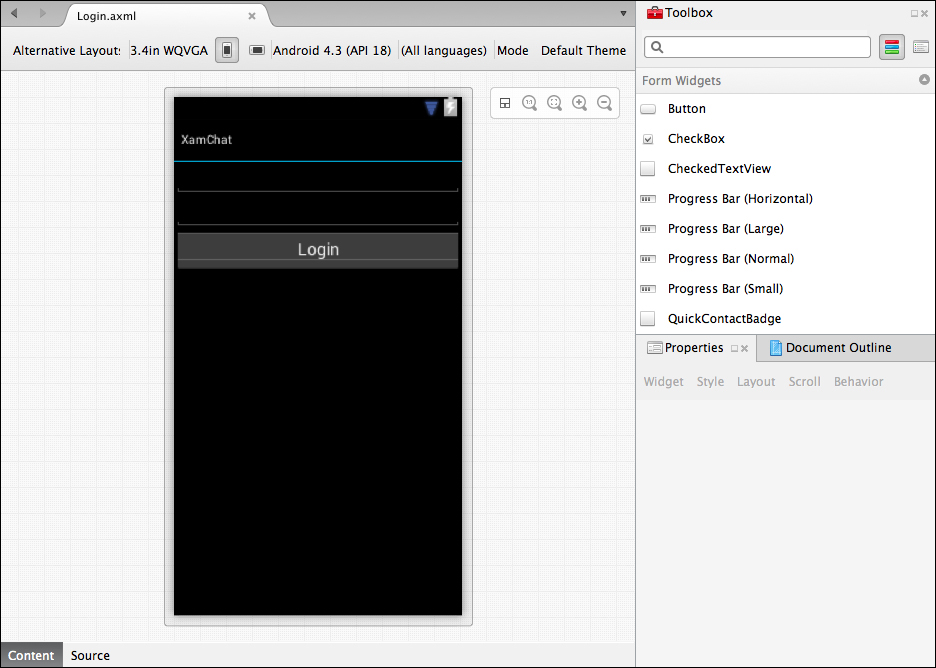
Your layout will look something like the following screenshot when complete:
Now create a new Android Activity file named LoginActivity.cs in the Activities folder we created earlier. Let's implement the login functionality as follows:
[Activity(Label = "@string/ApplicationName", MainLauncher = true)]
public class LoginActivity : BaseActivity<LoginViewModel>
{
  EditText username, password;
  Button login;

  protected override void OnCreate(Bundle bundle)
  {
    base.OnCreate(bundle);
    SetContentView(Resource.Layout.Login);
    username = FindViewById<EditText>(Resource.Id.username);
    password = FindViewById<EditText>(Resource.Id.password);
    login = FindViewById<Button>(Resource.Id.login);
    login.Click += OnLogin;
  }
  protected override void OnResume()
  {
    base.OnResume();
    username.Text =password.Text = string.Empty;
  }
  async void OnLogin (object sender, EventArgs e)
  {
    viewModel.Username = username.Text;
    viewModel.Password = password.Text;
    try
    {
      await viewModel.Login();
      //TODO: navigate to a new activity
    }
    catch (Exception exc)
    {
      DisplayError(exc);
    }
  }
}
Notice that we set MainLauncher to true to make this activity the first activity for the application. We also took advantage of the ApplicationName value and BaseActivity class we set up earlier in the chapter. We also overrode OnResume to clear out the two EditText controls so that the values are cleared out if you return to the screen.
Now if you launch the application, you will be greeted by the login screen we just implemented, as shown in the following screenshot:
