Since the first screen of our application will be a login screen, let's begin by setting up the appropriate views in the storyboard file. We will implement the login screen by using Xamarin Studio to write the C# code, and Xcode for creating iOS layouts in our storyboard file.
Return to the project in Xamarin Studio and perform the following steps:
- Double-click on the
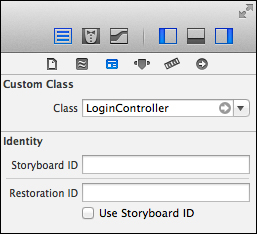
MainStoryboard.storyboardfile to open it in Xcode. - Select your view controller and click on the Identity Inspector tab. It is the third tab from the left, located on the right-hand side of the screen.
- Under the Custom Class section, enter
LoginControllerinto the Class field. - Save the file and return to Xamarin Studio. Notice that the
LoginControllerclass is generated for you. You may create aControllersfolder and move the file in it if you wish.
The following screenshot shows what the controller's settings will look like in Xcode after the changes have been made:
Now let's modify the layout of the controller by performing the following steps:
- Double-click on the
MainStoryboard.storyboardfile a second time to return to Xcode. - Drag two text fields onto the controller. Position and size them appropriately for the username and password entries.
- For the second field, check the Secure checkbox under the Text Field section. This will set the control to hide the characters for the password field.
- Drag a button onto the controller. Rename the button as
Login. - Drag an activity indicator onto the controller. Check the Animating and Hidden checkboxes.
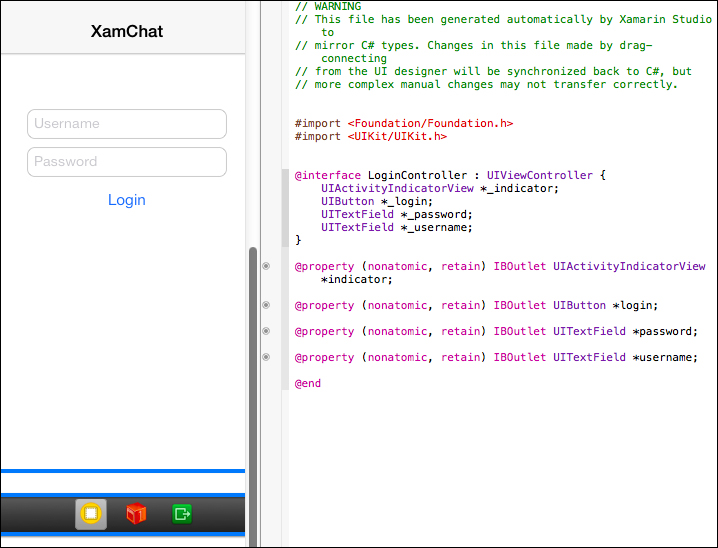
- Create an outlet for each of the controls. Toggle on the Assistant Editor by selecting the button in the top-right corner of Xcode that resembles a tuxedo, as shown in the following screenshot:

- You may have to select the
LoginController.hheader file in the upper navigation of the code window. - Next, create the outlets by right-clicking and dragging from each control to the header file. In the pop up that appears, name the outlets
username,password,login, andindicatorrespectively. - Save the header and storyboard files and return to Xamarin Studio.
Your outlet set up in the storyboard will look something like what is shown in the following screenshot:
Go ahead and compile the application to make sure everything is okay. At this point, we need to add all of our code from the shared library to the project using the file-linking strategy. Create a new folder in the XamChat.iOS project named Core. Right-click and go to Add | Add Files From Folder, and add all the files from the XamChat.Core project. You will now be able to access all the shared code we wrote in the previous chapter.
Next let's set up our iOS application to register all its view models and other services that will be used throughout the application. We will use the ServiceContainer class we created in Chapter 4, XamChat – a Cross-platform App, to set up dependencies throughout our application. Open AppDelegate.cs and add the following method:
public override bool FinishedLaunching(UIApplication application,NSDictionary launchOptions)
{
  //View Models
  ServiceContainer.Register<LoginViewModel>(() =>new LoginViewModel());
  ServiceContainer.Register<FriendViewModel>(() =>new FriendViewModel());
  ServiceContainer.Register<RegisterViewModel>(() =>new RegisterViewModel());
  ServiceContainer.Register<MessageViewModel>(() =>new MessageViewModel());

  //Models
  ServiceContainer.Register<ISettings>(() =>new FakeSettings());
  ServiceContainer.Register<IWebService>(() =>new FakeWebService());
}
Down the road, we will replace the fake services with real ones. Now let's add the login functionality to LoginController.cs. First add LoginViewModel to a member variable at the top of the class as follows:
readonly LoginViewModel loginViewModel =ServiceContainer.Resolve<LoginViewModel>();
This will pull a shared instance of LoginViewModel into a local variable in the controller. This is the pattern we will use throughout the book in order to pass a shared view model from one class to another.
Next, override ViewDidLoad to hook up the view model's functionality with the views set up in outlets as follows:
public override void ViewDidLoad()
{
  base.ViewDidLoad();

  login.TouchUpInside += async(sender, e) =>
  {
    loginViewModel.Username = username.Text;
    loginViewModel.Password = password.Text;

    try
    {
      await loginViewModel.Login();

      //TODO: navigate to a new screen
    }
    catch (Exception exc)
    {
      new UIAlertView("Oops!", exc.Message, null, "Ok").Show();
    }
  };
}
We'll add the code to navigate to a new screen later in the chapter.
Next, let's hook up the IsBusyChanged event to actually perform an action as follows:
public override void ViewWillAppear()
{
  base.ViewWillAppear();

  loginViewModel.IsBusyChanged += OnIsBusyChanged;
}

public override void ViewWillDisappear()
{
  base.ViewWillDisappear();

  loginViewModel.IsBusyChanged -= OnIsBusyChanged;
}

void OnIsBusyChanged(object sender, EventArgs e)
{
  username.Enabled =
    password.Enabled =
    login.Enabled =
    indicator.Hidden = !loginViewModel.IsBusy;
}
Now you might ask, why do we subscribe to the event in this manner? The problem is that the LoginViewModel class will exist through your application's lifetime, while the LoginController class will not. If we subscribed to the event in ViewDidLoad but didn't unsubscribe from it later, then our application would have a memory leak. We also avoided using a lambda expression for the event, since it would otherwise be impossible to unsubscribe the event. Note that we don't have the same problem with the TouchUpInside event on the button, since it will live in memory the same amount of time as the controller does. This is a common problem with events in C#, which is why it is a good idea to use the preceding pattern on iOS.
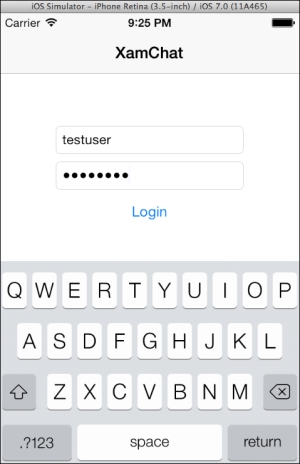
If you run the application now, you should be able to enter a username and password, as shown in the following screenshot. On pressing Login, you should see the indicator appear and all the controls disabled. Your application will call the shared code correctly, and should function correctly when we add a real web service.