Before we start implementing the friends list screen, we must first add a menu item to ActionBar in our application. Begin by creating a new menu folder within the Resources folder of our project. Next, create a new Android Layout file named ConversationsMenu.axml. Remove the default layout XML created and replace it with the following:
<?xml version="1.0" encoding="utf-8"?>
<menu xmlns:android="http://schemas.android.com/apk/res/android">
  <item android:id="@+id/addFriendMenu"
    android:icon="@android:drawable/ic_menu_add"
    android:showAsAction="ifRoom"/>
</menu>
We set up a root menu with one menu item inside it.
The following is a breakdown of what we set for the item in XML:
android:id: We will use this later in C# to reference the menu item withResource.Id.addFriendMenu.android:icon: This is an image resource to display the features for the menu item. We used a built-in Android one for a generic plus icon.android:showAsAction: This will make the menu item visible if there is room. If for some reason the device's screen is too narrow, an overflow menu will be displayed for the menu item.
Now we can make some changes in ConversationsActivity.cs to display the menu item as follows:
public override bool OnCreateOptionsMenu(IMenu menu)
{
  MenuInflater.Inflate(Resource.Menu.ConversationsMenu, menu);
  return base.OnCreateOptionsMenu(menu);
}
This code will take our layout and apply it to the menu at the top in our activity's action bar. Next, we can add some code to be run when the menu item is selected as follows:
public override bool OnOptionsItemSelected(IMenuItem item)
{
  if (item.ItemId == Resource.Id.addFriendMenu)
  {
    //TODO: launch the next activity
  }
  return base.OnOptionsItemSelected(item);
}
Now let's implement the next activity. Begin by making a copy of Conversations.axml found in the layout folder in the Resources directory and rename it to Friends.axml. The only change we'll make in this file will be to rename the ListView's ID to @+id/friendsList.
Next, perform the following steps to create a layout that can be used for the list items in ListView:
- Make a new Android Layout called
FriendListItem.axml. - Open the layout and switch to the Source tab found at the bottom of the screen.
- Change the root
LinearLayoutXML element to aRelativeLayoutelement. - Switch back to the Content tab found at the bottom of the screen.
- Drag a Large Text control from the Toolbox onto the layout and set Id to
@+id/friendName. - Drag an ImageView control from the Toolbox onto the layout; you can either let Id be its default value or blank it out.
- Change the image of
ImageViewto@android:drawable/ic_menu_add. This is the same plus icon we used earlier in the chapter. You can select it from the Resources dialog under the Framework Resources tab. - Set the Width and Height fields of both the controls to
wrap_content. This is found under the Layout tab, under the ViewGroup section. - Next, check the value for Align Parent Right on just the image view.
- Finally, set the Margin fields of both the controls to
3dpin the Layout tab of the Properties box.
Using the Xamarin designer can be very productive, but some developers prefer a higher level of control. You might consider writing the XML code yourself as an alternative, which is fairly straightforward as in the following code:
<?xml version="1.0" encoding="utf-8"?>
<RelativeLayout
  xmlns:android="http://schemas.android.com/apk/res/android"
  android:layout_width="fill_parent"
  android:layout_height="fill_parent">
  <TextView
    android:text="Large Text"
    android:textAppearance="?android:attr/textAppearanceLarge"
    android:layout_width="wrap_content"
    android:layout_height="wrap_content"
    android:id="@+id/friendName"
    android:layout_margin="3dp" />
  <ImageView
    android:src="@android:drawable/ic_menu_add"
    android:layout_alignParentRight="true"
    android:layout_width="wrap_content"
    android:layout_height="wrap_content"
    android:layout_margin="3dp" />
</RelativeLayout>
Since we now have all the layouts we need for the new screen, let's create an Android Activity in the Activities folder named FriendsActivity.cs. Let's create the basic definition of the activity as follows, just like we did before:
[Activity(Label = "Friends")]
public class FriendsActivity : BaseActivity<FriendViewModel>
{
  protected override void OnCreate(Bundle bundle)
  {
    base.OnCreate(bundle);
  }
}
Now, let's implement a nested Adapter class for setting up the list view items as follows:
class Adapter : BaseAdapter<User>
{
  readonly FriendViewModel friendViewModel =
    ServiceContainer.Resolve<FriendViewModel>();
  readonly LayoutInflater inflater;
  public Adapter(Context context)
  {
    inflater = (LayoutInflater)context.GetSystemService (
      Context.LayoutInflaterService);
  }
  public override long GetItemId(int position)
  {
    return friendViewModel.Friends [position].Id;
  }
  public override View GetView(int position, View convertView, ViewGroup parent)
  {
    if (convertView == null)
    {
      convertView = inflater.Inflate (
        Resource.Layout.FriendListItem, null);
    }
    var friend = this [position];
    var friendname = convertView.FindViewById<TextView>(
      Resource.Id.friendName);
    friendname.Text = friend.Username;
    return convertView;
  }
  public override int Count
  {
    get { return friendViewModel.Friends == null ? 0
      : friendViewModel.Friends.Length; }
  }
  public override User this[int index]
  {
    get { return friendViewModel.Friends [index]; }
  }
}.
There is really no difference in this adapter and the previous one we implemented for the conversations screen. We only have to set the friend's name, and we use the User object instead of the Conversation object.
To finish setting up the adapter, we can update the body of the FriendsActivity class as follows:
ListView listView;
Adapter adapter;
protected override void OnCreate(Bundle bundle)
{
  base.OnCreate(bundle);
  SetContentView(Resource.Layout.Friends);
  listView = FindViewById<ListView>(Resource.Id.friendsList);
  listView.Adapter =adapter = new Adapter(this);
}
protected async override void OnResume()
{
  base.OnResume();
  try
  {
    await viewModel.GetFriends();
    adapter.NotifyDataSetInvalidated();
  }
  catch (Exception exc)
  {
    DisplayError(exc);
  }
}
And last but not least, we can update OnOptionsItemSelected in the ConversationsActivity class as follows:
public override bool OnOptionsItemSelected(IMenuItem item)
{
  if (item.ItemId == Resource.Id.addFriendMenu)
  {
    StartActivity(typeof(FriendsActivity));
  }
  return base.OnOptionsItemSelected(item);
}
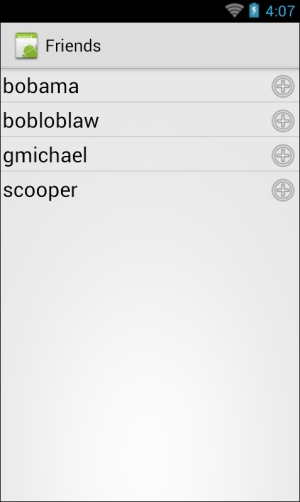
So if we compile and run the application, we can navigate to a fully implemented friends list screen, as shown in the following screenshot:

