
Stationery in Lotus Notes is a similar concept to templates in Microsoft Word, we can create a message that has information in it that we will reuse. For example many HR departments have a standard message they send to announce job vacancies. The IT department may send out a standard message announcing server outage, among other reasons. The information in these messages is predominately the same. For example, the server outage memo would have a different server name and date but the other information such as the value in the To and Subject fields would remain the same. Therefore using stationery in these instances saves us from having to recreate the message each time. I have come across quite a few people who have created Stationery to send when they are booking flights or accommodation. The stationery includes their frequent flyer information as well as passport details and so on. They typically will also include a table with headings such as Date, Time, Depart From, Arrive At, and so on so that when they are requesting flights they simply just enter details and tab through the table.
We can create stationery with text or graphics and include a recipient list that we can reuse.
Tip
If the Stationery includes an attachment, we can edit the attachment each time we need to send the stationery.
To create stationery is very simple. There are three options, which are as follows:
Option 1:
- Create a message and add required text, recipient list (if necessary), delivery options, and any other elements we require in the message.
- From the More button, select Save as Stationery; we will see a prompt requesting a name for the stationery.

- Type in name and click the OK button (or press the Enter key).
- Stationery will be saved in the Stationery folder.

Option 2:
- In the mail side navigator, expand Tools and then select Stationery.
- Click New Stationery | Message.
- Add required text, recipient list (if necessary), delivery options, and any other elements we require in the message.
- Click Save, type a name for the stationery, and then click OK.
Option 3:
- In the mail side navigator, expand Tools and then select Stationery.
- Click New Stationery | Personal.
- Between the first set of brackets under Header, insert any text or graphics to show at the top of the message. Note that importing is the best way to include graphics.
- Between the set of red brackets, insert any text or graphics to show directly before the body of the message.
- Between the last set of brackets, insert any text or graphics to show at the bottom of the page. If we want to add our signature to this field, we can insert it between the red brackets and then cut and paste it between the last set of brackets.
- Click Save, type a name for the stationery, and then click OK.
Often we need to tweak the stationery that we have created. We may need to change the recipient list or add a new section to the body of the memo. Other times we may need to delete stationery as it is not longer required or we may need to rename stationery.
The following are steps we need to follow to edit, rename, or delete stationery:
- In the mail side navigator, expand Tools and then select Stationery.
- Select the stationery to change.
- Perform any one of the following:
- Click Edit, make changes to the stationery, and then click Save.
- Click Rename, type a new name for the stationery, and then click OK.
- Click the trash icon to delete the stationery.

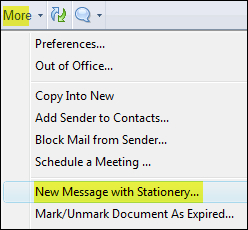
Once we have created our stationery, we will find it very easy to use. Stationery is stored in the Stationery folder. To use stationery, we can go to the Stationery folder and double-click on the stationery we require. Alternatively, if we are in our inbox, we can click the More button and select New Message with Stationery; this will open a prompt box listing the stationery stored in the Stationery folder, we need to select the Stationery we require.
Stationery that is most often used can be bookmarked so it can be easily accessed. We can do this by opening the stationery message and then dragging the window tab of the opened stationery to the Open button or the Bookmark Bar. This will result in the stationery being listed in our Open button or the Bookmark Bar. The following screenshot shows that I have bookmarked the Travel request stationery. When I need to use the Travel request stationery, I simply click to open it from the Open button or the Bookmark Bar.

If we find ourself searching for the last e-mail we sent to a person(s), copying the contents to the clipboard, pasting it into a new memo, making some slight changes and then sending it on a regular basis, it is time we think about using stationery!