
ESSID is the sequence of characters that uniquely identify a wireless local area network. Hiding the ESSID is a poor method of attempting to achieve security through obscurity; unfortunately, the ESSID can be obtained by doing either of the following:
- Sniffing the wireless environment and waiting for a client to associate to a network and then capturing that association
- Actively deauthenticating a client to force the client to associate and then capturing that association
The aircrack tools are particularly well-suited to capture the data that's needed to unhide a hidden ESSID, as shown in the following steps:
- At the command prompt, confirm that wireless is enabled on the attacking system by entering the following command:
root@kali:~# airmon-ng
- Next, use the following ifconfig command to review the available interfaces and to determine the exact name that's used by your wireless system:
root@kali:~# ifconfig
- Enable your wireless interface by entering the following (you may need to replace wlan0 with an available wireless interface that was identified in the previous step):
root@kali:~# airmon-ng start wlan0
- If you reconfirm with ifconfig, you will see that there is now a monitoring or wlan0mon address in use. Now use airodump to confirm the available wireless networks, by entering the following command:
root@kali:~# airodump-ng wlan0mon

As you can see, the first network's ESSID is identified only as <length: 0>, as it appears in the preceding screenshot. No other name or designation is used. The length of the hidden ESSID is identified as being composed of nine characters; however, this value may not be correct because the ESSID is hidden. The true ESSID length may actually be shorter or longer than nine characters.
What is important is that there may be clients attached to this particular network. If clients are present, we will de-authenticate the client, forcing them to send the ESSID when they reconnect to the access point.
- Rerun airodump and filter out everything but the target access point. In this particular case, we will focus on collecting data from the hidden network on channel six using the following command:
root@kali:~# airodump-ng -c 11 wlan0mon
Executing this command removes the output from the multiple wireless sources, and allows the attacker to focus on the target ESSID, as shown in the following screenshot:
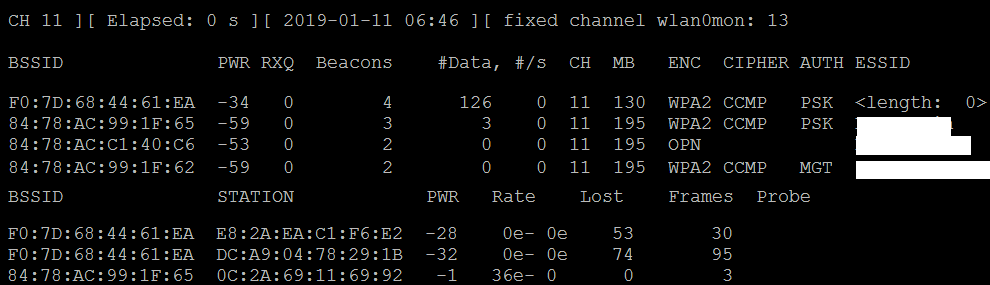
The data that we get when the airodump command is executed indicates that there are two stations (E8:2A:EA:C1:F6:E2 and DC-A9:04:78:29:1B) connected to the BSSID (F0:7D:68:44:61:EA), which is, in turn, associated with the hidden ESSID.
- To capture the ESSID as it is being transmitted, we need to create a condition where we know it will be sent—during the initial stage of the connection between a client and the access point.
Therefore, we will launch a de-authentication attack against both the client and the access point by sending a stream of packets that breaks the connection between them and forces them to re-authenticate.
To launch the attack, open a new command shell and enter the command that's shown in the following screenshot (0 indicates that we are launching a deauthentication attack, 10 indicates that we will send 10 deauthentication packets, -a is the target access point, and c is the client's MAC address):

- After all the de-authentication packets have been sent, return to the original window that monitors the network connection on channel six, as shown in the following screenshot:

You will now see the ESSID in the clear.
Knowing the ESSID helps an attacker to confirm that they are focused on the correct network (because most ESSIDs are based on the corporate identity) and facilitates the logon process.