
As the project server administrator, you have the capability to create custom pages, views, and reports for your Project Web Access users. Do this to make Project Web Access clearly reflect your organization and also to provide users with information where and when they need it.
Pages are the major screens you see as you move from area to area within Project Web Access. For example, Server Settings is a page, Project Center is a page, and Resource Center is a page. You can add and remove elements on most pages by editing the page’s Web Parts, which are the content components that make up the page.
On the other hand, views are subsets of pages. Views specify a certain collection or format of information within a page. For example, the default view for the Project Center page is the Summary view. But you can switch to the Cost view or the Tracking view.
Reports in Project Web Access are PivotTables and PivotCharts that are built dynamically and displayed from selected fields of project information. As the project server administrator, you set up various groupings of project fields. These groupings, or cubes, are then made available to users such as portfolio managers and executives to select the information they want for their analyses and reports.
Project Web Access is essentially a Web site made up of a series of pages. The elements on these pages come from a collection of predesigned Web Parts. Web Parts are self-contained, reusable components that consist of types of information varying from sophisticated dynamic Web page content embedded in a frame to simple concise text messages. Generally, most features and content that can be seen on a Web page can be included as a Web Part. Web Parts group and position all key information logically and consistently; the information is accessed through hyperlinks.
You can use Web Parts to develop Web page components in Project Web Access that convey key project information efficiently for your team or organization.
For example, the My Tasks page is made up of the My Tasks Web Part, and the Project Center is made up of the Project Center Web Part. But you could put the two together to create a new page that has both of these together. You can add the Reminders Web Part to the Timesheet page if you learn that’s what your users need.
Web Parts are a function of Windows SharePoint Services, which is the basis for Project Web Access.
You can modify the structure and content category of any Project Web Access page, including the home page. To do this, follow these steps.
In Project Web Access, navigate to the page you want to change.
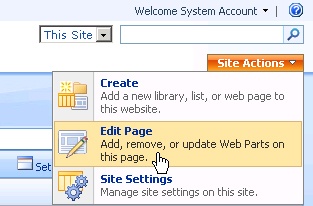
Click the Site Actions button in the upper-right corner of the window and then click Edit Page.
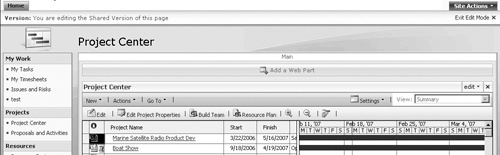
The page is redrawn with several Add A Web Part controls (see Figure 21-22). One is at the top of the page (header), one is at the bottom of the page (footer), and three are in a row (left column, middle column, and right column) in roughly the center of the page. In addition, a title bar is added to each Web Part element already existing on the page. An Edit and Delete control sits at the right edge of the title bar.
Using the Web Parts controls, edit the page:
To add a new Web Part, click the Add A Web Part control that is closest to the area where you want the new Web Part to be positioned. In the Add Web Parts dialog box, select the check box next to the Web Part you want to add. Scroll through the list to see them all. Click Add. The Web Part is added to the page.
To edit an existing Web Part, click the Edit button on the right edge of the Web Part’s title bar and then click Modify Shared Web Part. A task pane appears on the right side of the window (see Figure 21-23). Specify how you want to modify the Web Part. The choices will be different depending on the nature of the Web Part. However, most Web Parts provide choices for Appearance, Layout, and Advanced. Click OK or Apply at the bottom of the Web Part pane to implement your changes in the page.
To delete a Web Part on a page, click the Close (X) button on the right edge of the Web Part’s title bar. The page is redrawn with that Web Part removed.
When finished making changes to Web Parts on the current page, click Exit Edit Mode in the upper-right corner of the page, just under Site Actions.
The Web Parts controls disappear, and the changes you made are shown on the page.

You can create an entirely new page and arrange the Web Parts you want on it. To do this, follow these steps:
On any page in Project Web Access, click the Site Actions button in the upper-right corner of the window and then click Create.
On the Create page, under Web Pages, click Web Part Page.
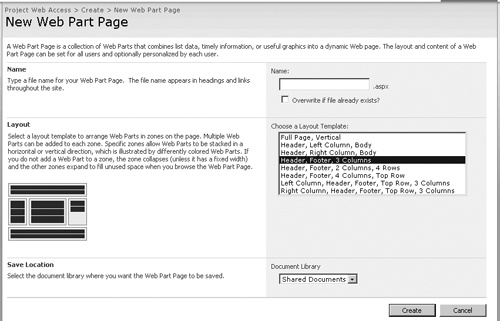
On the New Web Part Page page, enter the name that you want to appear in headings and links throughout Project Web Access when referring to this new page.
In the Layout section, in the Choose A Layout Template box, click the page layout you want for the new page (see Figure 21-24).
In the Save Location section, click the document library where this Web page is to be saved.
Click Create.
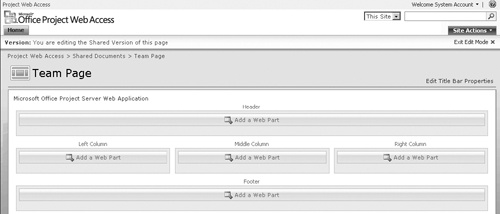
The page is created and appears as a page filled only with Web Parts controls (see Figure 21-25).
Click the Add A Web Part control that is closest to the area where you want the new Web Part to be positioned.
In the Add Web Parts dialog box, select the check box next to the Web Part you want to add. Scroll through the list to see them all.
Click Add.
The Web Part is added to the page.
Repeat steps 7–9 for any additional Web Parts you want to add to this new page.
When finished adding Web Parts to the new page, click Exit Edit Mode.
The new page appears according to your specifications.
To delete an entire Web page in Project Web Access, in the Quick Launch task bar, click Shared Documents. Any pages you have created are listed. Click the arrow in the box that appears when you move the mouse over the name of the page. Then click Delete. To return to Project Web Access, click the Home tab in the upper-left corner.
Note
For more information about working with Web Parts, Site Actions, project workspaces, and other aspects of Windows SharePoint Server, see the Windows SharePoint Services 3.0 Technical Library, available at go.microsoft.com/fwlink/?LinkId=81199.
Project 2007 has a new method for extending functionality and integrating project information with other applications. Through the new application program interface (API) called the Project Server Interface (PSI), which works with the Windows Workflow Foundation, you can integrate information between your project server and other organizational systems that interact with project management processes, such as accounting, procurement, and human resources. In fact, the means through which Project Professional and Project Web Access interact with Project Server 2007 is solely through the Project Server Interface.
The Project Server Interface also provides the means for solutions built with the XML-based Project Data Service (PDS) methods in Project Server 2003 to be ported to Project Server 2007.
Depending on other resources in use by your organization, you can also integrate Outlook and Active Directory for additional functionality.
Note
For information about the Project Server Interface, the Event Modeler, and Windows Workflow Foundation, refer to the Project 2007 Software Development Kit, available at http://msdn2.microsoft.com/en-us/library/bb187382.aspx.
Many pages throughout Project Web Access only need to display a single view of project data. Examples of such pages include the home page, the Proposals And Activities page, and the Personal Settings page.
The use of other pages, however, benefit from the availability of different views of project data. Such pages include:
My Tasks
My Timesheets
Project Center
Resource Center
Data Analysis
A view is a collection of selected fields filtered in a particular way, laid out in a certain format, with certain permissions applied. The Project Center page includes the Cost, Earned Value, Project Owner, Summary, Tracking, and Work views. To see the views available for one of these pages, the user selects from the View box in the upper-right corner of most pages throughout Project Web Access.
You can modify existing Project Web Access views or create new views to add to a page. When defining a view, you can specify the following types of information:
View name and description
The fields to be displayed in the view’s table
Formatting for the view, including Gantt Chart format if applicable, outline levels, grouping format, and sort order
The filter to be applied to the view’s information
The security categories that the view belongs to
To modify an existing view, follow these steps:
On the Server Settings page, under Look And Feel, click Manage Views.
All views used throughout Project Web Access are listed under their categories.
Click the name of the view you want to change.
The Edit View page appears.
Go to the section that contains the aspect of the view you want to change, for example, the fields included in the view are in the Table And Fields section, whereas the filter applied to this view is in the Filter section.
Click Save.
The view is now changed for all Project Web Access users.
You can create a new view that uses an existing view as its starting point. To do this, follow these steps:
On the Server Settings page, under Look And Feel, click Manage Views.
On the Manage Views page, click somewhere to the right of the name of the view you want to copy. Don’t click the name of the view itself, or you’ll open the Edit View page instead.
Click Copy View. Enter the name for the new view and then click OK.
The copied view appears in the list.
Click the name of the copied view to open the Edit View page and then make the changes you want. Click Save when finished.
If you prefer, you can create a new view from a completely clean slate. To do this, follow these steps:
On the Server Settings page, under Look And Feel, click Manage Views.
Click New View.
In the Name And Type section, click the type of view you want from the View Type drop-down list.
This view type determines the page on which your new view will become available.
Work through the sections of the New View page to define the view.
The new view is added to the list and is also now available to apply to the page you specified through the Views drop-down list.
You can delete a view you have created. To do this, follow these steps:
On the Server Settings page, under Look And Feel, click Manage Views.
On the Manage Views page, click somewhere to the right of the name of the view you want to delete. Don’t click the name of the view itself, or you’ll open the Edit View page instead.
Click Delete View and then click OK in the alert that appears.
The view is deleted from the list.
To change the Quick Launch task bar to better suit the needs and preferences of your organization, follow these steps:
On the Server Settings page, under Look And Feel, click Quick Launch.
In the Configure Quick Launch Behavior section, specify how menu items should be expanded or collapsed within their sections.
In the Set Menu Item Details section, you can do the following:
Edit the name or Web address of a link in the Quick Launch task bar. Click the link name to open the Add Or Edit Link page. Enter a different name in the Custom Link Name field or enter a different URL in the Custom Web Address field.
Hide a link in the Quick Launch task bar. Click the link name to open the Add Or Edit Link page. In the Display Links In Quick Launch box, click No.
Change the order of links on the Quick Launch task bar. Click anywhere to the right of the link whose position in the list you want to change. Don’t click the name of the item itself, or you’ll open the Add Or Edit Link page. Click the Move Up or Move Down button until the link appears in the position you want.
Create a new link. Click New Link to open the Add Or Edit Link page. In the URL section, enter the name of the link as it should appear on the Quick Launch task bar. Also enter the Web address for the link. In the Heading section, select the location where the new link should appear on the Quick Launch task bar.
Delete a link you created. Click anywhere to the right of the link to select it and then click Delete Link.
When finished, click Save.
Executives and other managing stakeholders can review aspects of all projects managed by the project server by using the Data Analysis services, which dynamically generate reports of summary or detailed project information needed for a single project or any collection of projects. These services providing reports in Project Web Access are also referred to as the Portfolio Analyzer.
Through the use of the Data Analysis services, managing stakeholders can review a high-level picture of tasks, resources, assignments, schedules, progress, costs, and other information across one, several, or all projects in the organization.
Data Analysis is implemented through the use of online analytical processing (OLAP) tools provided by SQL Server Analysis Services and the Cube Building Services in conjunction with Project Server 2007 and Project Web Access.
As the project server administrator, you must first configure the Data Analysis Services and create the OLAP cubes to then make these OLAP cubes available to users. The cubes, or dynamic reports, are added to the View list of the Data Analysis page for users to manipulate and view. Users can add, move, or delete fields in the resulting PivotTable or PivotChart.
Note
For more information about how managing stakeholders use OLAP cubes configured for the Data Analysis page to analyze project information and generate reports, see the section titled Analyzing and Reporting on Project Information in Chapter 24.
To specify the date range and update frequency for building the OLAP cubes, follow these steps:
On the Server Settings page, under Cube, click Build Settings.
In the Cube Build Settings page, make sure the Analysis Services Settings are complete.
You might need to obtain some of this information from your SQL Server administrator.
In the Database Date Range section, indicate the date range of information for which the cube is to be built.
In the Cube Update Frequency section, indicate how often you want the cube to be refreshed.
You can specify an automatic update at regular intervals or a manual update whenever you specify.
Remember that frequent updates are important for the users generating reports from the cube. Balance this priority with the knowledge that building the cube takes project server resource time and can delay other processes in the queue if you specify that the cube be updated too often.
Click Save or Save And Build Now.
Note
If you ever want to check the status of your OLAP cubes, on the Server Settings page, under Cube, click Build Status.
You can build 11 cubes in Project Server 2007. These cubes are:
Project Non-Timephased
Resource Non-Timephased
Resource Timephased
Task Non-Timephased
Assignment Non-Timephased
Assignment Timephased
Timesheet
EPM Timesheet
Issues
Risks
Deliverables
To build the cubes, follow these steps:
On the Server Settings page, under Cube, click Configuration.
In the Cube Dimensions section of the Cube Configuration page, select the cube (Project, Task, Resource, or Assignment) in the Cube box. From the list of available fields, select the fields that you want to make up the cube and then click Add. Select another cube in the Cube box and select the fields for that cube. Repeat this process until fields are identified as dimensions for each of the four cubes.
In the Cube Measures section, select the cube you want in the Cube box. In the Available Fields box, select the custom fields to be added. Repeat this process for all the cubes to which you want to add custom fields. If there are no custom fields for a cube, or if identified custom fields contain no data, the Available Fields box is empty.
If you want to further customize a cube with a Multiple Dimension Expression (MDX) script, you can do so in the Calculated Measures box. Select the cube and then click Insert in the table. Click under Member Name and type a name for the calculated member. Under MDX Expression, type the MDX script that defines the member. Repeat this process for all the cubes for which you want to identify MDX expressions.
Click Save.
Note
For more information about configuring your OLAP cubes for data analysis, see the article at http://technet2.microsoft.com/Office/f/?en-us/library/5d90076f-bbcc-48c1-a569-bd236862d47c1033.mspx in the Office Project Server 2007 Technical Library.