
Team members use Project Web Access primarily to track and update their tasks assigned from one or more projects. This is done on the My Tasks page.
Team members can also use the Windows SharePoint Services features built in to Project Web Access to manage issues and risks that have been assigned to them for resolution. This is done on the Issues And Risks page.
New in Project Server 2007 is the ability to submit timesheets that track different categories of time, for example, billable time, nonbillable time, billable overtime, and nonbillable overtime. This is done on the My Timesheets page.
These three pages are available under My Work in the Quick Launch task bar.
Note
In previous versions of Project Web Access, the task progress page was called the timesheet. Now in Project 2007, the timesheet is a different page and serves a different, but complementary, purpose to the task progress page.
Your organization might choose to use just the My Tasks page alone, or it might decide to implement the My Tasks page in conjunction with the timesheet. To use either or both of these pages successfully, you must understand the differences between the two as well as how they work together.
The My Tasks page, also referred to as the task progress page, is the page that team members work with to track and update their tasks assigned from one or more projects (see Figure 21-18). As the project server administrator, you can customize the My Tasks page to suit the needs of your organization.

Figure 21-18. Design the task progress page to fit the requirements of your organization and its projects.
Team members use the My Tasks page to see the tasks they’re assigned to, their scheduled start and finish dates, and other assignment information. They also use this page to periodically report on current progress, submitting this progress information to their project manager for incorporation into the project plan.
The My Timesheets page is used in organizations that have specific time reporting requirements. For example, use the timesheet when you want visibility into certain time categories, for example, billable and nonbillable time, scheduled and actual time, overtime, and so on. Default time categories are provided, but you can set up custom time categories as appropriate. The timesheet is especially useful when you need to integrate information about resource time with an accounting or general ledger system, particularly for client billing purposes.
In the timesheet, team members can also set up and use the administrative time feature, in which they can identify instances of nonproject working time or nonworking time.
Similar to task progress on the My Tasks page, team members submit timesheets to their designated timesheet managers on a periodic basis.
You do not have to use both task progress and timesheets. If you do not have specialized time reporting needs outside the project plan, then just use the task progress page to update the project plan.
However, use both if you need to update the project plan as well as an accounting or general ledger system.
Remember that the task progress page indicates status on how complete a task assignment is, while the timesheet indicates the number of hours spent per day or per week doing various activities. The two are often, but not always, related.
For example, suppose the project team is working for a customer who is to be billed 8 hours per day (40 hours per week) for the contracted work. The timesheet would reflect this, and invoices would be generated for the customer from the timesheet showing 8 hours a day for 5 days a week. However, the resource might actually be working 10 hours a day to complete the tasks by a certain deadline. The task progress page would show this, and be reflected in project actuals, but would have no impact on the timesheet or the customer billing.
Team members can import information from their task progress page into their timesheet page and vice versa.
To set up the task progress page (the My Tasks page), you need to establish the update method and rules used by your organization. If you need to, you can also change the fields and the type of Gantt Chart used on the page.
Note
For more information about how team members work with the My Tasks page, see the section titled Tracking Assignments and Submitting Progress Updates in Chapter 23.
With your project server administrator privileges, you define the assignment progress tracking method that is then reflected on the My Tasks page. The tracking method can be as simple as noting whether an assignment is not started, in progress, or completed. It can also be as detailed as tracking every hour devoted to each assignment.
Depending on the level of project management control that your organization needs, you can set up a number of assignment update restrictions. You can specify whether time should be reported every day or just once a week. You can specify whether project managers have the capability to edit updates submitted by team members. You can close tasks to further update by anyone after a certain period of time.
Work with the project managers, the portfolio manager, and the requirements of the organization to determine the most appropriate default tracking method. After setting the default, project managers might still be able to switch to a different tracking method for their own projects, but only if you allow that possibility in your project server configuration.
The three tracking methods are as follows:
Percentage of work complete. This is the least restrictive and least time-consuming tracking method. The My Tasks page includes a field that team members use to update how far along they are with their assignments.
Actual work done and remaining work. This tracking method provides a medium level of detail. With this method, the My Tasks page includes fields for total actual work and remaining work for each assignment. Team members enter those total amounts for each progress update requested.
Hours of work done per time period. This is the most detailed tracking method. The My Tasks page includes a field for each time period, either days or weeks, for the duration of the project. Team members enter the number of hours worked per day or per week and submit this information with each progress update.
In addition to the default tracking method, you can also control when actuals are accepted and whether they can be changed after they’ve been submitted to the project server.
Note
For more information about tracking actual work in Project 2007, see the section titled Using Resource Work to Update Progress in Chapter 10.
To set the default tracking method and certain update restrictions, follow these steps:
On the Server Settings page, under Time And Task Management, click Task Settings And Display.
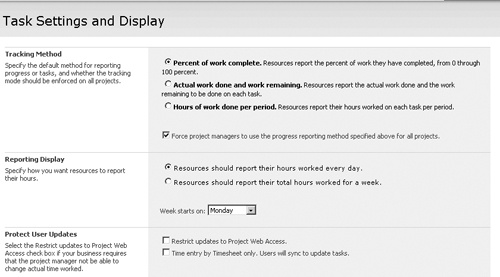
The Task Settings And Display page appears (see Figure 21-19).
In the Tracking Method section, select the option for the tracking method that represents the default for your organization: Percent Of Work Complete, Actual Work Done And Work Remaining, or Hours Of Work Done Per Period.
Select or clear the Force Project Managers To Use The Progress Reporting Method Specified Above For All Projects check box. If this check box is cleared, project managers are allowed to change the tracking method in their individual projects. If this check box is selected, project managers must always use the default method selected on this page.
If you allow project managers to change the default tracking method, they can do so by clicking Tools, Options, Collaborate In Project Professional 2007.
Work through the other options on this page, reading the information in the left pane of each section for additional guidance. Options include whether team members should report their hours each day or at the end of the week, and whether the project manager is permitted to change actual time worked as reported by the team members.
When finished, click Save.
Another restriction you can apply to protect actual progress information is to close completed tasks to prevent any further updates from being submitted on them. This is also known as locking down the tasks. On the Server Settings page, under Time And Task Management, click Close Tasks To Update. In the Project section, select the project that contains the tasks you want to lock down. The tasks in that project are listed in the Select Tasks section. Select the check box next to the task you want to close. Click Publish or Submit.
The My Tasks page is set up with a standard set of task and assignment fields. That set of fields changes according to the tracking method chosen. You can change the fields that the team members see on their task progress page. As the project server administrator, you can choose from the full set of Microsoft Project fields to establish the set of available Timesheet fields.
Note
In Microsoft Office Project 2003 and earlier versions, the project server administrator could set a collection of available fields for the task progress page. Project managers then could select fields from this collection to tailor the task progress page for their individual projects.
In Microsoft Office Project 2007, this functionality is no longer available. To provide for consistency among projects and better reporting, it’s best for the task progress pages to all have the same fields.
If you have defined any custom enterprise fields, including custom fields with a drop-down "pick list" or lookup table, you can include them in the set of default task progress fields as well.
Note
For more information about defining custom enterprise task fields, including defining drop-down lookup tables, see the section titled Customizing Enterprise Project Fields earlier in this chapter on page 21xx.
To modify the set of default task progress fields, follow these steps:
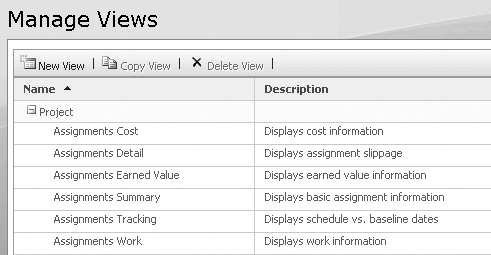
On the Server Settings page in Project Web Access, under Look And Feel, click Manage Views.
The Manage Views page appears (see Figure 21-20).
Scroll down the table, almost to the bottom, to find and click the My Assignments view under the My Work category.
The Edit View: My Assignments page appears (see Figure 21-21).
In the Table And Fields section, select one or more fields in the Available Fields box and then click Add to move them to the Displayed Fields box on the right.
This process adds the selected fields to the task progress page.
If you have defined any custom enterprise fields, they are also part of the list of available fields.
If you need to delete any fields from the view, select them in the Displayed Fields box on the right and then click Remove to delete them from the set of fields shown in the task progress page.
Use the Up and Down buttons to arrange the fields into the order you want them displayed in the view.
When finished, click Save.
Your changes are saved to the project server. The next time any team member click My Tasks, they’ll see your new version of the page.

To set up the timesheet (My Timesheets) page, you establish the fiscal year and reporting periods for your organization. You set up the categories of time to be reported and set any necessary timesheet update rules.
Note
For more information about how team members work with the timesheet, see the section titled "Tracking Time in Your Timesheet" in Chapter 23.
Because team members will be using the timesheet to report on their progress, you can be sure that the time periods on which they’re reporting map not only to your organization’s fiscal year but also to the reporting periods you need, whether it’s weekly, biweekly, or monthly.
The first step is to set up your fiscal year and define your monthly periods within that year, whether they are calendar months, 4-week periods, or 4-week periods with a 5-week adjustment period. To set up your organization’s fiscal year and the reporting periods within that year, follow these steps:
In the Project Web Access Quick Launch task bar, click Server Settings. Under Time And Task Management, click Financial Periods.
In the Manage Fiscal Period section, click the year you are defining and then click Define.
The Define Fiscal Year Parameters page appears.
Follow the instructions in the left pane to complete this page and define the fiscal year start date, the fiscal period model, and the fiscal period naming conventions.
Click Create And Save.
The Fiscal Periods page appears again, this time showing the table of fiscal periods you have just specified.
If you need to make any adjustments, click in the End Date field for a period. Using the date picker icon that appears, click the date for the fiscal period. Repeat this for any other fiscal periods you want to adjust.
Click Save.
As the project server administrator, you are responsible for defining the defaults and updating rules for the resources’ timesheets.
To set timesheet defaults and additional update restrictions, follow these steps:
On the Server Settings page, under Time And Task Management, click Timesheet Settings And Defaults.
Work through the options on this page, reading the information in the left pane of each section for additional guidance. Options include what information can be displayed in the Microsoft Office Outlook timesheet, whether the Project Web Access timesheet should include fields for overtime and nonbillable time, how timesheets are created, whether tracking units are days or weeks, and whether future time reporting is allowable.
When finished, click Save.
Team members are each associated with a working time calendar. However, they can also designate administrative time to schedule vacation or nonbillable working time, that is, time spent not working directly on project tasks. Project managers and resource managers can then approve and incorporate administrative time into the project scheduling.
As the project server administrator, you can set up categories for administrative time, for example, vacation, company meetings, and training. You specify whether the administrative time is a working or nonworking time, and whether it requires approval by the team member’s manager.
To add a new administrative time category, follow these steps:
On the Server Settings page, under Time And Task Management, click Administrative Time.
The Edit Or Create Administrative Time page shows the list of categories. Default categories are Administrative Working Time, Sick Time, and Vacation Time.
Click New Category.
In the new row that’s added to the table, type the name of the new category.
In the Status field, specify whether the category is Open or Closed. With an open category, team members can record time against the category. A closed category does not show in the team member’s Administrative Time dialog box.
In the Work Type field, specify whether the category is Working or Non Work. For example, a category called Nonproject Meeting would be a Working type, while the Personal Time Off category would be Non Work.
In the Approve field, specify whether the category requires approval by the team member’s manager.
In the Always Display field, select the check box if the category should appear in the team member’s Administrative Time dialog box. Clear the check box if it should not appear.
Turning the Always Display field on or off can be useful if there is a category that your organization wants to make available only during a certain period of the year.
When finished, click Save.
To edit an existing category, simply click in the field and make the change you want. To delete an existing category, click the name of the category and then click Delete Category.
Note
For more information about how project managers work with administrative time, see the section titled Reviewing and Approving Administrative Time in Chapter 22.
Note
For information about how team members set up administrative time, see the section titled Requesting Nonproject or Nonworking Time in Chapter 23.
Built in to Project Server 2007 is a Standard billing category for project work, as well as three billing categories for administrative work (Administrative, Sick Time, and Vacation). You can add different billing categories as needed. To do this, follow these steps:
On the Server Settings page, under Time And Task Management, click Timesheet Classifications.
Click New Classification.
In the new row that’s added to the table, type the name of the new billing category.
In the Description field, type an explanation for the use of this new category.
Click Save.
The new line classification becomes available in the timesheet. When a resource working in the timesheet clicks Add Lines to add an existing assignment or other item, the new category is listed in the Line Classification box. The selected category appears in the Billing Category field for the new line.