 Using Views to Report Project Information
by Teresa S. Stover
Microsoft® Office Project 2007 Inside Out
- Microsoft® Office Project 2007 Inside Out
- SPECIAL OFFER: Upgrade this ebook with O’Reilly
- A Note Regarding Supplemental Files
- Your All-in-One Resource
- Acknowledgments
- About the CD
- Conventions and Features Used in This Book
- I. Project Fundamentals
- 1. Introducing Microsoft Office Project 2007
- 2. Understanding Projects and Project Management
- II. Developing the Project Plan
- 3. Starting a New Project
- Focusing the Project Vision
- Creating a New Project Plan
- Entering Tasks
- Sequencing and Organizing Tasks
- Organizing Tasks into an Outline
- Setting Up Your Work Breakdown Structure
- Adding Supplementary Information to Tasks
- 4. Viewing Project Information
- 5. Scheduling Tasks
- 6. Setting Up Resources in the Project
- Understanding the Impact of Resources in the Project Plan
- Adding Resources to the Project
- Removing a Resource from the Project
- Identifying Tentative, Generic, or Budget Resources
- Setting When Resources Are Available for Work
- Adding Detailed Resource Information
- 7. Assigning Resources to Tasks
- 8. Planning Resource and Task Costs
- 9. Checking and Adjusting the Project Plan
- Working with the Critical Path and Critical Tasks
- Bringing in the Project Finish Date
- Reducing Project Costs
- Balancing Resource Workloads
- Changing Project Scope
- Reviewing the Impact of Changes
- Obtaining Buyoff on the Project Plan
- 3. Starting a New Project
- III. Tracking Progress
- 10. Setting a Baseline and Updating Progress
- 11. Responding to Changes in Your Project
- IV. Reporting and Analyzing Project Information
- 12. Reporting Project Information
- Establishing Your Communications Plan
- Using Views to Report Project Information
- Generating Text and Visual Reports
- Running Reports for Your Requirements
- Summarizing with Overview Reports
- Focusing on Tasks with Schedule Progress Reports
- Using the Unstarted Tasks Report
- Using the Tasks Starting Soon Report
- Using the Tasks In Progress Report
- Using the Completed Tasks Report
- Using the Should Have Started Tasks Report
- Using the Slipping Tasks Report
- Using the Baseline Report in Visio
- Using the Baseline Work Report in Excel
- Using the Task Status Report in Visio
- Using the Budget Work Report in Excel
- Analyzing Budget Status with Cost Reports
- Using the Cash Flow Report
- Using the Cash Flow Report in Excel
- Using the Cash Flow Report in Visio
- Using the Baseline Cost Report in Excel
- Using the Budget Report
- Using the Budget Cost Report in Excel
- Using the Resource Cost Summary Report in Excel
- Using the Overbudget Tasks Report
- Using the Overbudget Resources Report
- Using the Earned Value Report
- Using the Earned Value Over Time Report in Excel
- Evaluating Resource Allocation with Assignment Reports
- Using the Who Does What Report
- Using the Who Does What When Report
- Using the To-Do List
- Using the Overallocated Resources Report
- Using the Resource Availability Report in Visio
- Using the Resource Work Availability Report in Excel
- Using the Task Usage Report
- Using the Resource Usage Report
- Using the Resource Work Summary Report in Excel
- Using the Resource Remaining Work Report in Excel
- Using the Resource Status Report in Visio
- Revising a Built-In Report
- Building a Custom Report
- Saving Project Data Fields
- 13. Analyzing Progress Using Earned Value
- 12. Reporting Project Information
- V. Managing Multiple Projects
- 14. Managing Master Projects and Resource Pools
- 15. Exchanging Information Between Project Plans
- VI. Integrating Microsoft Project with Other Programs
- 16. Exchanging Information with Other Applications
- 17. Integrating Microsoft Project with Microsoft Excel
- Copying Between Microsoft Project and Excel
- Embedding Between Microsoft Project and Excel
- Linking Between Microsoft Project and Excel
- Importing and Exporting with Excel
- Producing a Visual Report of Project Data in Excel
- 18. Integrating Microsoft Project with Microsoft Outlook
- 19. Integrating Microsoft Project with Microsoft Visio
- VII. Managing Projects Across Your Enterprise
- 20. Understanding Enterprise Project Management
- 21. Administering Your Enterprise Project Management Solution
- Logging On and Off
- Managing Users and Permissions
- Administering the Enterprise Resource Pool
- Establishing the Enterprise Portfolio
- Standardizing Enterprise Project Elements
- Setting Up Team Member Work Pages
- Managing Pages, Views, and Reports
- Managing and Maintaining the Server
- 22. Managing Enterprise Projects and Resources
- Connecting to Your Project Server
- Working with Enterprise Projects
- Building Your Enterprise Project Team
- Finding Resources to Meet Your Needs
- Adding Enterprise Resources by Name
- Identifying Resource Attributes Using Custom Enterprise Fields
- Using Generic Resources as Placeholders
- Adding a Team Assignment Pool to Your Project Resource List
- Finding Enterprise Resources That Meet Specific Criteria
- Replacing an Existing Project Resource with an Enterprise Resource
- Matching an Existing Project Resource
- Matching and Replacing Generic Resources
- Proposing Tentative Resources
- Assigning Tasks to Enterprise Resources
- Finding Resources to Meet Your Needs
- Collaborating with Your Project Team
- Creating Proposals and Activity Plans
- 23. Participating on a Team Using Project Web Access
- Getting Started with Project Web Access
- Working on Your Assignments and Updates
- Submitting Text-Based Status Reports
- Logging Time Using Timesheets
- Setting Up E-Mail, Reminders, and Calendars
- Managing Resources in Project Web Access
- 24. Making Executive Decisions Using Project Web Access
- Getting Started with Project Web Access
- Viewing Project Portfolio Information
- Working with the Project Portfolio
- Working with Resource Information
- Analyzing and Reporting on Project Information
- Setting Your Alerts and Reminders
- VIII. Customizing and Managing Project Files
- 25. Customizing Your View of Project Information
- Customizing Views
- Customizing Tables
- Customizing Fields
- Working with Outline Codes
- Customizing Groups
- Customizing Filters
- Sharing Customized Elements Among Projects
- 26. Customizing the Microsoft Project Interface
- 27. Automating Your Work with Macros
- 28. Standardizing Projects Using Templates
- 29. Managing Project Files
- 25. Customizing Your View of Project Information
- A. Installing Microsoft Office Project 2007
- B. Online Resources for Microsoft Project
- C. Keyboard Shortcuts
- D. Index to Troubleshooting Topics
- E. About the Authors
- Index
- About the Author
- SPECIAL OFFER: Upgrade this ebook with O’Reilly
Suppose that you’ve been tracking and managing your project for some time now by using the Gantt Chart, the Resource Sheet, and other Microsoft Project views. You can set up one of these views to contain exactly the fields of information you need and then print it to create a kind of interactive report. By printing views, you can share pertinent information with team members and stakeholders. You can include printed views in project status reports and in progress meetings.
Note
Form views, such as the Task Form or Resource Form, cannot be printed. Neither can combination (split-screen) views. You can print one part of a split screen at a time, but if one part of the split screen is a form (such as Task Entry), the form portion is not printed.
To set up and print a view, follow these steps:
Open the view and arrange the data as you want it to appear when printed.
Note
For more information about available views and arranging information in those views, see Chapter 4.
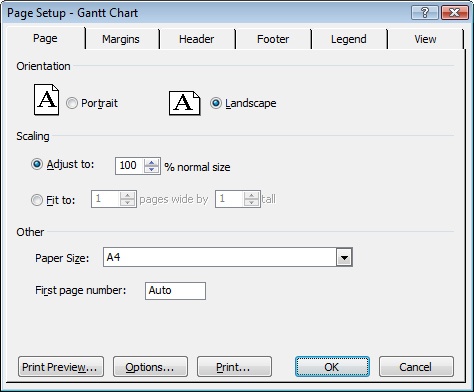
Click File, Page Setup to display the Page Setup dialog box (see Figure 12-1).
Specify the options you want for the printed view by using controls on the different tabs of this dialog box.
You can adjust the view orientation, page scaling, margins, header and footer, and so on. When finished, click OK.
On the Standard toolbar, click Print Preview.
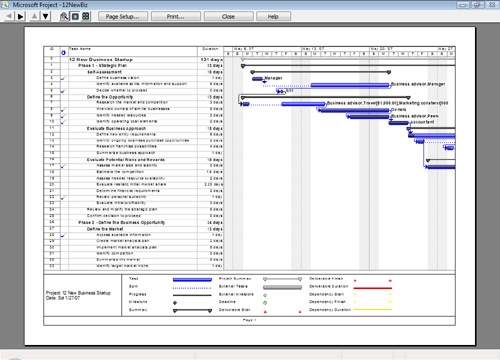
A picture of the view as it will be printed appears, reflecting your Page Setup options (see Figure 12-2).
To make further adjustments to the print options, click Page Setup at the top of the Print Preview window.
To make further adjustments to the view itself, click Close on the Print Preview toolbar and work in the view again.
When finished with your adjustments, print the view by clicking Print on the Standard toolbar.
Set Options for Printed Views
The following list describes the options available on the six tabs of the Page Setup dialog box, which controls how your view looks when printed. To display this dialog box, click File, Page Setup.
Page tab. Specifies whether the view should be printed in portrait or landscape orientation, and whether the view should be scaled up or down to fit on a page.
Margins tab. Specifies the size of each of the four margins and whether a border should be printed around the page.
Header tab. Specifies the content and location of header information. You can add the page number, current date and time, or the file name. You can also add a picture (such as a company or project logo) as part of your left, center, or right header. For example, next to Alignment, click the Center tab and then click Insert File Name to display the project file name at the center top of every page. You can also specify that a project field should be part of the header. You can enter your own text as well. Simply click the Left, Center, or Right tab and then click the text box and type the text you want.
Footer tab. Specifies the content and location of footer information. The same information available for headers is also available for footers. For example, click the Left tab in the Alignment area and then click Insert Current Date to display the date in the lower-left corner of every page. The Preview box shows what your footer will look like.
Legend tab. Specifies the content and location of a view’s legend, which specifies what symbols or bars on the view represent. For example, when printing the Gantt Chart, the legend includes a key for the task bars, summary bars, deadlines, and milestone symbols. By default, the legend appears on the bottom 2 inches of every page and includes the project’s title and the current date. The same information available for headers and footers is available for legends. You can also enter your own information.
View tab. Specifies which elements you want printed on each page, for example, notes, blank pages, or sheet columns.
Note
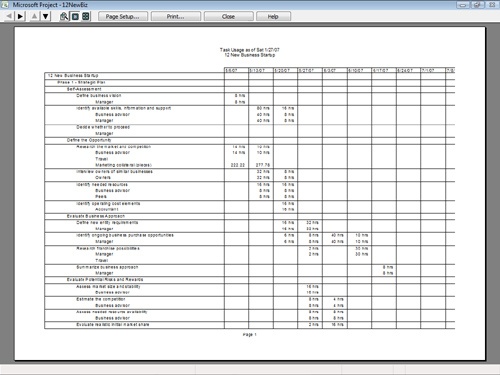
Divided views, such as Task Usage, have a table on the left and the timephased information sheet on the right. Such divided views are not split screens, so you can print both sides of these views.
Inside Out: Be careful when inserting the current date and time on a printed view
The Insert Current Date and Insert Current Time buttons take their information from your computer’s system clock. This date and time will change to reflect the date and time that you print the view. However, you might prefer to print a fixed date or time, perhaps one that specifies when the project was last updated, rather than last printed. In this case, in the Alignment area of the Page Setup dialog box, simply type the date or time on the Left, Center, or Right tab text box itself.
Use the Report Project Guide to help you set up key views presenting important progress and cost information. On the Project Guide toolbar, click Report. The Report pane appears.
Note
If your Project Guide toolbar is not showing, click View, Toolbars, Project Guide. If the Project Guide toolbar is not listed on the Toolbars menu, click Tools, Options, Interface and then select the Display Project Guide check box.
The Report Project Guide includes steps and controls for setting up your project to view specific types of information, such as critical tasks, risks and issues, resource allocation, project costs, and so on.
The Report Project Guide focuses on view setup and printing options. Click the Print Current View As A Report link to start the Print Current View Wizard. This wizard provides options for printing the current view, with optimum print spacing and scaling (see Figure 12-3).
Note
For more information about the Project Guide, see the section titled Working with the Project Guide in Chapter 1.
Copy a Picture of a View
You can copy a view in Microsoft Project and paste it as a graphic file into a Microsoft Office Word 2007 document or a Microsoft Office PowerPoint 2007 presentation slide. If you’re copying to Office Word 2007, Office PowerPoint 2007, or Office Visio 2007, you can use the Copy Picture To Office Wizard. For these or any other application, you can use the Copy Picture function.
Note
For more information about copying a view and using the graphic in another application, see the section titled Copying a Picture of a View in Chapter 16.
-
No Comment


