
You’ve developed your work breakdown structure, and your task list is now sequenced and outlined. You have a good work breakdown structure now, but you don’t have a schedule...yet.
Although there are many knowledge areas (including scope management, cost management, and resource management) that contribute to successful project management, time management is most related to development of your project schedule—your roadmap for completing tasks, handing off deliverables, passing milestones, and finally achieving the goals of your project in a timely manner.
To develop an accurate and workable schedule that truly reflects how your project will run, you need to do the following:
Enter task durations.
Identify the relationships, or dependencies, among tasks.
Schedule certain tasks to achieve specific dates when necessary.
When you’ve done these three things, you begin to see the basic outline of a real project schedule. You have not yet added and assigned resources, which further influence the schedule. Nor have you refined the project plan to make the project finish date and costs conform to your requirements. However, at this point, you can start to see how long certain tasks will take and how far into the future the project might run.
Note
To learn about adding and assigning resources, see Chapter 7. For information about refining your project, see Chapter 9.
You can use a variety of scheduling tools and cues to help keep you focused and on track as you and your team work your way through the project. You can do the following:
Create reminders to alert you as deadlines are approaching.
Add milestones to your schedule as conspicuous markers of producing a deliverable, completing a phase, or achieving another major event in your project.
Apply a calendar to a task that is independent of the project calendar or the calendars of resources assigned to the task, so that the task can be scheduled independently.
See the effects of scheduling changes while you work, and review the factors that affect the scheduling of a task.
When your task list is entered, sequenced, and outlined in Microsoft Office Project 2007 (see Figure 5-1), you’re ready to start the work of creating a schedule.
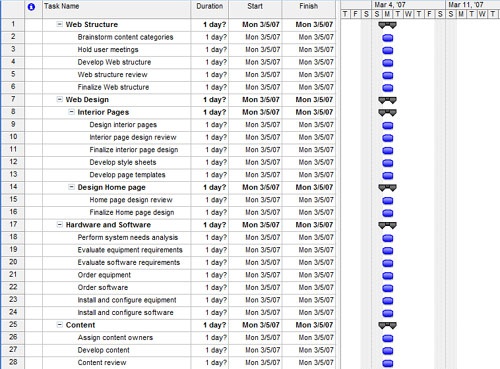
Figure 5-1. Your project schedule displays all tasks starting on the project start date, each with an estimated duration of 1 day.
To create a realistic schedule, you can start by entering the length of time you believe each task will take to complete; that is, the task duration. As soon as you enter a task, Microsoft Project assigns it an estimated duration of 1 day, just to have something to draw in the Gantt Chart. You can easily change that duration.
Entering accurate duration estimates is very important for creating a reliable project schedule. Microsoft Project uses the duration of each task to calculate the start and finish dates for the task. If you will be assigning resources, the duration is also the basis for the amount of work for each assigned resource.
As the project manager, you can start by entering a broad duration estimate based on your own experience. Then, you can refine the estimate by soliciting input from others who are more directly involved or experienced with the sets of tasks. There are four possible sources for developing reliable task durations, as follows:
Team knowledge. Suppose that you’re managing a new business startup project, and you already have your team in place. The business advisor can provide durations for tasks such as creating a market analysis, researching the competition, and identifying the target market niche. The accountant can provide durations for tasks such as forecasting financial returns, setting up the accounting system, and obtaining needed insurance. Team members ready to work on the project can also provide duration estimates for tasks based on their previous experience as well as their projection of how long they expect the tasks to take for this particular project.
Expert judgment. If you have not yet assembled a team from whom you can obtain durations, or if you want reliable input from impartial specialists in the field, you might call upon experts such as consultants, professional associations, or industry groups. These can help you establish task durations for projects common to your field.
Past projects. Similar projects that have been completed in your organization can be a most excellent source of accurate durations. If Microsoft Project files are available, you can see the initial durations. If the project manager maintained the project plan by diligently tracking actual information throughout the life of the project, you have at your disposal invaluable information about how long certain tasks actually took, as well as any variances from their planned durations.
Industry standards. Historical duration information for tasks typical to an industry or discipline is sometimes available commercially through professional or standards organizations. You can adapt such information for tasks and durations to fit the unique requirements of your project.
You might use a combination of these methods to obtain durations for all the tasks in your project. It’s often very useful to have durations based on established metrics. For example, suppose that you know the industry standard for the number of hours it takes to develop certain types of architectural drawings as well as the number of those drawings you need. You can multiply these figures to develop a reasonable duration for your specific task.
Note
You can also use these methods to obtain work amounts for resources assigned to tasks. While duration is the span of time from task start to finish, work is the amount of time a resource has to complete the task. Sometimes duration and work are the same; many times they are not, depending on the type of task and then number and type of resources assigned.
Any value in the Duration field that’s followed by a question mark is considered a duration estimate. Technically, all planned durations are only estimates because you don’t know how long a task takes until it’s completed and you have an actual duration. However, the question mark indicates what you might consider an "estimate of a duration estimate." Estimated durations are calculated into the schedule the same as confirmed durations; they simply serve as an alert that a duration is still more of a guess.
Note
If you have no use for the estimated durations question mark, you can turn it off. Click Tools, Options and then click the Schedule tab. Clear the Show That Tasks Have Estimated Durations check box as well as the New Tasks Have Estimated Durations check box.
This setting will take effect for the current project. If you want this setting to be in effect for all projects you create, click the Set As Default button.
By default, a duration estimate of 1 day is entered for any newly added task (1d?). Use this value as a flag to indicate that the duration still needs to be entered for this task. You can also enter a question mark (?) after a duration, for example, 2w?. Any durations with question marks can serve as flags to indicate that the duration is still under consideration and might change after you receive more solid information. When you remove the question mark from a duration, the duration is confirmed; that is, you’re now confident of this duration.
Note
You can sort, group, or filter tasks by whether a task has an estimated or confirmed duration. For more information, see the section titled Rearranging Your Project Information in Chapter 4.
You can enter duration in different time period units, as follows:
Minutes (m or min)
Hours (h or hr)
Days (d or dy)
Weeks (w or wk)
Months (mo or mon)
Whether you type h, hr, or hour in your duration entry, by default Microsoft Project enters "hr". You can change which abbreviation of the time unit appears in the Duration field. Click Tools, Options and then click the Edit tab. In each of the fields under View Options For Time Units, set the abbreviation of the time unit you want to see.
Note
This setting applies to the current project file only. If you want it to apply to all new projects you create, click the Set As Default button.
You can use different duration units throughout your plan. One task might be set with a duration of 2w, and another task might be set for 3d.
Note
If you don’t specify a duration unit, by default Microsoft Project assumes that the unit is days and automatically enters "days" after your duration amount. If you want the default duration unit to be something different, such as hours or weeks, you can change it. Click Tools, Options and then click the Schedule tab. In the Duration Is Entered In box, select the time unit you want as the default.
This setting applies to the current project file only. If you want it to apply to all new projects you create, click the Set As Default button.
To enter a duration, follow these steps:
Display the Gantt Chart.
In the Duration field for each task, type the duration, for example, 1w or 4d.
If a duration is an estimate, add a question mark after it, for example, 1w? or 4d?.
Press Enter. The Gantt bar is drawn to represent the time period for the task (see Figure 5-2). In addition, the Finish field is recalculated for the task. Microsoft Project adds the duration amount to the Start date to calculate the Finish date.

When you enter a duration, the task is scheduled according to its assigned calendar. Initially, this is the project calendar. When resources are assigned, the task is scheduled according to the resource’s working times calendar. If a task calendar is applied, the task is scheduled according to the task’s working times calendar.
Note
For more information about task calendars, see the section titled Working with Task Calendars later in this chapter.
For example, suppose you enter a 2d duration for the "Create market analysis plan" task, and the task starts Monday at 8:00 A.M. Based on the default Standard calendar and its options, and assuming that the resource is assigned full-time to the task, Microsoft Project counts the 16 working hours in the 2-day duration to arrive at a finish date of Tuesday at 5:00 P.M.
If you want a task to take a set amount of time regardless of any working times calendars, you can enter an elapsed duration. An elapsed duration can be useful for tasks such as "Paint drying" or "Cement curing" that can’t be stopped after they’ve started or that are independent of project schedules or resource assignments. Elapsed durations are scheduled 24 hours a day, 7 days a week, until finished. That is, one day is always considered 24 hours long (rather than 8 hours), and one week is always 7 days (rather than 5 days). To specify an elapsed duration, simply enter an e before the duration unit, for example, 3ed for 3 elapsed days or 2ew for 2 elapsed weeks (see Figure 5-3).
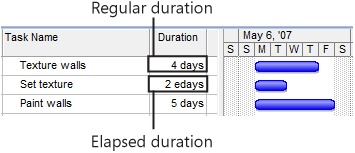
Figure 5-3. Regular durations are scheduled according to applied working times calendars, whereas elapsed durations are based on 24 hours per day, 7 days per week.
For regular (nonelapsed) durations, we need a way to specify the number of working hours in a day and week, the number of working days in a month, and so on. This way, when we specify 2 weeks as a duration, for example, we can be assured that this means the same thing as 80 hours, or 10 days. To set these options, follow these steps:
Click Tools, Options and then click the Calendar tab (see Figure 5-4).
You can also click Tools, Change Working Time and then click the Options button.
Select the options on this tab to reflect the way your team works.
The Default Start Time (8:00 A.M.) and Default End Time (5:00 P.M.) are assigned to tasks when you enter a start or finish date without specifying a time.
The Hours Per Day, Hours Per Week, and Days Per Month values serve as your time unit specifications when needed. If you specify that a task has a duration of 1 month, does that mean 20 days or 30 days? These settings are used in conjunction with the working times calendars to dictate how your tasks are scheduled.

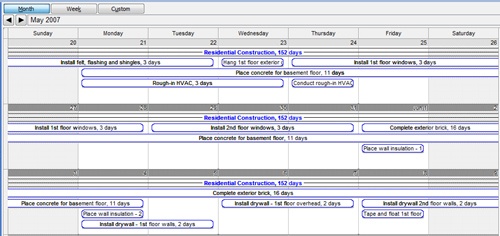
Any Gantt chart view can give you a closer look at your task durations graphically across the timescale. The Calendar view also shows each task as a bar on the days and weeks in which it’s scheduled.
In the course of researching task duration information, you might get conflicting results. Maybe the team member who will carry out a major task says it will take 3 weeks. Perhaps an expert stakeholder says it should take 2 weeks. And maybe the industry standard states that the same task should take 6 weeks. These are large discrepancies, and they’re all coming from credible sources. How do you schedule a task with three possible durations?
Or imagine this situation—you have a single reliable duration or a duration range such as 2 weeks +/- 10 percent for all tasks in your task list, and you want your project plan to model a best-case scenario, a worst-case scenario, and an expected scenario for all durations. This way, you can learn the earliest possible project finish date, the latest possible date, and the most probable finish date.
To help resolve discrepancies or to model alternative scenarios, you can run a PERT analysis. A PERT (program evaluation and review technique) analysis uses a weighted average of optimistic, pessimistic, and expected durations to calculate task durations and therefore the project schedule. This analysis can be an effective risk management tool. It can also help if you’re working out a project proposal or estimating time, cost, or resource requirements.
To set up a PERT analysis, follow these steps:
Click View, Toolbars, PERT Analysis.
On the PERT Analysis toolbar, click PERT Entry Sheet.
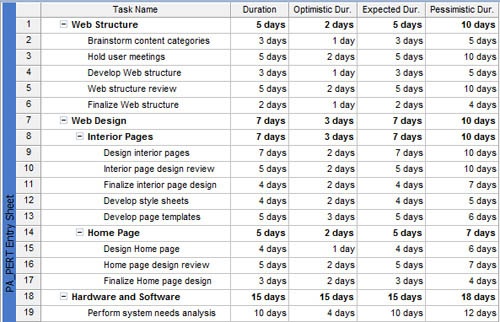
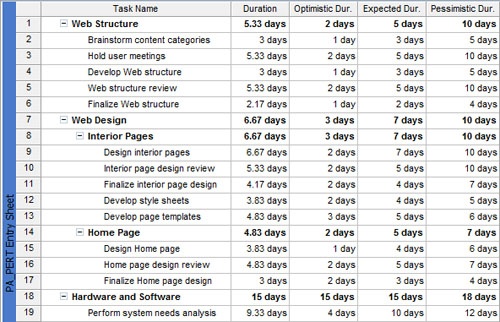
For each task, enter the optimistic, expected, and pessimistic durations in the appropriate fields (see Figure 5-5). You can also think of these fields as minimum, probable, and maximum durations for each task.
Figure 5-5. Use the PERT Entry Sheet to specify the optimistic, expected, and pessimistic durations for each task.
If you do not expect a duration for a particular task to vary at all, enter the same value in all three fields.
On the PERT Analysis toolbar, click Calculate PERT.
The PERT Analysis message appears, which explains the Duration, Duration1, Duration2, and Duration3 fields.
Click Yes.
The estimated durations are calculated, and the results change the value in the Duration field (see Figure 5-6).
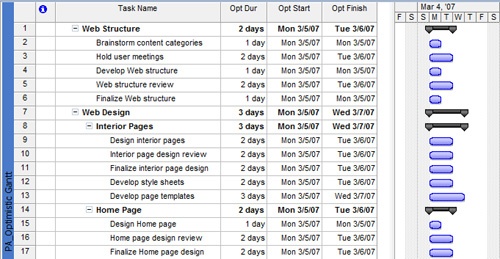
You can review Gantt charts using each of the three sets of durations, as follows:
For the optimistic durations, click Optimistic Gantt on the PERT Analysis toolbar (see Figure 5-7).
For the expected durations, click Expected Gantt on the PERT Analysis toolbar.
For the pessimistic durations, click Pessimistic Gantt on the PERT Analysis toolbar.
You can also display one of the PERT Analysis Gantt charts or the PERT Entry Sheet by clicking View, More Views and then selecting it in the dialog box. However, be aware that a PERT Analysis view does not appear in the More Views dialog box until you click the button for that view on the PERT Analysis toolbar the first time after installing Microsoft Project.
Inside Out: Adjust PERT analysis weighting
Sometimes, the PERT analysis results appear to be skewed or exaggerated. You can adjust how Microsoft Project weights duration estimates for the PERT analysis. On the PERT Analysis toolbar, click Set PERT Weights. Change the number in at least two of the three fields—Optimistic, Expected, and Pessimistic—so that the sum of all three numbers equals six (see Figure 5-8). Then, enter the durations in the PERT Entry Sheet as described previously. Finally, click Calculate PERT.
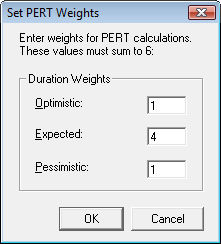
Figure 5-8. Use the Set PERT Weights dialog box to change the weighting of optimistic, expected, and pessimistic durations for the PERT Analysis calculation.
By default, the PERT weights are 1-4-1; that is, heavily weighted toward the expected duration, and lightly and equally weighted for the pessimistic and optimistic durations. Although 1-4-1 is the standard PERT weighting, 1-3-2 can build in a little more pessimism for better risk management.