
After you set up your enterprise project team, you have powerful methods of project collaboration and communication at your fingertips. Using Project Professional and Project Web Access, you can assign tasks to resources, receive progress updates, and request narrative status reports—all electronically via publication of information to your project server.
This collaboration process automates the gathering and entry of actuals so that you don’t have to enter actuals on assignments yourself. Your project server administrator or portfolio manager sets up your resources’ task progress pages in Project Web Access so that they can enter and submit their actuals on a periodic basis. You can then review these actuals and accept them for incorporation into the project plan.
To keep a close eye on time usage and project availability, you can also track nonproject tasks and time through the use of timesheets and administrative time such as nonproject meetings, training, or nonworking time requested by resources.
Because Project Server is tightly integrated with Windows SharePoint Services, you can also control project-related documents, track project issues, and manage project risks.
When collaborating with your resources on their project assignments, three basic activities are at work:
You publish project information, thereby making project and assignment information available on the project server for resources and other Project Web Access users.
You request information from resources, such as task updates and status reports.
You review and accept information from resources, such as task updates and status reports, and then incorporate that information into the project plan.
Before you start doing any of these, it’s a great idea to set up options that govern the details of how these activities are done.
The project server administrator or portfolio manager often configures how progress reporting on team member task assignments are done throughout the enterprise. However, as the project manager, you have some choices in how to support your resources in their work as well as which efficiencies you need to help you manage the flow of information between you and your resources.
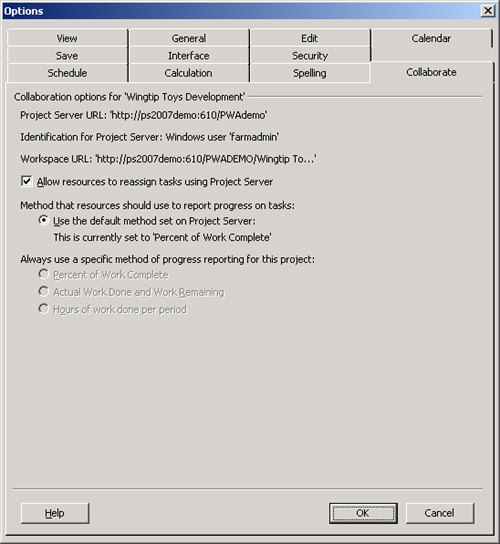
Using the Collaborate tab in the Options dialog box, you can specify certain aspects of task assignment and tracking, as follows:
With Microsoft Office Project Professional 2007 connected to the project server, and your enterprise project open, click Collaborate, Collaboration Options. The Collaborate tab of the Options dialog box opens (see Figure 22-18).
If it’s acceptable for resources to reassign tasks to other resources, select the Allow Resources To Reassign Tasks Using Project Server check box.
This is particularly useful if you have team leads or resource managers responsible for specific assignments or for delegating tasks as they see fit.
This check box is selected by default.
If your project server administrator is allowing you to change the method of progress reporting, you can do so under Always Use A Specific Method Of Progress Reporting For This Project.
If the options are available, then select the one you want to use for this project, or leave the selection at the Use The Default Method Set On Project Server.
Select the Percent Of Work Complete option if you want resources to simply report percentage complete on each of their assignments, for example, 15%, 50%, or 100%. This is the least restrictive and least time-consuming tracking method. With this method, the My Tasks page includes a % Work Complete field that the resource uses for her assignment updates.
Select the Actual Work Done And Remaining Work option if you want resources to report the total hours of work completed on an assignment so far as well as the number of hours remaining to complete the assignment. This tracking method provides a medium level of detail. The My Tasks page includes fields for total actual work and remaining work for each assignment. Resources enter those total amounts for each progress update requested.
Select the Hours Of Work Done option if you want resources to report the number of hours of work completed per day or per week on each assignment. This is the most detailed tracking method and is required for any organization using the Managed Timesheet Periods feature of Project Server. The My Tasks page includes a field for each time period, either days or weeks, for the duration of the project. Resources enter the number of hours worked per day or per week and submit them with each progress update.
If the options are dimmed, this means that you and your team are required to use the specific method of progress reporting imposed by the project server administrator.
Other Project Web Access task update and status options are set by the project server administrator or portfolio manager. Work with these individuals to set up the task update page you need for your project while at the same time adhering to your organization’s standards (see Figure 22-19).
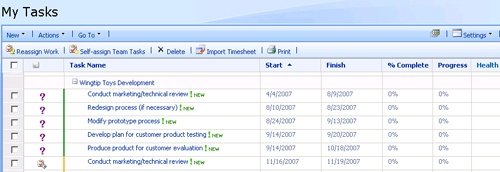
Figure 22-19. Project resources work with their individual assignment progress pages in Project Web Access.
Note
In previous versions of Microsoft Office Project, you could specify what information you wanted to publish to the project server whenever you saved your project. Now in Microsoft Office Project 2007, saving and publishing are separate operations.
Note
For more information about saving, publishing, checkin, and checkout, see the section titled Managing Your Project Files on the Server earlier in this chapter.
To help manage the flow of information between you and your resources, you can specify that alerts, reminders, and e-mail messages automatically be sent to you or your resources under certain conditions. Such conditions might include when a resource updates assignments, when a resource’s assignment is coming about to start, or when a status report is due.
To set up automated alerts and reminders, follow these steps:
Start Microsoft Office Project Web Access and log on if necessary.
On the Quick Launch task bar, click Personal Settings.
On the Personal Settings page, click Manage My Resource’s Alerts And Reminders.
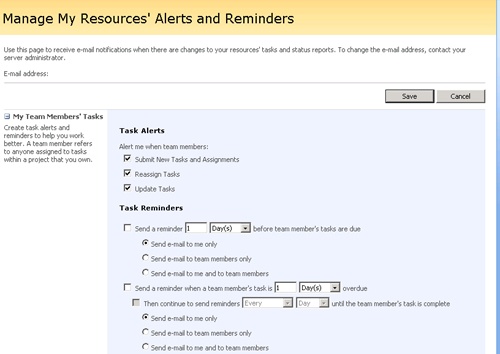
On the page that appears, work through the fields to specify which alerts and reminders should be sent under which conditions (see Figure 22-20).
Click Save.
As resources work on, update, and complete their assigned tasks, they submit their task updates to the project server on a periodic basis. You can manually review each task update and accept the information into your project plan, or not. Or, you can set up rules to specify which updates are safe to automatically incorporate into your project plan. Using rules can help keep your project plan up-to-date while significantly reducing the number of updates you have to handle.
To set up rules for accepting changes to the project plan, follow these steps:
Start Microsoft Office Project Web Access and log on if necessary.
On the Quick Launch task bar, under Approvals, click Task Updates.
Click Actions, Manage Rules.
On the Rules page, click New Rule.
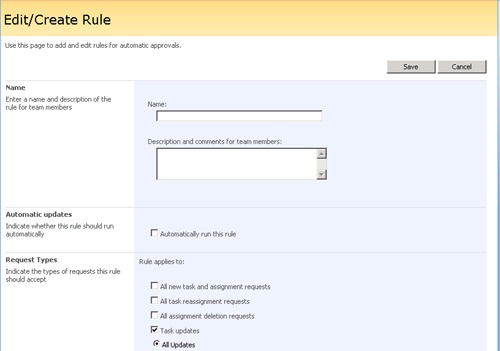
On the Edit/Create Rule page, read the sections and make selections to set up the rules you want for managing assignments and updates (see Figure 22-21).
When finished, click Save.
You can create different rules for different conditions. All the rules you create are listed on the Rules page.
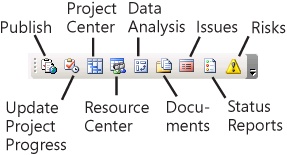
The Collaborate Toolbar
As you publish your project more and more frequently, update project progress with updates from your resources, or move back and forth between Project Professional views and Project Web Access pages, take advantage of the Collaborate toolbar. Click View, Toolbars, Collaborate to show the Collaborate toolbar. This toolbar makes your collaboration commands immediately accessible.
Your enterprise project plan is built, resources are added, and tasks are assigned to those resources. Furthermore, your options for team collaboration using Project Web Access are set up. You’re ready to start moving forward on your project.
Although all the information about your project is published on the project server, the three primary types of information you are exchanging with your resources are:
Task assignments and progress updates on those assignments.
Narrative status reports about assigned tasks.
Nonproject information such as timesheets and administrative time.
Unlike in previous versions of Microsoft Office Project, merely saving a project to the server in Microsoft Office Project 2007 does not make it available for other users to see and work with. You must explicitly give the File, Publish command in Project Professional 2007 for the project information to be published to the server and therefore be usable to your resources and other users of the project server with the right permissions. You can also click the Publish button on the Collaborate toolbar.
When you publish your project, the changes you have made since the last time you published are made public on the server. Although you can explicitly exclude certain tasks from being published, typically all changes in your project are published at the same time. This includes new assignments, changed assignments, and any other information changed throughout the entire project.
Note
New in Microsoft Office Project 2007 are permanent assignment comments. If you create an assignment note and publish it, the assigned resource can see it and respond to it, and that response becomes part of the permanent comment as well. There can be as many additions to the comment as needed.
When you publish a project, assignments from the project appear on the Project Web Access My Tasks page for the assigned resources. By default, the assigned resources see an alert on their home page indicating that new tasks have been assigned to them. On their My Tasks pages, the new assignments are marked with the NEW icon. A resource can view details about the assignment, including the start and finish date, the amount of scheduled work, other resources assigned, predecessor and successor tasks, and notes.
If you publish a project that includes changed assignments, those assignments are marked with the Assignment Updated icon in the assigned resources’ My Tasks page.
Resources can also see details of the entire project by clicking its name in the Project Center. This is helpful for resources who want to see the overall context of their assignments.
Note
For details about how resources and resource managers work with assigned tasks, see Chapter 23.
While your resources are working on their assignments, you periodically need progress updates of actual work on assignments. You can request progress updates, and then accept and incorporate those updates into your project plan.
As soon as you publish assignments, your resources can submit updates. It’s best for you and your project team to agree on when task updates should be submitted, for example, every Monday morning or every other Wednesday by noon. You might also want them to send you a task update whenever a task is completed, whenever a major milestone or deliverable has been fulfilled, or whenever there is a significant change or accomplishment.
However, you can explicitly request progress updates any time you want, as follows:
Make sure that Microsoft Office Project Professional 2007 is connected to the project server and that your project is checked out and open.
If you need information on only certain tasks, display a task view and select those tasks.
Click Collaborate, Request Progress Information.
A message appears, stating that your project must be published before the update can be requested.
Click OK.
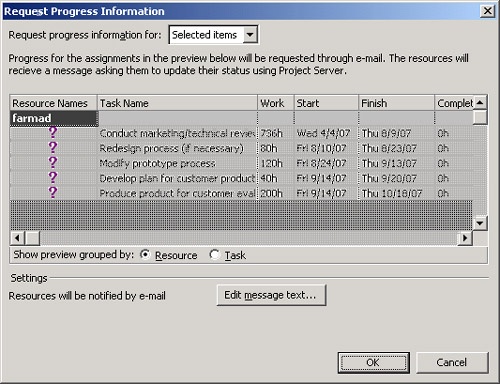
The Request Progress Information dialog box appears (see Figure 22-22).
In the Request Progress Information For box, select Entire Project, Current View, or Selected Items.
If you want the dialog box to group the assignments by task name, click the Task option. By default, the assignments are grouped by resource name.
If you want to edit the e-mail message text that will be sent along with this request, click the Edit Message Text button, make the changes you want, and then click OK.
Click OK in the Request Progress Information dialog box.
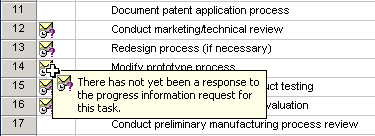
Your progress update request is published to the project server. Each of the tasks for which progress information is being requested is marked with the Request Progress Information icon in the indicators column.
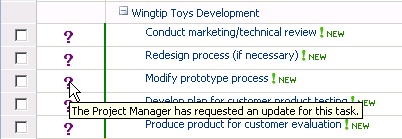
Your resources will receive the automated e-mail with your request. In addition, on their My Tasks page, the assignments for which you requested progress information are marked with an icon indicating that you have requested an update for this assignment.
Just as you publish information for resources to see on the project server, resources submit information to keep you informed. Whenever they change a task assignment in some way—whether to update their progress, reassign it to someone else, or reject it—they can save it or they can submit it. When they submit it, the information is essentially published, and you are notified. Upon submitting the information, they can enter a comment about the transaction.
When your resources submit updates about their assignments, by default, you see a reminder item on your Project Web Access home page, for example, "You have 3 task updates from resources pending your approval."
You can click the link in that reminder to go to the Task Updates page in Project Web Access. You can also click Task Updates under Approvals on the Quick Launch task bar.
If you’re working in Project Professional, you can open the Task Updates page from there. Click Collaborate, Update Project Progress. Or, on the Collaborate toolbar, click Update Project Progress. The Project Web Access Task Updates page appears in your Project Professional window. All updates submitted by resources are listed in the table.
On the Task Updates page, you can review the information resources are submitting and decide whether to accept the information and incorporate it into your project plan or whether you need to take some other action (see Figure 22-23).
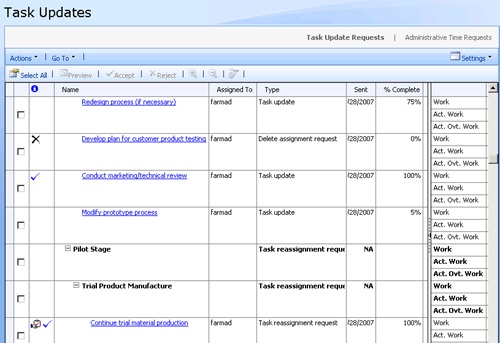
Figure 22-23. The Task Updates page shows any assignment information that has been submitted by a resource assigned to tasks in one of your projects.
Resources typically submit three types of information to the project server for you to review, accept, and incorporate as appropriate:
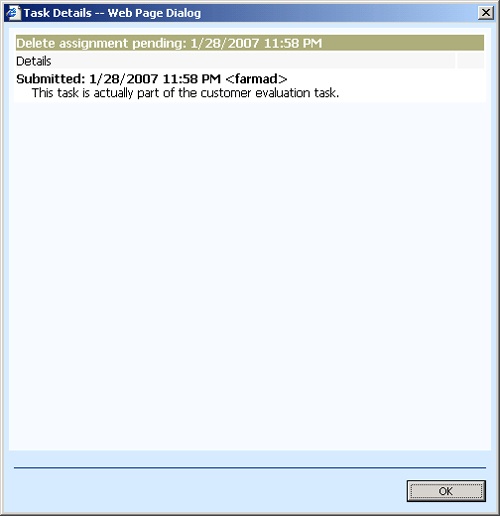
Rejected assignments. When you publish new assignments to the project server, resources see their assignments on their My Tasks pages. If necessary, resources can delete, or reject, an assignment. Project Web Access prompts resources to type a comment when they delete an assignment, generally to explain why they have to reject the assignment. You see any deleted assignments, along with the comment, listed on your Task Updates page (see Figure 22-24).
New self-assigned or reassigned tasks. From Project Web Access, resources can create new tasks, assign themselves to them, and submit them to the project server for inclusion in the project plan, if you approve. This is particularly helpful when you are relying on your resources to fill in the details of tasks that are needed for their areas of expertise.
If your resources are members of a team assignment pool, they can assign themselves to a team task. If you allow it, your resources may reassign tasks to other resources.
When resources assign themselves to newly created tasks, assign themselves to team tasks, or reassign tasks to other resources, you are notified on the Task Updates page. This way you always know of any new tasks and the specific resources working on those tasks.
Assignment progress updates. When you send a request for progress information, resources respond by updating their assignment-tracking information according to the tracking method set up by the project server administrator. They might update percentage complete on their current assignments, enter total work and remaining work hours on assignments, or enter the number of hours per day or per week they’ve spent on each assignment. Such updates are one of the primary reasons for using Project Web Access. They keep your project tracking up-to-date, and you always know the current status of tasks without having to collect and enter the information manually. Review the task update and any comments from your Task Updates page in Project Web Access.
Once you have reviewed the task update information submitted by your resources, you can decide whether to incorporate the information into the project plan or to return it to the resource who sent the update.
To accept a task update, follow these steps:
On the Task Updates page, select the check box next to the name of the assignment(s) you want to accept and incorporate into your project plan.
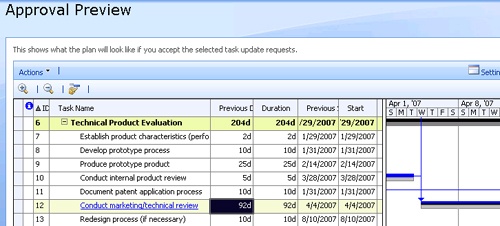
If you’re not sure whether you want to accept or reject an update, select the assignment in question and then click the Preview button. A separate Approval Preview window appears with a Gantt Chart showing how the schedule would look if you accepted the update (see Figure 22-25). Using this window, you can see the updated schedule in a Web browser before you commit to the changes the update would cause.
Click the Accept button on the toolbar.
In the dialog box that appears, you have another chance to view an approval preview. You can also enter a transaction comment that will become part of the assignment for the resource to see. Click Accept.
The information is submitted to the project server, and your project plan is updated accordingly. If the update was an assignment rejection, the resource is removed from the task. If the update was a reassigned task, the new resource is shown as assigned to the task in the project plan. If it was a progress update, the tracking information is incorporated into the project plan. The accepted task updates are removed from the Task Updates table.
To reject a task update, follow these steps:
On the Task Updates page, select the check box next to the name of the assignment you want to reject and send back to the resource who sent it.
Click the Reject button on the toolbar.
In the dialog box that appears, you can enter a comment for the resource who sent the update, explaining why you are rejecting the update. Click Reject.
Your project plan is unchanged, and the update is removed from the Task Updates table. The task is updated in the resource’s My Tasks page, marked with an update rejected icon. Your comment appears in the assignment’s transaction comments and task history, which can be viewed on the Assignment Details page.
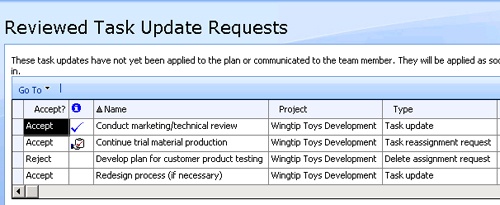
If you want to see processed task updates that are waiting to be updated in the project plan, click Go To, Reviewed Requests. The Reviewed Task Update Requests page appears, listing updates you have recently processed (see Figure 22-26).
If you want to see processed task updates that have already updated the project plan, click Go To, Applied Requests And Errors. The Applied Task Update Requests And Errors page shows the list of updates that have already been implemented in the project server.
It’s great to get task updates specifying the percentage complete or the number of hours worked each day on a task. However, often you want more detail about task progress. That’s where narrative status reports come into play. You can design a status report for resources to complete and submit to you periodically. You set up how often the status report should be submitted. You also set up the topics that the resources should report on. At the designated time periods, your resources write their status reports and submit them to the project server. When the resources’ reports are in, the project server automatically compiles them into a full team status report.
You need to request the status report only when you first set it up. Resources see automated reminders on their Project Web Access home page when a status report is coming due.
To set up a narrative status report, follow these steps:
In Project Web Access, under Resources, click Status Reports.
If you’re working in Project Professional, you can open the Status Reports page from there. Click Collaborate, Status Reports. Or, on the Collaborate toolbar, click Status Reports. The Project Web Access Status Reports page appears in your Project Professional window.
Under Requests, click New, New Request.
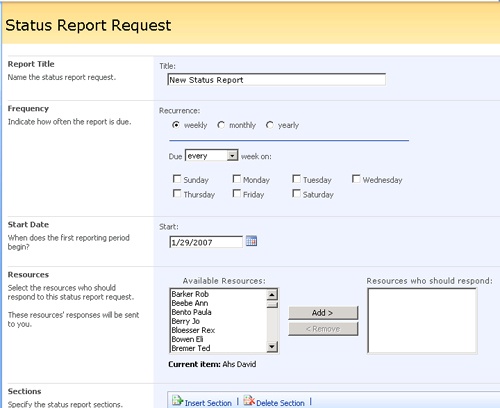
The Status Report Request page appears (see Figure 22-27).
Work through the page to specify the design and frequency of your status report.
In the Resources area, select the resources who are to receive this status report request and who will be responsible for submitting the status reports.
In the Sections area, specify the headings to be included in the status report under which your resources will report. To add a new heading, click Insert Section. A new row opens up. Click in the row and type the heading you want. To remove a heading, click it and then click Delete Section.
When finished, click Send.
The status report request, details, and schedule are sent to the selected resources. They will see reminders on their home page about status reports coming due. They will also see the name of the status report listed on their Status Reports pages.
When it’s time for your resources to submit a status report, they’ll click the name of your status report and complete the page. The page includes a box for each of the sections you identified in your request (see Figure 22-28).
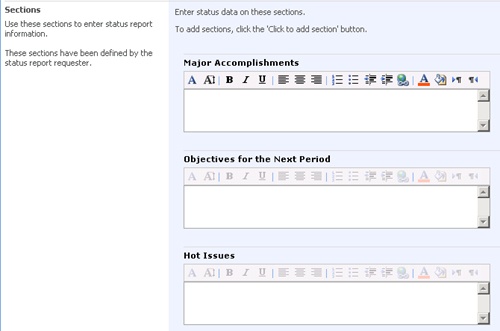
Resources can add extra sections and send unrequested status reports outside the normal schedule if they want.
Note
For more information about how resources work with their status reports, see the section titled Submitting Text-Based Status Reports in Chapter 23.
Project Web Access automatically merges the status reports from all resources for a given time period. To review the combined status reports that have been submitted, follow these steps:
In Project Web Access, under Resources, click Status Reports.
Under Requests, click the name of the status report whose responses you want to review.
The View Responses page appears.
To specify the time period of status reports you want to see, set the dates in the View Status Reports From boxes and then click Apply.
Under Group Merged Reports By, select whether you want the merged report to be grouped by resource name or response date.
Click the Open button.
The merged status report appears. The responses from each resource are grouped under the section headings you identified.
If you want to include the status report in a Microsoft Office Word document for printing or for inclusion in a project status report, click Export To Word.
Click Yes in the ActiveX control alert that appears.
The report is formatted and exported to Office Word. You can save it or print it from there.
Microsoft Office Project Server 2007 has a new method—timesheets—for tracking non-project working time and time off in conjunction with time spent on projects. With timesheets, an organization can essentially account for every hour of every resource’s day, even time that’s spent in meetings, in training, on different projects, or on time off.
Such detailed tracking is important in organizations that have specific time reporting requirements. For example, certain organizations need visibility into certain time categories, for example, billable and nonbillable time, scheduled and actual time, or overtime. Default time categories are provided with the timesheet in Project Web Access, but your project server administrator can set up custom time categories as appropriate. The timesheet is especially useful when you need to integrate information about resource time with an accounting or general ledger system, particularly for client billing purposes.
Note
In previous versions of Project Web Access, the task progress page is called the timesheet. Now in Microsoft Office Project 2007, the timesheet is a different page and serves a different, but complementary, purpose from the task progress page, which is also called the My Tasks page.
If your organization does not need such tight time tracking, it can simply ignore the timesheet feature and use just the My Tasks page to keep the project plan up to date. In fact, the project server administrator could set up Project Web Access in such a way as to remove the timesheet pages and links.
However, if you do use timesheets, here are some key points to understand:
Your project server administrator or portfolio manager sets up the timesheet format. This includes the fiscal year and reporting periods, accounting classifications, billing categories, and any rules and restrictions for how timesheets are updated.
Note
For information about what’s involved in setting up the timesheet format, see the section titled Setting Up Team Member Work Pages in Chapter 21.
Timesheets can be updated independently of the task progress page, or they can work together. Resources can incorporate assignments from the task progress page into the timesheet. Likewise, resources can import timesheet items into the task progress page.
Resources can identify and report administrative time, which is used to account for nonproject working time such as meetings and classes. Administrative time can also be used to account for nonworking time such as vacations and personal time off.
Note
In Microsoft Office Project 2003, the administrative project was introduced, in which users could create non-project working time and nonworking time categories and then assign themselves to these categories. In Microsoft Office Project 2007, this feature has become a part of the timesheet as administrative time.
If your organization uses timesheets, all resources using Project Web Access are associated with a timesheet manager. This could be the resource’s supervisor, resource manager, or project manager. The timesheet manager is responsible for reviewing and approving the resource’s periodic timesheets and any administrative time that requires approval. The project server administrator or other user with permissions to edit resource information identifies each resource’s timesheet manager.
Similar to task updates from the My Tasks page, resources submit timesheets to their designated timesheet managers on a periodic basis. If you are serving as a timesheet manager, you will receive timesheets for review and approval. Timesheets can be set up for automatic approval.
To review and approve timesheets, follow these steps:
On the Quick Launch task bar in Project Web Access, under Approvals, click Timesheet.
The Timesheet Approvals page appears (see Figure 22-29).
If necessary, apply any filters to see just the timesheets you want.
If the filter controls are not showing above the timesheet table, click Settings, Filter.
To approve a timesheet, select the check box next to the timesheet and then click Approve.
To reject a timesheet, select its check box and then click Reject.
Note
For information about how resources work with their timesheets, or if you need to submit timesheets yourself, see the section titled Logging Time Using Timesheets in Chapter 23.
No matter how dedicated and conscientious, no one can spend every minute of the workday or workweek devoted to project assignments. There is bound to be time taken for nonproject and nonbillable tasks such as handling e-mail, attending staff meetings, and participating in training workshops.
In addition, there is bound to be some nonworking time happening during the course of a project, such as sick time, vacation time, and holidays.
In past versions of Project Web Access, nonworking time was handled by the resource’s working time calendar. Everyday administrative duties were not accounted for formally, although many project managers built in extra time for resources to handle them.
Now in Project 2007, through the use of timesheets, administrative time can be used to account for and even track nonproject time. Resources can assign themselves to an administrative time category in the timesheet.
Resources can also create additional administrative time categories as needed. New administrative time categories and sometimes the use of other categories set up by the project server administrator need to be approved by the resource’s timesheet manager.
To review and approve administrative time, follow these steps:
On the Quick Launch task bar in Project Web Access, under Approvals, click Administrative Time.
The Administrative Time page appears.
To approve administrative time, select its check box and then click Accept.
To reject administrative time, select its check box and then click Reject.
Note
For information about how resources work with administrative time, or if you need to use administrative time yourself, see the section titled Requesting Nonproject or Nonworking Time in Chapter 23.
Because Project Server is a Windows SharePoint Services application, you have the following collaboration features available in Project Web Access:
Document control
Risk management
Issues tracking
Documents, risks, and issues can be added, tracked, linked with tasks, assigned responsibility, and eventually closed. These all become an important aspect of managing the project as well as capturing important project archival information for use in planning future projects.
Through Windows SharePoint Services and Project Server, you can establish a document library associated with your project. The Project Web Access document library can be an excellent repository for project-related documents, including needs analyses, scope definition, product specifications, deliverable documents, team contact information, change control plan, and status reports. By creating a central location for public documents related to the project, you can enhance collaboration and the project management process, ensuring that resources and other stakeholders have all essential information at their disposal.
Depending on permissions, you and your resources can add documents, view documents, and search for documents in the document library. When adding a new document, you enter the file name and location for the document, specify the owner and status (for example, Draft, Reviewed, Final), and enter any pertinent comments. You can also associate a document with specific tasks if you want.
Document versions can be controlled using check-in and checkout processes. If a document is checked out, only the user who has checked it out can save to it. Multiple versions of a document can be compared and archived separately. When a document is linked to a project or individual tasks, the most current version of the document is linked.
To work with the document library, follow these steps:
On the Quick Launch task bar in Project Web Access, under Documents, click Shared Documents.
The Shared Documents page appears, showing documents that have been uploaded to this site.
Click a document name to open it in the Web browser.
Click the down arrow next to the document name to check out or edit the document.
Use the menus to add a new folder, create a new document, upload existing documents, set up e-mail notifications, and so on.
To return to Project Web Access, either click the Home tab or click Project Web Access above the table.
Note
You can also open the document library from within the Project Professional window. Click Collaborate, Documents. Or, on the Collaborate toolbar, click Documents.
To return to your normal Project Professional view, click the Click Here To Close This View link in the upper-right corner.
You can also associate documents with projects and tasks. To do this, follow these steps:
On the Quick Launch task bar in Project Web Access, under Projects, click Project Center.
Click the name of the project to which you want to attach a document.
The Project Details page appears.
Click Actions, Link Documents.
The Link Risks, Issues And Documents page appears.
In the Use The Following Lists To Link Items To This Task box, make sure Document Library is selected.
Click Upload.
On the Upload Document page, click Browse to navigate to the document you want to link to the project. Click the file and then click Open.
If you’re linking several files that are in the same folder, it’s easier to click Upload Multiple Files. Browse to the folder and then click the check boxes next to the names of all the files you want to link. Click OK and then click Yes.
Click OK on the Upload Document page.
The document is listed on the Link Risks, Issues And Documents page.
Click Save.
To see all documents for a project, open the project from the Project Center. Then on the Project Details page, click Actions, Link Documents. The Link Risks, Issues And Documents page appears.
Risks are events or conditions that can have a positive or negative impact on the outcome of a project. Because of this, project management and risk management go hand in hand. Much of what we do in project management is essentially managing risk. Straightforward risk management functionality is provided in Project Web Access through Windows SharePoint Services integration. Users can record information about risks, update this information, and track the risk. Risks can be escalated to the right person for mitigation.
Risks can also be associated with specific tasks, resources, documents, issues, and other risks.
Note
Although the new risk management functionality enables you to attach risk assessments to tasks, it does not provide cross-project risk tracking, reporting, or sophisticated risk management, such as MonteCarlo analysis.
To log a risk against a project or even against a task within a project, follow these steps:
On the Quick Launch task bar in Project Web Access, under Projects, click Project Center.
Click the name of the project for which you need to log a risk.
The Project Details page appears.
Click Actions, Link Risks.
The Link Risks, Issues And Documents page appears.
Click New.
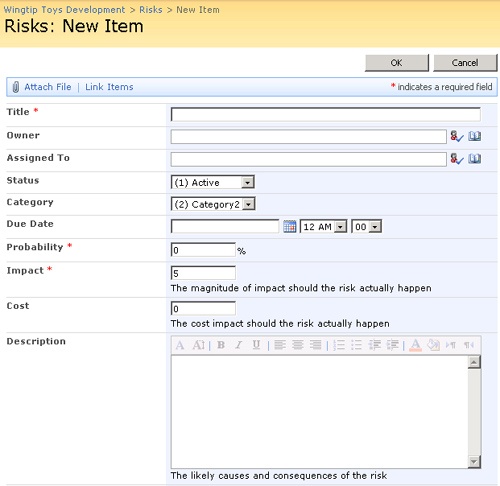
Complete the fields in the Risks: New Item page (see Figure 22-30). These include the owner of the risk, probability, impact and cost, description, mitigation plan, and contingency plan.
To link the risk to one or more tasks in the project, click the Link Items button near the top of the page. All tasks in the current project are listed. Select the check box for the task(s) with which you want to associate this risk. In the Relation field, click the description of the relationship of the risk to the task, for example, Risk Affects Task or Task Triggers Risk. Click OK in the dialog box. The linked tasks are added to the Links section at the bottom of the page.
To attach a file related to the risk, click the Attach File button near the top of the page. Click the Browse button to navigate to the file location, select the file, and then click Open. Click OK. The file path is listed in the Attachments section at the bottom of the page.
The new risk is saved and listed on the Link Risks, Issues And Documents page.
Click Save.
Although the risk is linked to the task, the task is not linked to the risk. There is no indication in the project plan about the risk. Because of this, it’s worth your while to enter a task note referring to the risk.
To see all risks for a project, open the project from the Project Center and then on the Project Details page, click Actions, Link Risks. The Link Risks, Issues And Documents page appears. Click the name of a risk to see details. Click Edit Item if you want to make any changes to these details.
You can also review risks for a project by selecting (but not opening) the project from the Project Center and then clicking Go To, Risks. In a separate window, the Risks page opens, showing the list of risks for the project, who each risk is assigned to, and its status. Click the risk name to see details.
By creating and editing risks, you can make mitigation and contingency plans for the risk, and track progress on the risk until it is resolved.
Issues tracking is integral to project management and team communication because most issues either arise from task activity or will affect task activity. By tracking issues related to a project, you can improve communication on project-related issues and ensure that problems are handled before they become crises.
With the issue tracker, resources can enter issues, assign ownership, track progress, record resolutions, and create related reports. The issues are stored on your project server and are accessible through Project Web Access.
Depending on permissions, you and your resources can create an issue, set its priority, and assign responsibility. The issue page includes a due date, discussion of the issue, and date of resolution. Issues can be associated with affected tasks, documents in the document library, or other related issues.
To log an issue against a project task, follow these steps:
On the Quick Launch task bar in Project Web Access, under Projects, click Project Center.
Click the name of the project for which you need to log an issue.
The Project Details page appears.
Click Actions, Link Issues.
The Link Risks, Issues And Documents page appears.
Click New.
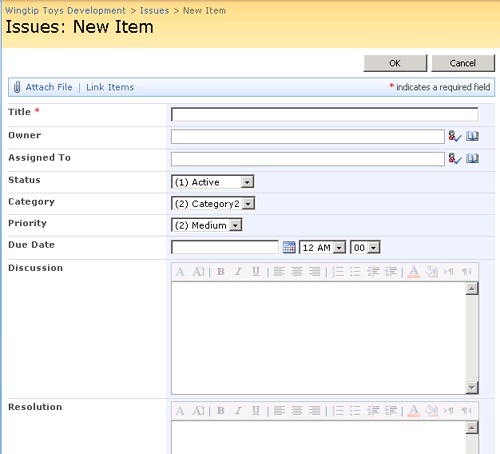
Complete the fields on the Issues: New Item page (see Figure 22-31). These include the owner of the issue, status and priority, discussion of the issue, and resolution.
If you want to link the issue to tasks other than the selected task, click the Link Items button near the top of the page.
All tasks in the current project are listed. Select the check box for the task(s) with which you want to associate this issue. In the Relation field, click the description of the relationship of the risk to the task, for example, Issue Affects Task or Issue Resolves Task. Click OK in the dialog box. The linked tasks are added to the originally selected task in the Links section at the bottom of the page.
The new issue is saved and listed on the Link Risks, Issues And Documents page.
Click Save.
Although the issue is linked to the task, the task is not linked to the issue. There is no indication in the project plan about the issue. Because of this, it’s worth your while to enter a task note referring to the issue.
To see all issues for a project, open the project from the Project Center and then on the Project Details page, click Actions, Link Issues. The Link Risks, Issues And Documents page appears. Click the name of an issue to see details. Click Edit Item if you want to make any changes to these details.
You can also review issues for a project by selecting (but not opening) the project from the Project Center, and then clicking Go To, Issues. In a separate window, the Issues page opens showing the list of issues for the project, who each issue is assigned to, and its status. Click the issue name to see details. Click the Edit Item button to update these details.