
Now that we have seen the Simple and Full views in the Categories and Items, let's make some categories. We will be using the Simple view to do this, although you are able to do it in the Full view as well.
The first thing we want to do is determine which categories to make. I have gone ahead and added a few new assignments to our course, which we will add to a category.
At the bottom of the page, click on the Add category button. Once this is done, we will be brought to a new page called New category. It is divided into two sections, Grade category and Grade item.
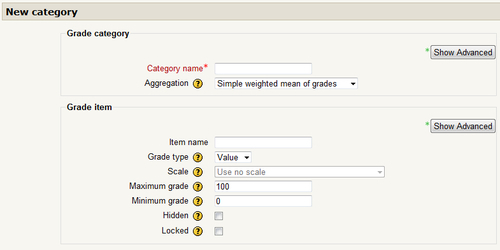
Note that we are looking at the basic view. Clicking on the Show Advanced buttons will add many new options. Feel free to experiment with these advanced options when you are comfortable with the basic settings.
In this section, we have two items to work with: Category name and Aggregation.
This will be the title of the new category we are making. Something clearly defining the parameters of the category is a good idea. For example, since we are going to be working with Ancient Persian Art and Literature, something along those lines would be useful. Alternatively, a general category containing different activity types could be used, for example, a category with only tests or one with only forums. However you decide to break down the activities in your course, a name that clearly defines the category is useful.
This will be the title of the new category we are making. Something clearly defining the parameters of the category is a good idea. For example, since we are going to be working with Ancient Persian Art and Literature, something along those lines would be useful. Alternatively, a general category containing different activity types could be used, for example, a category with only tests or one with only forums. However you decide to break down the activities in your course, a name that clearly defines the category is useful.
Here is where the information about the Grade items is entered.
Enter the name of the item here. Again, it is important to be clear about the item so there is no confusion about the assignment.
This menu offers four options for the type of grading that will be used:
Selecting this setting will use the Maximum grade and Minimum grade settings to determine the student's grade on the activity.
This drop-down menu holds a list of scales for use with the assignment. Any scale previously created in the course, either Custom or Standard, will be available for use in the menu.
These two settings determine the highest and lowest grade available. The minimum is typically set to zero, with the maximum changing depending on the course and your needs.
This will allow you to hide grades from the students enrolled in the course. If you decide to use this, click on the Advanced button. There you will see a Hidden until feature, which will automate the process of showing the activity results to the students when you are ready.
This setting is used to lock assignments, meaning that students will no longer be able to make changes after a certain point. This setting is usually used after a deadline is set. If you decide to lock the assignment, again, click on the Advanced button. This will show a deadline setting, which will automatically lock the assignment at the time of your choosing.
We are looking at Ancient Art and Literature in this course. We have several assignments on Ancient Persia that we want to be grouped together into a category. For our Category name, we will enter "Persian Art and Literature".
For our Aggregation, we will use the default, Simple weighted mean of grades.
For Item name, we will enter "Persia".
For Grade type, we will use Value. In our Maximum and Minimum grade settings, we will set the maximum to 20 and leave the minimum at zero.
We will leave Hidden and Locked disabled.
Once we have done all this, we will click on Save changes. Here is what our Simple view looks like after we have added our new category:
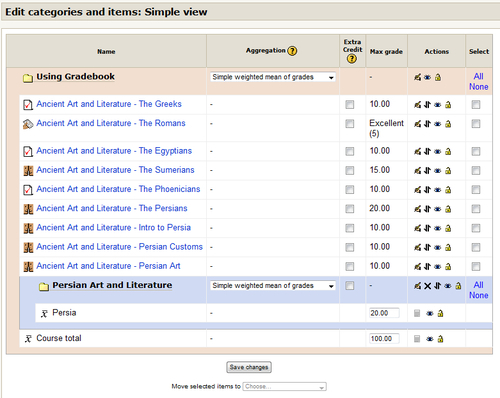
You can see that our new subcategory has been added and is clearly a subcategory in the larger Using Gradebook category.
Now, you can see that there are several Ancient Art and Literature activities related to Persia. We want to move those files from where they are now into the new category. We have two options here. The first is that we can click on the up or down arrows to move individual files to where we want them. This works, but it can be time consuming. Do you see the Move selected items to drop-down menu? Now that we have a second category, we can select multiple items and move them to where we want them. We will click on all the Forums related to Persia and, using the drop-down, place them all in the new subcategory at one time.
I am also going to make a few small changes. I'm going to change the scale grades we were using on the Romans to a 20-point values scale, I'm going to add a few more Forums, and then I'll add three more categories.
When I go to the New category page now, there will be a new section called Parent category. This is a simple drop-down menu and it contains all the categories we have available in the Gradebook. Choose the category you wish the new one to be part of. If you want it to be a simple subcategory, choose the course category. If you want to embed it in another category, choose the one you want it to be part of.
It is important to remember that subcategories in categories are limited to the value of the parent category. For example, if we were to place several subcategories into our Persia subcategory, the subcategory itself would still only be worth the original points assigned to it, that is, 20 points.
When we have finished, the part of our Gradebook appears as shown in the next screenshot:
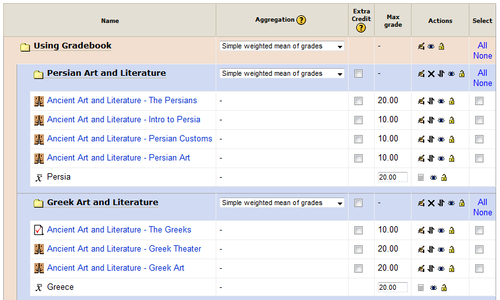
As seen from the previous screenshot, both sections are worth a total of 20 points. I have made four sections, each worth 20 points giving us a total of 80 points. However, the course itself is worth 100 points. We have two options here. The first is the easiest, leave everything as it is. If it is left as it is, Moodle will calculate everything and make each section worth the correct portion of the total. Our other option is to make the totals add up. We can go in and change each section to reflect the percent weight we want it to have. In our case, with four sections, we would simply need to add 5 points to each section bringing the total to 100 points. However, we will choose the simple route and leave it as it is.
As seen from the previous screenshot, both sections are worth a total of 20 points. I have made four sections, each worth 20 points giving us a total of 80 points. However, the course itself is worth 100 points. We have two options here. The first is the easiest, leave everything as it is. If it is left as it is, Moodle will calculate everything and make each section worth the correct portion of the total. Our other option is to make the totals add up. We can go in and change each section to reflect the percent weight we want it to have. In our case, with four sections, we would simply need to add 5 points to each section bringing the total to 100 points. However, we will choose the simple route and leave it as it is.
Now, we need to go in and give our students grades for all their hard work. I am going to go into the Grader report and turn editing on. I will manually enter grades for all three of the students enrolled in the course. I am not going to enter feedback, just the scores. This is shown in the next screenshot:
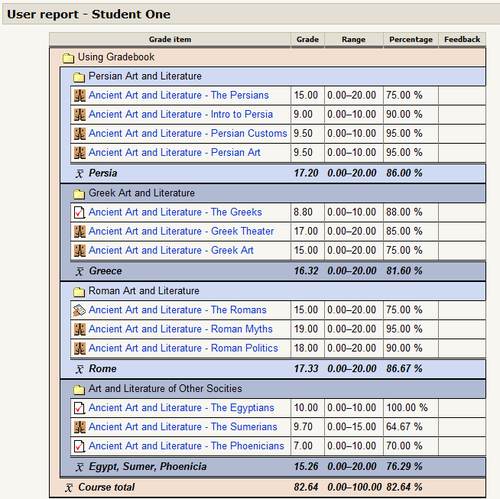
As you can see here in the User report - Student One, each section has been broken down into a percentage, then that percentage is calculated into a total number of points. This is then calculated into a percentage score.
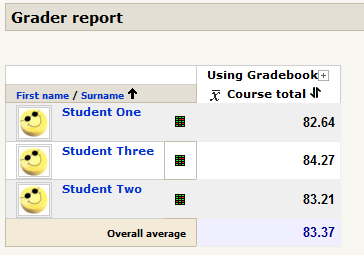
Going back to the Grader report, we can now see all the participants in the course and all the grades they have received for each of the assignments, but this view is not as useful as the User report because it only gives raw scores. However, if the course category +/- icon is clicked, you will see only the course grade. This is a very useful feature and will allow you to quickly see which students are excelling and which you may need to meet with. It also shows the course average. The collapsed view of the Grader report is shown in the next screenshot:
In this option, you are able to view the scales associated with the course. There are two types of scales: Custom and Standard. We have looked at how to set up scales in the Outcomes section. The scales page is shown in the next screenshot:
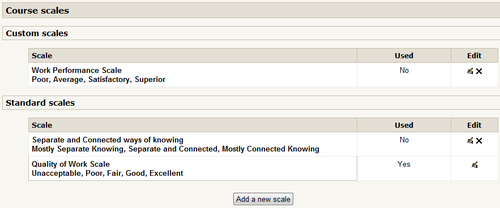
These are scales that are custom-made for the course. They are not used site-wide. In the previous example, you can see that I have added a custom scale titled Work Performance Scale. This was done by not selecting the Standard scale checkbox. You can see the title of the scale in the cell directly under the Scale header and the rankings/results under the scale's title.
In addition, you are shown whether or not it is used under the Used header. You also have the option to edit or delete the scale from here.
This section displays the percentage score assigned to letter grades and how they are assigned in Moodle. This section has two options: View and Edit. Note that Grade letters are set at the site level, but can be overridden at the course level as we will see next.
To enable letter grades in your course, log in and on the front page Administration block, go to Grades | Grade item settings. Once you are there, you will see an option called Grade display type. Change the display type to Letter and your grades will be displayed as letters.
This option takes us to a page called Grade Letters. This page simply shows the range of percentage scores required to achieve one of the defined letter grades. The scores required are shown from Highest to Lowest. A screenshot of the View page follows:

On this page you are able to edit Moodle's default settings for grades as shown in the next screenshot:
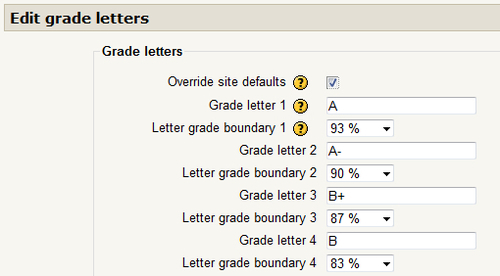
Clicking on the Override site defaults checkbox will enable you to change the default settings to whatever you feel is appropriate for the course.
Once the override setting is enabled, you are able to adjust the character used in Letter 1, by default A, to any letters or characters you desire. For example, you may want to give an A+ for students who achieve 98 percent or above. To do this, you would simply insert A+ into the Grade letter 1 textbox. Using this option allows you to create special, predefined scales for use in your course.
This percentage shows the minimum number required to achieve that score. Again, if you would like to alter the percentage, simply press the drop-down button and select the desired percentage from the list.
The options available range from 100 percent to 0 percent. They also include an Unused option, which means that Letter grade boundary will not be used. You have fourteen options to work with, so chances are that several options will remain set to Unused.
Again, this explanation applies to all Letter grade boundaries.
When you have finished with all the changes desired, click on the Save changes button located directly below the last Letter grade boundary.
In Moodle, it is possible to import and export your grades.
If you need to import grades to your course you are able to use two file types: CSV and XML. The size of the file you are able to import to the course depends on the course settings and the maximum uploadable file size will be displayed on both Import pages.
For detailed information about how to import grades visit Moodle's site at http://docs.moodle.org/en/Grade_import.
Sometimes you may need to have paper copies of your grades or you may simply want to physically store them on CDs. To do this you'll need to export them. Moodle offers several ways to export grades, from spreadsheets to plain text files.
The process is explained clearly on the Moodle grade export page found at: http://docs.moodle.org/en/Grade_export.