
Now that we have all the settings complete, we save the Lesson settings. Once our options are saved, we are taken to the Lesson Edit page where we are able to begin creation of the material and questions inside the Lesson. Part of the page is shown in the next screenshot:
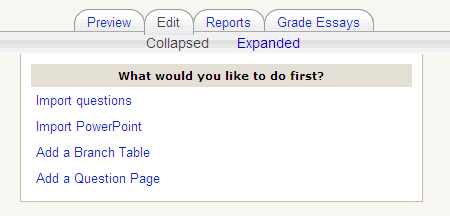
As we saw in the previous screenshot, there are four tabs: Preview, Edit, Reports, and Grade Essays. Because we have no questions or branches yet, Preview does nothing. Also, because there are no attempts on the Lesson yet, there are no reports to see or essays to grade. We will look at each of these sections after we have some material. So, for now, we are left with Edit.
Edit is where we start making the Lesson, and where all the material for the Lesson is created or imported. Here, we can make or import questions, import a PowerPoint, presentation or add a branch.
Previously, I briefly explained what Branches were, and now we are going to make our first one.
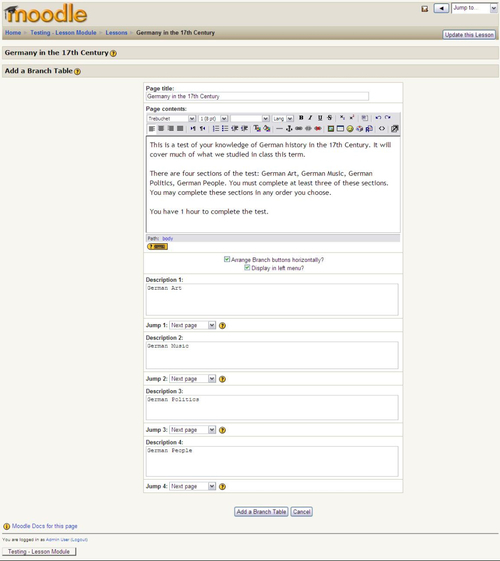
To create a Branch, we need to click on the Add a Branch Table link in Edit. Once we have clicked on the link, we will see the Add a Branch Table creation page. At the top of the creation page, we see textboxes for Page Title and Page Contents. For Page Title, we will enter what we want the page to be called. In the Page Contents we are going to explain what the test is about, what material is going to be covered, and what to do in the test.
Directly underneath these sections, we see two checkboxes. The first is Arrange Branch buttons horizontally. This option is selected as default, and will place the navigation options horizontally along the bottom of the page. If this option is un-checked, the buttons will be placed vertically.
The second checkbox is Display in left menu, which is also already selected by default. If the Display left menu option from the Formatting section in Editing Lesson has been enabled and this option is at the default setting, the Branch Table will be visible to the student in the left menu. If this option is disabled, the menu will not display the Branch Table page.
Under these two options, we start to create the descriptions of the navigation buttons. There are four description textboxes because we entered 4 in the Maximum number of Answers/Branches. In each of these textboxes we will enter what we want to be displayed within the button.
Under each of the descriptions, we can see a drop-down menu called Jump, which has four options: This page, Next page, Previous page, and End of Lesson. Selecting This page will move the student back to the top of the current page. Selecting Next page will move the student to the next page in the Lesson order. Choosing the Previous page option will bring the student to the previous page in the Lesson. Selecting End of Lesson will take the student to the end of the lesson. We haven't created any pages to link to yet, so we will select Next page for all of our Jumps options, and we will change them to the proper pages once the rest of the Lesson is created.
Once we have entered all the information in the appropriate places, we will click on the Add a Branch Table button at the bottom of the page and the page will be created. Here is what the page looks like with all the information included before clicking on the Save button.
When we click on the Add a Branch Table button, the page is created. However, the new page is not what we see when we click on the Add a Branch Table button. After clicking on it, we are taken back to the Edit tab, where we see our new page details, as shown in the next screenshot:
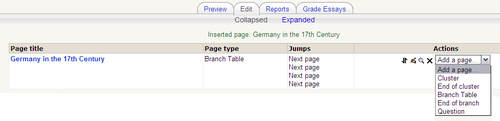
Here, we are shown which page has been added to the Lesson. Under the Inserted page line, we can see several headings detailing the pertinent information about the page. We see the title of the page, the page type, number of jumps and where they take us, and an actions drop-down menu. In a vain attempt to stop this run-on sentence... offering options for the creation of new pages.
However, this page is not the only way to view our newly-created page. Notice the Collapsed and Expanded links just above Inserted page? the previous screen shot shows us the Collapsed view—the most basic information about the page. Clicking on the Expanded link will give us a much more detailed, and possibly more useful, view of the page. In addition, if you have included any images in the Branch Table, they will be displayed here as well, as shown in the next screenshot:

Here, you can see the text of the page, what the jump buttons are titled, as well as all the other information that was contained in the previous Collapsed view.
Now that we have created a page and click on the Preview button, we will see what the Branch page looks like.
Just to show how an image would be displayed, I have gone back and edited the Branch Table. Because we are dealing with 17th Century German history, we will use a painting of the Battle of Nordlingen, a famous military engagement in 1634.
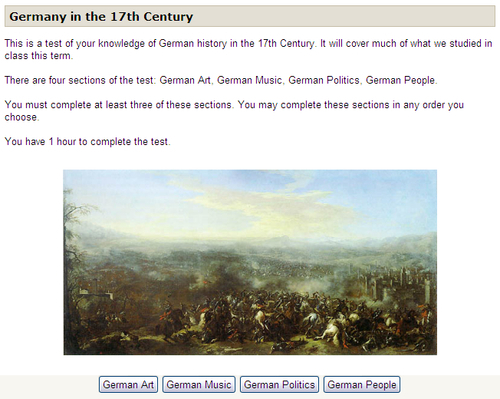
This screen is what our students will see when they begin the test. If you click on any of the buttons, it will simply return you to the same page because there is, so far, only a single page created.
From here, we could create sub-branches, but because of space issues, we will start creating some question pages.
As seen from the previous screenshot, we have created a Branch Table with four possible paths. We will now create four separate question pages, one for each of the buttons.
To being with, we will click on the Add a question page here link in the Expanded view page, located just above the page title. Clicking on this link will bring us to the Add a question page. The page is shown in the next screenshot:
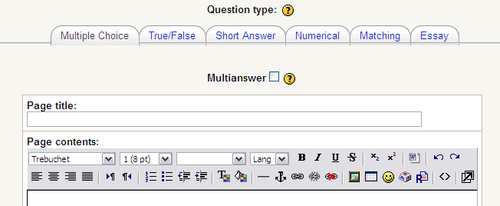
At the top of this new page, we see a series of six tabs showing which question types we can include in the Lesson. The six types of questions available in Lesson are: Multiple Choice, True/False, Short Answer, Numerical, Matching, and Essay. Under the question type tabs, we see a Multianswer checkbox, the Page title, and Page contents.
If the Multianswer checkbox is enabled, it allows us to accept multiple responses to the question. The Page title will designate the title of the page, which, like in Quiz questions, should be as descriptive as possible. Page contents is where we can enter our question, images, and links.
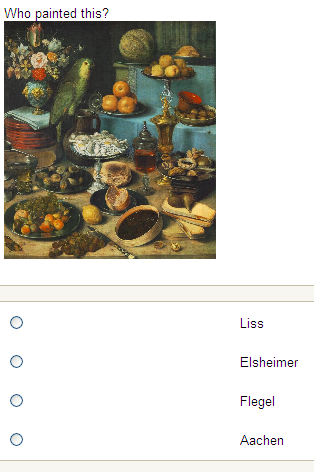
For our first question, we are going to use multiple choice. The question is about German art and includes an image. This question is not a Multianswer item, so we will leave the Multianswer checkbox blank. Now we create a name for the page. In the contents, we will ask about the image shown. Below the contents we see spaces for Answers and Responses. The Answers and Responses are accompanied by textboxes. Answer is where we put the answer and Response is where we give feedback, if desired.
Note, there is no option to the shuffle response order off or on in Lesson as there is in Quiz; the responses are automatically randomized.
Under the Answer and Response, there is a drop-down menu giving us options of what to do if the student selects that answer. We can send the student to the Next page, keep him/her on This page, move him/her to the Previous page, or send him/her to the End of the Lesson.
We will fill in our title, question, include an image, add the Answers and Responses, and send the student back to the Branch Table regardless of his/her response. Once everything has been entered and we have confirmed everything is correct, we click on the Add a question page here button and the question will be added to the Lesson.
There is also a Use editor checkbox next to the all the answers and responses. This option will allow you to use HTML while creating the answers and responses.
If custom scoring is turned off, a correct answer will move the student further along in the Lesson, while an incorrect response will jump to a page further back or remain on the same page. If jumps have not been changed, the first answer will be the correct answer and the other answers will be incorrect. Therefore, it is important to change the jumps.
Now we can click on the Preview tab to see the new question, shown in the next screenshot, but note that the image can be as large or small as you'd like.
Once the student has selected a response, he or so can click on the Please check one answer button and receive the feedback for their choice. The student will then click on the continue button and will continue on to wherever that response has been directed, in our case, the Branch Table we created earlier.
These questions are very similar to the Multiple Choice. The only differences is that there is no Multianswer option and there are only two places to enter Answers and Responses.
We will create a simple True/False question related to German Music. After everything has been entered and saved, the preview shows us something that looks like a Quiz True/False item.
In Lesson's Short Answer questions, we have two types to work with: Simple Analysis and Regular Expressions Analysis.
Simple Analysis is similar to the Short Answer items in the Quiz module. We enter a question, enter acceptable answers, use any wildcards we want, and create a final wildcard in the final answer slot to catch anything that falls outside of what is acceptable.
The asterisk says that the character directly preceding can be used or not and also allows any number of characters to be used between the character preceding the asterisk and the character immediately following it. J*Tolkien would accept JTolkien, J Tolkien, JR Tolkien, J R R Tolkien, John Ronald Reuel Tolkien, or anything else, as long as the expression began with J and ended with 'Tolkien.
If you ever need to use an asterisk in your actual answer, the asterisk must be preceded by a backslash. Here is how it needs to be entered: *.
The Regular Expressions Analysis is our second option in Short Answer, which is enabled by clicking on the Regular Expression checkbox. While offering a lot of power and flexibility, this option requires a little practice to master the basics, and a lot of practice to become an advanced user. Regular expressions work by placing special characters inside the answer string, which allow the computer to recognize an acceptable response. Let's look at how this works. We are only looking at a few basic examples here, so if you want more information about these expressions, you can start by checking out the following websites:
http://gnosis.cx/publish/programming/regular_expressions.html and http://www.zytrax.com/tech/web/regex.htm#intro.
The asterisk functions a little differently in Regular Expressions. While it means that there is any number of characters preceding it, it must be preceded by a period, because the period means any characters in this position. So, using the J*Tolkein example again, we would enter J.*Tolkein to enable the system to accept any of the previous combinations.
The plus sign functions in the same way as the asterisk, except that the plus sign requires that the preceding character be a part of the final answer. So, using the previous example, J+Tolkien would accept JR Tolkien, JRRTolkien, J R R Tolkien or anything else that began with J+one letter or more and ended with Tolkien.
This symbol, when used to separate two words, tells the computer to accept one of the two as correct. For example, center|centre, would accept either center or centre as a correct response.
The parentheses indicates what we are working with. This can be a phrase, word, or even part of a word. For example, placing the parentheses as they are seen here, Cent(er|re) would accept either center or centre as correct.
Using the question mark in an answer will allow the previous character to either be entered or not, and accept the response. For example, media?eval would accept medieval or mediaeval.
Using brackets will allow any letters inside the bracket to be acceptable as an answer. If [bce]ar is entered as the answer, bar, car, and ear, will all receive full points and a correct response feedback.
The Regular Expressions are case-sensitive. If you do not want the response to be case-sensitive, you must include a /i at the end of the answer. It is from Italy/i would not require any capital letters.
In order to use Regular Expressions to determine if something is missing from the correct response, you need to include two minus signs -- at the beginning of the answer. For example, --.*socks.* will tell the system that the word socks is missing from the answer. The student would then see the feedback you entered, and be directed to the page you selected.
As shown previously, to enable the system to detect incorrect information, we need to include two addition signs ++ at the beginning of the sentence. For example, if the answer should be dogs and cats, we might enter, ++(birds|snakes|fish|rabbits). So, if a student entered dogs and fish, fish would be identified as incorrect. From here, in the response, you would enter some appropriate feedback and link the student to where you want him/her to go.
These symbols can also be used in combination. For example, (|I am) working at the Colour Theater|Theatre/i .would allow for a variety of responses, such as I am working at the Color Theater, working at the colour theatre, I am working at The Colour theatre, Working at the color theatre, and many more.
As you can see, Regular Expressions can be a very powerful tool. I have only covered the basics here. Refer to the Moodle documentation at http://docs.moodle.org/en/Lesson_question_types#Short_answer for more information.
Now we are going to continue and make a Short Answer question about German politics. We are going to use the Regular Expression option and we will enter our question title, question text, answers, and responses. It is important to note that, unlike Quiz, we are limited in the number of possible answers we can accept. We have set our Maximum number of answers/branches to four, so we only have four possible response options. We have two options to change this. We can either edit the Lesson settings and increase the number of answer options, or we need to make sure that the question is framed so that the possible response options are limited. We are going to stick with our four Answer/Branches and try to create a question that will limit the response possibilities.
The question we are asking is, What happened on May, 15, 1648? The response we are looking for is something about the signing of the Treaty of Westphalia. To try and cover as many possibilities as we can with as few entries as possible, we have created two answers and two responses. We have also redirected the student to the branch table regardless of their response. This is what was entered, as shown in the next screenshot:
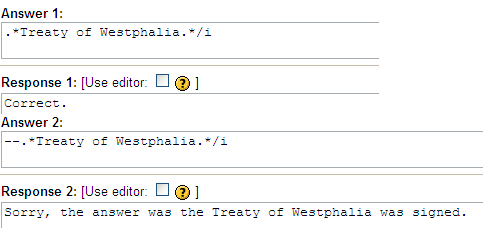
We can see that the Answer 1 will accept any answer as long as Treaty of Westphalia is included, we have also added the /i, which eliminates case sensitivity. In Answer 2, we can see that any answer that does not include Treaty of Westphalia will be considered incorrect, again with case being ignored.
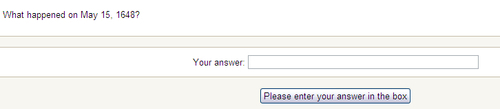
The student will see the question and be given an empty textbox to write in his/her answer. The output is shown in the next screenshot:
Short answer questions can be complex, and they require practice, but these question types are a great addition to any test you are designing. It is also important to remember that answers to Short Answer question are viewed in the order entered, so it is always best to have the most correct answer first, following a descending pattern to the final, incorrect response.
These items are set up like Short Answer, but require a number as the answer. Numerical questions are similar to Numerical questions in Quiz, but the options available and the way they are set up are different.
To use Numerical questions, we write a question that will elicit a numerical response. Then we enter the correct answer, or answers in the Answer textboxes available. If we are willing to accept a variation in the numerical response, for example, 150-200, we can use a colon between the numbers, 150:200, and this will tell the system to accept any number within that range. Unfortunately, there is no wildcard available in Lesson Numerical questions.
To deal with incorrect answers, and to provide feedback, we need to create a range of acceptable and unacceptable answers. For example, in the question we have on German people, we are going to ask about population in the 1650s. The correct answer is that (about) 10,000,000 people were living in the region at the time. So, in the first answer space, we enter 10000000. Note, there are no commas. If you enter a comma, the system will interpret the first comma it comes to as a stop marker, and the answer will only include the answer up to the first comma. Now, we have the correct answer, and that is the only response we want. Because there is no wildcard in this question type, we need to give a range of incorrect responses: 0:9999999 for Answer 2 and 10000001:99999999999999999 or so for Answer 3. Now, if the student responds with 10000000, he or she will receive the correct answer feedback. For any other answer, the incorrect feedback will be given instead., they will receive the incorrect feedback.
The final numerical product is shown in the next screenshot. Note that I added a message telling the students exactly how to enter their answers, just in case they are unfamiliar with Lesson or the Numerical format.

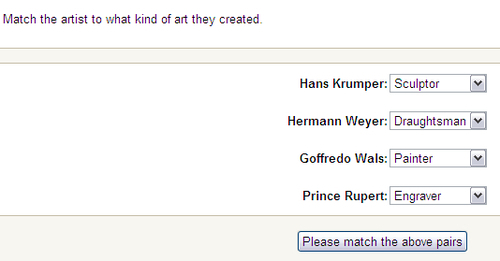
Matching questions in Lesson are very similar to how they are set up in Quiz. There is a series of pairs titled Answers and Matches With. Depending on how the students match the items, they are directed to the appropriate page.
It is important to note here that the Answers in Matching in Lesson are not shuffled. The items will be presented exactly the same each time; however, the Matches With are shuffled. Here is our example of German artists and their art forms.
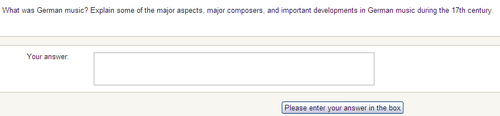
Essay is extremely easy to set up. Once the Essay is opened, we simply need to enter a title and a prompt for the students to respond to. Once that is done, we choose where we want them to go once they have finished with their response, then we click on Save page.
When the students open the Essay page, they are presented with the prompt and a textbox to enter their response. When they have finished, they click on Please enter your answer in the box button, and are directed to the page determined during the item creation. The question is shown in the next screenshot:
We have seen all the question types available in Lesson and showed how to create them. We have looked at the Branch Table and the Question Pages, but now we need to look at the other Lesson pages, the first of which is called Clusters.
Clusters are groups of questions inside the Lesson, typically focusing on some sub-aspect of the main material or a quiz inside the Lesson. Clusters are also the way to enter variations into the Lesson. For example, if, in the German Art section, we wanted to have our students look at some art and tell us if Flegel had painted it or not, we could either create questions within the Branch Table and place them in the order we wanted, or we could start a Cluster, create the questions we wanted, and allow the computer to decide the order. All we would need to do is create a Cluster including the items we want included and then create an end of the Cluster. Let's do one now.
First, I have gone back and added several more True/False questions to the German Art branch. All the questions are True/False, showing an image and asking the same question, Is this one of Flegel's paintings?
Now that I created have all the questions I want to include, I go to any drop-down menu and click on Cluster, which will add a new Cluster to the Lesson. Once the cluster is there, I need to move it to an appropriate place.
I have titled the new Cluster Cluster - German Art Flegel? T/F w/ Images. This title tells us that it is the beginning of a Cluster, is related to German Art, the questions in the Cluster are going to be related to Flegel, and they are all T/F questions with images.
In the Cluster, I have included a brief introduction (the students will not see this, but it helps to organize Lessons more effectively) and in the Jumps drop-down, I have set the link to Unseen question within a cluster, so, regardless of the students responses, they are directed to a random question in the Cluster. This action forces the students to work through every example in the Cluster until they have seen them all, then they will automatically be sent to the End of Cluster.
Now, we need to create the End of Cluster, which lets the system know that the Cluster has been completed and it is time to move on to another part of the Lesson. To create the End of Cluster, click on the Edit tab, select the End of Cluster link from any drop-down menu, and click on End of Cluster, which moves to the end of the questions in the cluster.
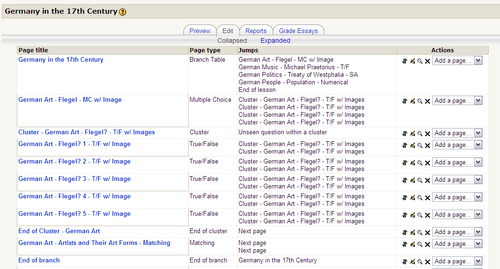
Next is the Collapsed view of how the Cluster is organized. You can see that the German Art Flegel MC w/ Image link? leads to the Cluster. Once the Cluster starts, there are five T/F questions in the cluster, which will be presented to the student in a random order. This random order is done by directing all five questions back to the start of the Cluster. The system recognizes which questions have already been presented, so each item will only be seen once. Once all the items have been attempted, the system directs the student to the End of Cluster, which will bring them to the Next Page in the sequence, in this case, German Art Artists and Their Art Forms Matching.
This sequence is how most clusters work. There are a few other ways to organize them, but for now, this example will get you started. If you want to get some additional information on Clusters, check out Moodle's site. Also, remember that Clusters are not included in the progress bar or standard grading, so when you are checking the Lesson and you see that the progress bar is not moving or the grade is not correct, don't worry.
Clusters can be a tricky at first, but once you try a few, they get to be pretty easy. Just remember that you need to put all the cluster questions somewhere between the start and end cluster. Also, all the items should, if you want the items displayed in a random order, be redirected to the Cluster start page.
End of branch functions like End of Cluster. It signifies the end of a particular branch and directs the user back to the Branch Table. End of Branches are created just like end of cluster pages. Simply go to the End of branch link or any of the drop-down menus in the Edit tab and click on End of branch. Place the newly-created End of branch at the appropriate place in the Lesson sequence and make its Jumps link take the user to the Branch Table.
As of now, if a student entered the Lesson and answered all the questions, he or she would not be able to complete the Lesson, because we have not added any way to end it. Unless the Lesson was timed and the student sat and waited for the time to run out, he or she would receive an Uncompleted message. We don't want this. We want the students to finish and then begin working on something else. What we need to do now is create an End of Lesson Page.
End of Lesson is created in a Branch Table. Using one of the Jumps drop-down menus from the Edit page, you can see an End of Lesson option. Clicking on this will create the End of Lesson Jump, which will bring students to the final page of the Lesson congratulating them on finishing, and showing them their results. You must write, some text, for example, End of Lesson, in the Description textbox.
Now the students have a way to end the Lesson when they are ready.
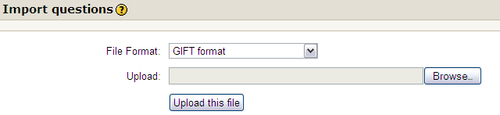
Importing questions to Lesson is a simplified version of importing to Quiz. To import questions to Lesson, we are given a drop-down menu with all the Moodle-acceptable formats. We choose the file format type when we enter the filename we want to upload in the Upload textbox. Once this step is done, we click on the Upload this file button. The Import questions page is shown in the next screenshot:
Once you have selected and clicked on the Upload this file, you will see a page showing the number of questions being imported at the top of the page and a list of the questions. At the bottom you will see a continue button. Click on it to complete the upload of the file. Once this action is done, the files will be added to the Lesson and are ready to be used.
Import PowerPoint allows you to take a PowerPoint presentation and have it added to a new Lesson as a Branch Table. The menu to do this looks just like Importing Questions; however, there are a few steps that need to be taken before we import the file.
First, we need to open our PowerPoint presentation and save it as a web page. Once it is saved as a web page, you will see an .htm file and a folder containing all the presentation data. Do nothing with the .htm file but zip the folder. Once the folder has been zipped, go the new Lesson and click on the Import PowerPoint link. You will see the Import menu. Find the zipped folder and upload it to the course. You will see a continue button. Click on it and the upload will be completed. You do not need to upload the .htm file.
The PowerPoint presentation will be now be displayed as a Branch Table and will have Next and Previous buttons for navigation between slides. From here, you can click on the Edit button and begin to enter clusters, branches, or question pages.
Now that we have a way to complete the test, we need to be able to see how the students did. When a student completes the Lesson, he or she will see a page similar to this.
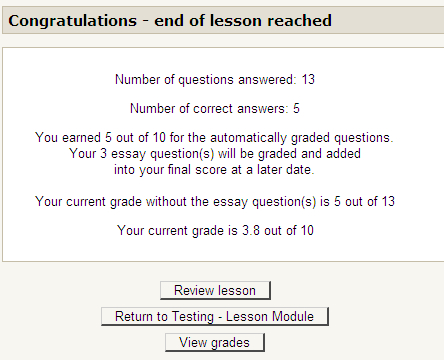
The data presented shows the student the number of questions answered, the number they got correct, their current grade without the essay points, and the overall current grade.
The students are also presented with three buttons linking them to a review of the Lesson, which, if enabled, will allow students to attempt the test again. The second button links the student back to the course homepage, seen in the previous screenshot as Return to Testing Lesson Module. The final button leads them to their grades.
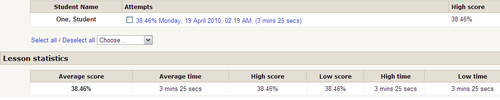
The instructor's report page is very different. Instructors are offered an overview and a detailed statistics view. The overview gives detailed information about individual students and also gives the class high, low, and average of scores and time. The teacher report view is shown in the next screenshot:
Tip
Careful!
The drop-down next to the Select all / Deselect all only has a single option, Delete selected. If you click on this option, you will not get a second chance to confirm the deletion, and the student results that were in the report a moment ago will be lost forever! If you have accidentally selected the Delete option, but not yet released the mouse button, the Esc key can save you!
The detailed statistics view offers instructors the class response statistics of each of the items. This report can be useful for evaluation of question difficulty or other possible question issues or research. The detailed view of a question, in this case a matching question, is shown in the next screenshot:

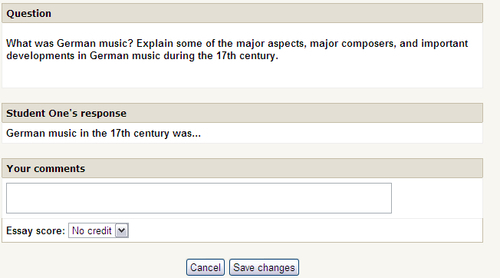
Clicking on this tab, located next to the Reports tab, will link us to a page where we will be able to review each student's essay and comment on it. In addition, we can e-mail our comments and grades to them. When we click on the tab, the next screenshot appears:

By clicking on any of the essay links, we will be shown a page that has the essay prompt, the student response, a place for us to make our comments, and a drop-down for us to give the grade. The available grades range from No Credit to the point value assigned to the lesson. We can see the German music essay opened and ready for our comments in the next screenshot:
As mentioned in the introduction, Lesson can give vocabulary, or flash card quizzes and drills as well. If you have a vocabulary list you are interested in quizzing your students on or having them review, here is how you can do it using Lesson.
First, we need to create a new Lesson. Go through the normal steps to create a Lesson and in the Flow control section of the Lesson settings page, adjust the settings depending on what you want to do with the test. The only setting we really have to work with here is the Action after correct answer drop-down. The functions available from this menu were described earlier in the Flow control section. You can set the minimum number of items the student will need to complete, as well as the Number of Pages (Cards) to show. If the Number of Pages (Cards) to show is left at 0, all the vocabulary in the Lesson will be displayed. If you set a number greater than zero, that number of cards will be displayed.
After getting the Flow control and the rest of the Lesson set to our liking and saved, we begin to add the vocabulary items to the Lesson. Multiple Choice and True/False provide quick vocabulary reviews or tests and they are also easy to design and create, but you could use any question style you wish. Once all the questions have been created, reviewed, and saved, it is time to move on to the preview of the test.
As you go through the vocabulary test, see if there are any problems with the setup or items. Once you have confirmed that the vocabulary test is working properly, you're ready to give it to your students.