
Removing and Replacing Camera
Movements
Movements may be removed from the camera body for lubricating and cleaning provided that the flange focal depth is checked before use. Otherwise movements should be cleaned and oiled while still in the camera.
Removing and Replacing a PANAFLEX Camera Movement
Tilt the camera slightly up to ensure the camera door remains open on its own.
Inch camera until the pulldown claws are at the bottom of the stroke and fully withdrawn from their slots, stopping just before the pulldown claw arm obstructs the lower movement lockdown screw.
Gently use a wide screwdriver to loosen the two short length knurled-head ”capture” screws which secure the movement plate. Unscrew approximately five turns until they go loose in their bushings. Remove movement by pulling on the pitch control knob, wiggling to loosen. Please be gentle.
To replace the movement, inch the camera until the pins of the motor coupling are horizontal with the witness mark downwards and similarly align the movement shaft so that they match. Hold the movement with both hands using the left hand for support and the right hand to guide the movement into position.
Hold the movement with the thumb on the pitch control knob and the forefinger on the top aperture dog-lock, slide the entire unit into the camera interior, engage coupling in camera body with the witness marks aligned, secure with short knurled-head capture screws and tighten with a wide screwdriver.
Check the flange focal depth, see page 150, before reusing the camera.
Note: The interface between the motor drive coupling and the movement coupling is offset so they cannot be assembled incorrectly. If the movement does not seat, inch camera back and forth slightly until they fit snugly together. If it still does not seat remove and check the drive and movement couplings for possible damage.
Removing and Replacing a PANASTAR Camera Movement
The method of removing and replacing the movement of a PANASTAR camera is similar to that of a PANAFLEX except that pull down claws should be set in the middle of the pull-down movement and then withdrawn by pushing the retraction knob downwards.
In addition to the two movement retaining screws there is also a cam at the rear of movement plate which must be released before the movement can be removed and replaced and tightened afterwards.
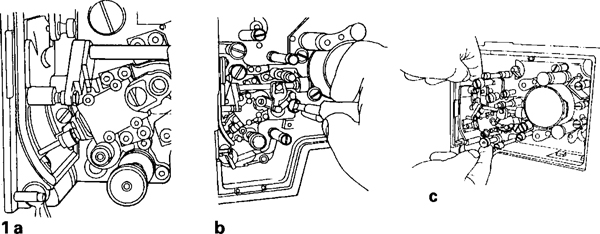
1 Removing a PANAFLEX movement: a. Position the claws at the bottom of the pull-down stroke stopping just before the link arm covers the lower captive screw, b. Loosen the two captive screws with a broad screwdriver, c. Pull gently on the pitch control to remove the movement.
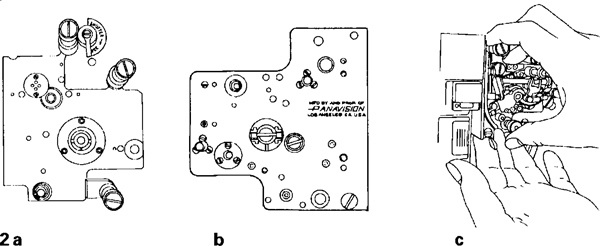
2 Replacing a PANAFLEX movement: a. Inch camera until witness mark on the movement coupling is directly downwards, b. Align the movement until the witness mark is directly downwards, c. Hold movement correctly to replace.

3 Removing a PANASTAR movement: a. Pull down claws should be in the middle of the pull-down movement and then withdrawn by pushing the retraction knob downwards, b. In addition to loosening the captured screws a cam at the rear of the movement plate must also be released with a screwdriver.