Managing Styles and Templates
As you can see from the discussion in this chapter, styles and templates are inextricably related. Because many of the styles you use are stored in templates, managing styles boils down to managing the templates that contain them.
Creating a New Template from Scratch
To create a new template choose File, New, click the Template button, and then click OK.
A Word template is nearly identical to a Word document, except it also contains AutoText entries. (The Normal template also contains formatted AutoCorrect entries.) That's the only difference. Usually Word templates are identified with the filename extension *.dot, but that isn't a requirement.
Where Does Word Store Templates?
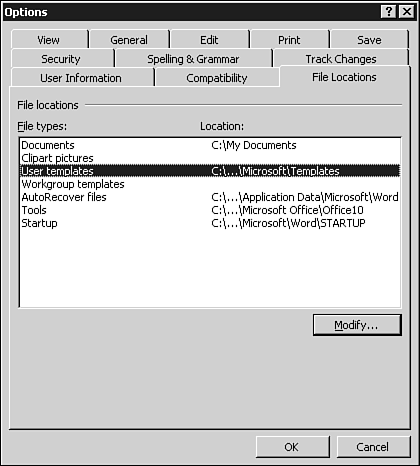
When you save a new template, Word attempts to save it in your User templates folder—that's the location marked User Templates in the File Locations tab of the Options dialog box (choose Tools, Options), as shown in Figure 18.6.
Figure 18.6. The User Templates and Workgroup Templates folders should hold all the templates you intend to use.

Unless you specifically change the location on the File Locations tab, user templates are stored in your Windows Profiles folder. If you're working on a Windows NT, 95, 98, or ME machine with user profiles enabled, that's typically C:<Windows folder>Profiles <username>Application DataMicrosoftTemplates (where <Windows folder> is the name of the folder that contains the Windows program files and <username> is your logon ID); in Windows 2000, it's C:Documents and Settings<username>Application DataMicrosoftTemplates. If you're working on a Windows 95, 98, or ME machine that doesn't distinguish among different users, you'll usually find user templates in C:<Windows folder>Application DataMicrosoftTemplates. If you want to create a new tab for the New dialog box and place your template on that tab, choose File, Save, click the Create New Folder icon, give the new folder the same name you want to appear on the tab, and then choose Save.
When you bring up the New dialog box, Word combines the templates in the User Templates folder, the Workgroup Templates folder, and any predefined (possibly uninstalled) templates that ship with Office (in the U.S. English version of Word, those are stored in C:Program FilesMicrosoft OfficeTemplates1033).
→ To learn the tricks of the trade when it comes to creating new files, see "Creating New Files".
Templates stored in the Startup folder (shown at the bottom of Figure 18.6) are automa tically loaded by Word when it starts. If you have any VBA macros that you want to be available every time you run Word, they should be placed in templates located in the Startup folder.
→ To learn about VBA's rather stringent requirements for the files that hold projects, see "Storing Projects".
Note
The Word documentation would have you believe that styles defined in templates in the Startup folder are available in every open document. That isn't true. Macros in the Startup templates are available in all the documents. Styles are not.
Customizing Word Templates
When you open a template (as opposed to creating a new document based on a template), you can modify it in precisely the same ways as you would change a document: You can add text, pictures, headers and footers, hyperlinks, macros—in short, everything that goes in a document (plus AutoText entries).
Remember, however, that any text you place in the document itself is considered to be "boilerplate," and is copied into any new documents you create based on that template.
Copying Styles and Settings Between Templates
Word includes a handy tool called the Organizer that allows you to copy styles, toolbars, and macro projects between documents and templates. The Organizer also lets you copy AutoText entries, but these can move only from template to template.
To make use of the Organizer, follow these steps:
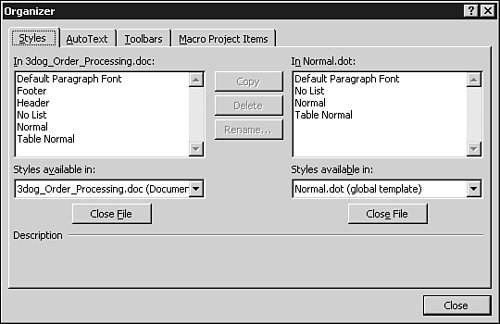
Choose Tools, Templates and Add-Ins. Click the Organizer button. You see the Organizer dialog box (see Figure 18.7).
Figure 18.7. The Organizer copies, deletes, or renames styles, AutoText entries, custom toolbars, and macro projects.

Make sure the "from" and "to" files—documents or templates—are referenced in the Styles Available In boxes. If you have the wrong files, click Close File, then Open File, and select the correct ones.
Select Styles, AutoText, Toolbars, or Macro Project Items, depending on which settings you want to manipulate. Note that AutoText items can reside only in templates.
