
Creating Directories
The only real difference between the way Word handles form letters and the way it handles merged "directories" (in previous versions of Word, they were called "catalogs") lies in the way Word uses page breaks. In a form letter, Word inserts a page break (actually, a "next page" section break) after it finishes processing a record from the data source. In a directory, Word doesn't add page breaks; as a result, one record follows another in the finished document.
→ You can also use Outlook's built-in printing capabilities to produce phone lists, even on Day-Timer sheets; for details, see "Printing Phone Lists from Your Contacts List".
Say you want to print a custom report of all the people in your Outlook Contacts list, in which several records appear on a page—perhaps in your own version of a Day-Timer-like format. Here's how you do it:
Start a new document as described in the preceding sections, but in the first step of the Mail Merge Wizard, choose Directory. That tells Word you want to put more than one record on a page.
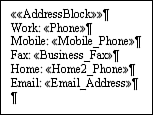
Add the fields by using Step 4 of the Mail Merge Wizard, as before. A typical MyTimer page might look like Figure 20.8.
Figure 20.8. Custom Outlook Contacts reports are much easier to configure in Word than in Outlook itself—if you know how to merge.
Adjust the document any way you see fit. In the case of Day-Timer-like reports, you might want to create multiple columns, change the page size, and/or set the paper source to print on special drilled sheets.
Tip from 
To control page breaks in directory-style merges such as this one, use the paragraph formatting property Keep with Next. In this case, you might put an empty paragraph mark at the end of all the data lines. Then select the data lines (not the final paragraph mark); choose Format, Paragraph; click the Line and Page Breaks tab; and check the Keep with Next box to ensure records don't break across pages.
Have Word merge to a new document. You'll probably want to print in duplex style—that is, using both sides of each sheet of paper. To do so, choose File, Print, and check the Manual Duplex box in the Print dialog box.