
Creating Custom Dialog Boxes
All the Office VBAs contain extensive tools for creating and controlling custom dialog boxes. VBA calls them UserForms but they have absolutely nothing to do with Word or Excel data-entry forms.
VBA custom dialog boxes can do anything any Windows dialog boxes or Office dialog boxes can do, without exception. You can create custom dialog boxes to ask for user input, have the user make choices, let them navigate to a file or folder, or warn them of questionable actions, for example.
All the items you're accustomed to seeing on Windows dialog boxes (they're called "controls") are available in VBA: pushbuttons, check boxes, radio buttons (option buttons), pictures, text boxes, tabs, and so on.
In general, when you want to build a custom dialog box, the general process looks like this:
Start with a blank dialog box.
Add controls to the box.
Write programs to handle various events associated with the controls: what should happen when the user clicks a button, types text, or checks a box, for example.
Test the custom dialog box to make sure it contains the controls you specified and that the programs attached to the controls work properly.
Repeat and refine.
Say you want to build a custom Word dialog box to handle printing letters. It contains two check boxes: One tells Word to print the current document; the other tells Word to print an envelope. Here's how:
Start Word and press Alt+F11 to bring up the VBA Editor. In Project Explorer, navigate to the Normal project.
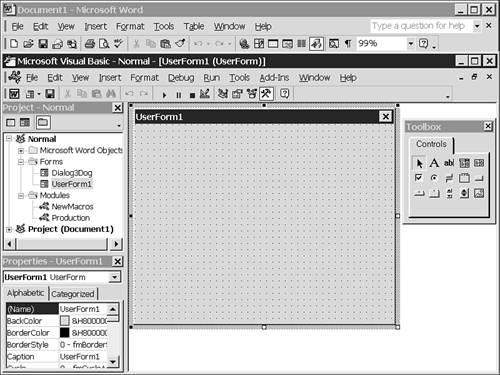
Choose Insert, UserForm. A custom dialog box called UserForm1 appears in the code window, along with a toolbox containing controls you can place on the custom dialog box (see Figure 40.16).
Figure 40.16. VBA calls its custom dialog boxes UserForms. This new one gets the name UserForm1.
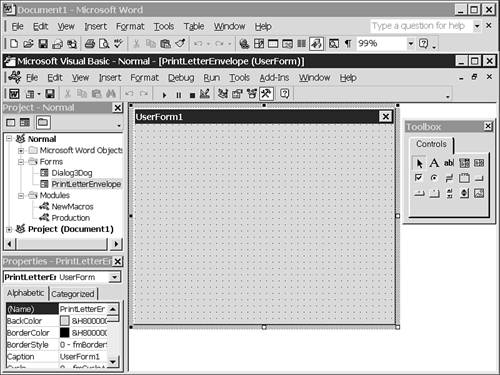
To change the name "UserForm1," move down to the Properties window, select the text to the right of the entry (Name), and type a new name—say, PrintLetterEnvelope.
To change the title of the UserForm1 window, select the text next to Caption in the Properties window, and replace it with Print Letter and/or Envelope (see Figure 40.17).
Figure 40.17. In the Properties window, the name of the custom dialog box is stored in (Name), and the window title is in Caption.
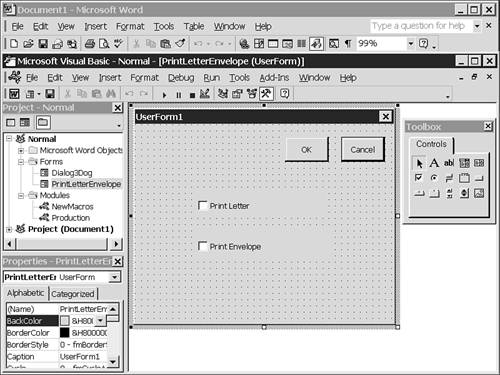
Click once on the check box icon in the toolbox. Then click and draw on the blank custom dialog box, as shown in Figure 40.18. Click CheckBox1 and type the text you want to appear in the custom dialog box—for example, Print letter.
Figure 40.18. Draw controls on the custom dialog box by clicking once in the toolbox, and then clicking and dragging on the dialog box.

Click once more on the check box icon in the toolbox, draw another check box on the custom dialog box, and add the following text: Print envelope.
Click once on the Command Button icon in the toolbox. Click and draw a button at the top of the custom dialog box; then click the face of the button and type the text OK.
Repeat the procedure and draw a Cancel button, typing the text Cancel on the face of the button. Then, in the Properties window, change the Cancel property to True (see Figure 40.19).
Although the custom dialog box doesn't do anything yet, now's a good time to test it, just to make sure the controls look right. To get the custom dialog box started, you have to create a macro that runs the dialog box. Here's how:
Find a convenient module in the Normal project.
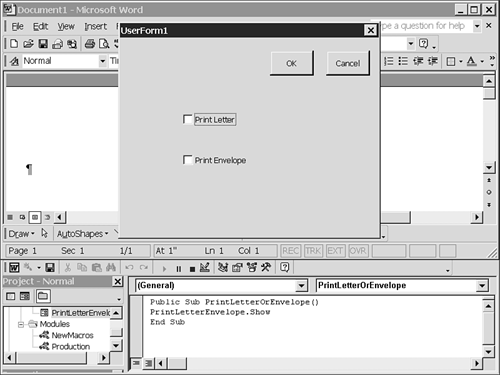
Choose Insert, Procedure to insert a new macro. Name it PrintLetterOrEnvelope and press Enter. As usual, VBA provides the Sub/End Sub pair.
Type this one-line program: PrintLetterEnvelope.Show.
To run the macro, press F5. VBA finds the PrintLetterEnvelope custom dialog box, and shows it on the screen (see Figure 40.20). To end the test, click the Close (X) button in the upper-right corner of the custom dialog box.
Figure 40.20. Custom dialog boxes have to be launched—in this case, by a macro. When launched, the dialog box's internal programs take over.
When you finish running the test, VBA/Word should look like Figure 40.19, shown previously, with the PrintLetterEnvelope custom dialog box showing. To add some intelligence to the custom dialog box:
Double-click the Cancel button. VBA/Word responds by creating a new subroutine, attached to the custom dialog box, called CommandButton2_Click(). This subroutine will run when the user clicks CommandButton2, which is the button you labeled Cancel. As always, VBA supplies the Sub/End Sub pair.
Type this one-line program: End.
Note
The End command removes the custom dialog box from the screen, closes all open files, releases any memory being held for variables, and stops the macro.
Bring back the custom dialog box by choosing View, Object. Again, the screen should look like Figure 40.19.
Double-click the OK button. VBA/Word creates the subroutine called CommandButton1_Click(). It runs when the user clicks CommandButton1—the one you marked OK. You'll see the Sub/End Sub pair.
Type this three-line program:
If CheckBox1 Then ActiveDocument.PrintOut
If CheckBox2 Then ActiveDocument.Envelope.PrintOut
End
That's it. The custom dialog box is complete. Anytime you want to use this custom dialog box, just run the PrintLetterOrEnvelope macro, using any of the techniques discussed in the first section of this chapter.