Let us take a few examples to understand how Instruction Files work in Documentum.
Let us walk through a very simple example where content is created from a simple template XML file and later an XML element is removed from the template file. The existing content is updated via a simple Instruction File using the <delete-element> instruction.
- Create a Template file (
Original_Template.xml) and its associated Rules file (Original_TemplateRules.xml) as per the following structure:Template File
Original_Template.xml:<?xml version="1.0" encoding="UTF-8"?> <PRODUCTINFO> <NAME/> <SHORTDESC/> <COST/> <PRODUCTTYPE/> </PRODUCTINFO> <?xml version="1.0" encoding="UTF-8"?> <rules> <tagcontent tag_name="NAME"> <textline instruction="Please enter a name" label="Product name:" required="Y"> </textline> </tagcontent> <tagcontent tag_name="SHORTDESC"> <content instruction="please provide a short description for product" label="Product Description:" lines="5"> </content> </tagcontent> <tagcontent tag_name="COST"> <textline instruction="Please enter cost in dollars" label="Cost:"> </textline> </tagcontent> <tagcontent tag_name="PRODUCTTYPE"> <choice instruction="Please choose a type" label="Product Type:" values="Type A,Type B,Type C"> </choice> </tagcontent> </rules>
- Create two sets of content using the template file
Original_Template.xmland provide names to them (refer to figures 17.2 and 17.3). For example:Testing1_Original_Template.xmlandTesting2_Original_Template.xml.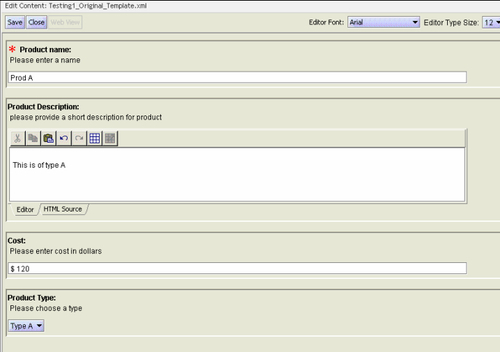
Figure 17.2: First content created from template Original_Template.xml
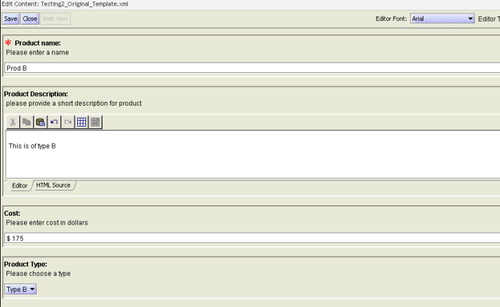
17.3: Second content created from template Original_Template.xml
You can view the XML structure of the created content from File | Export in Web Publisher, and export the content XML files on the local machine accessing Web Publisher.
Following are the content XML files for the content created above. These have been created from the template file
Original_Template.xmlversion 1.0:Testing1_Original_Template.xml:<?xml version="1.0" encoding="UTF-8"?> <PRODUCTINFO> <NAME>Prod A</NAME> <SHORTDESC> <p> This is of type A </p> </SHORTDESC> <COST>$ 120</COST> <PRODUCTTYPE>Type A</PRODUCTTYPE> </PRODUCTINFO> <?xml version="1.0" encoding="UTF-8"?> <PRODUCTINFO> <NAME>Prod B</NAME> <SHORTDESC> <p> This is of type B </p> </SHORTDESC> <COST>$ 175</COST> <PRODUCTTYPE>Type B</PRODUCTTYPE> </PRODUCTINFO>
- Modify the original template XML file by removing the
<COST/>XML element.Following is the template file (version 2.0)
Original_Template.xmlafter modification.<?xml version="1.0" encoding="UTF-8"?> <PRODUCTINFO> <NAME/> <SHORTDESC/> <PRODUCTTYPE/> </PRODUCTINFO>
- Using any XML editor, create an Instruction File (
Delete_Element_Instruction.xml) that updates content XML files by removing their contained<COST>XML element.The following Instruction File (
Delete_Element_Instruction.xml) can be used in such a scenario:<?xml version="1.0" encoding="UTF-8"?> <instructions xmlns ="http://www.documentum.com/wp" xmlns:xsi="http://www.w3.org/2001/XMLSchema-instance" xsi:schemaLocation="http://www.documentum.com/wp instructions.xsd"> <delete-element> <path>/PRODUCTINFO</path> <nodename>COST</nodename> <comments>Deleting COST element</comments> </delete-element> </instructions>
<delete-element>:Instruction File element to delete an existing XML element<path>:XPath expression to identify the path where the XML element to be deleted currently exists<nodename>:Name of the target node (XML element) to be deleted<comments>:Optional comments stating the purpose of the Instruction File
- Browse to Site Manager | Instructions from the left tree pane in Web Publisher as an administrator. Create a folder to store the custom Instruction Files. Within the created folder, import the
Delete_Element_Instruction.xmlInstruction File by choosing File | Import as shown in figures 17.4 and 17.5.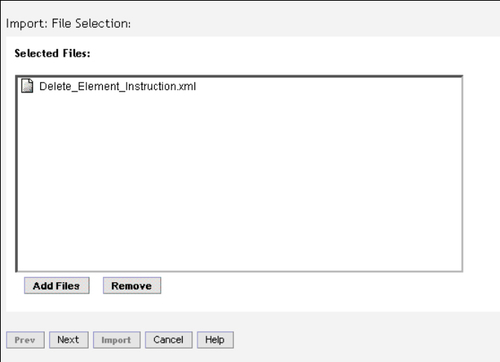
Figure 17.4: Importing the Delete_Element_Instruction.xml file (Step 1)

Figure 17.5: Importing the Delete_Element_Instruction.xml file (Step 2)
- We are all set as far as configurations for Instruction Files are concerned. Now, browse to the respective category for the modified template file
Original_Template.xmlunder Site Manager | Templates. Choose the modified template fileOriginal_Template.xmland click on the View | Versions option as shown in figure 17.6.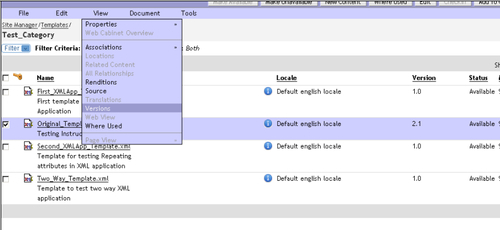
Figure 17.6: Viewing all versions of the modified template file
- Refer to figure 17.7; from the versions shown, choose version 1.0 of the template file, because the existing content was created from the older version (1.0) of the template and not the modified version 2.0 of the template file.
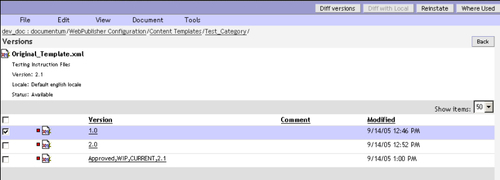
17.7: Choosing the version of template file with which content was created
After choosing version 1.0, click the Where Used button shown at the top right-hand side as shown in figure 17.7. All content files created from the selected version of the template file are shown.
Choose the content file(s) to be updated by the Instruction File and click the Update Content button at the top right-hand corner, as shown in figure 17.8.
We have chosen only the
Testing1_Original_Template.xmlcontent file.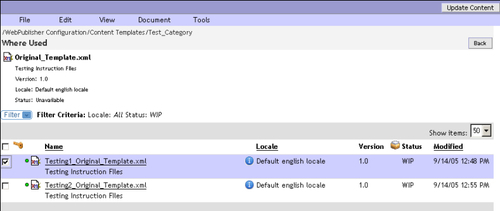
Figure 17.8: Choosing the content file to be updated by the Instruction File
- Choose the relevant Instruction File by clicking on the Select Instructions file link shown in figure 17.9. We have chosen the Instruction File
Delete_Element_Instruction.xml. Finally click on OK.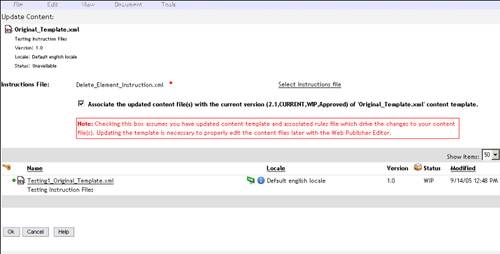
Figure 17.9: Choosing the correct Instruction File
- The Instruction File processing is triggered and the chosen content files(s) are modified as per the updated template file structure. Clicking on the Task Status button in Web Publisher shows the status of the Instruction File processing.
Example: When you update XML Content Task using the
Delete_Element_Instruction.xmlInstructions File, theUPDATE_XMLCONTENT_1126683079171log file is created in theWcmLogfolder. - Log in to Documentum Administrator as an administrator and go to Cabinets | WebPublisher Configuration. Click on the WcmLog folder to view the log file generated (refer to figure 17.10) by the above Instruction File processing.
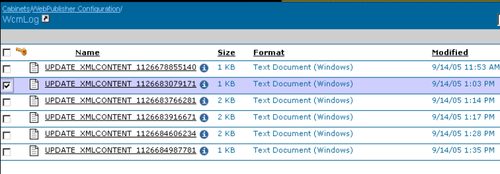
Figure 17.10: Existing log files due to Instruction File processing
- Verify the state of the content file
Testing1_Original_Template.xmlafter the Instruction File has been applied as shown in figure 17.11. You can see that the version of theTesting1_Original_Template.xmlfile is now 1.1 (as opposed to its version 1.0 before the Instruction File was applied). Choose the file and click on File | Export to export the updated content file to your client machine.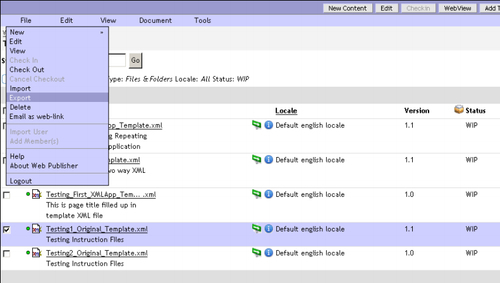
Figure 17.11: Exporting the updated content file
Updated content file Testing1_Original_Template.xml:
<?xml version="1.0" encoding="UTF-8"?>
<PRODUCTINFO>
<NAME>Prod A</NAME>
<SHORTDESC>
<p>
This is of type A
</p>
</SHORTDESC>
<PRODUCTTYPE>Type A</PRODUCTTYPE>
</PRODUCTINFO>
Notice the absence of the <COST> XML element from this content file.
The other content file (Testing2_Original_Template.xml) is still in version 1.0 since it was not updated via the Instruction File.
If you edit the content Testing1_Original_Template.xml using Web Publisher editor, the Cost: field will not be shown as per the updated template structure. Figure 17.12 shows the updated content file without the Cost field, as seen in Web Publisher editor.
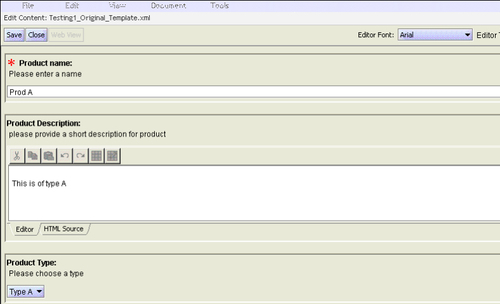
Figure 17.12: Cost field not shown in the updated content file
Opening the other content file Testing2_Original_Template.xml in Web Publisher editor will still show the Cost: field as per the older version of template file.
This was a simple example to delete an existing XML element from a content file. Let us now go ahead and take up some more examples so that we can understand the power of Instruction Files in a better fashion.
Let us take an example where content is created from a simple template XML file and then a new XML element is added to the template file. The existing content is updated via an Instruction File using the <insert-element> instruction.
- Update the existing Template file (
Original_Template.xml) and its associated Rules file (Original_TemplateRules.xml) as per the following structure:Updated Template file
Original_Template.xml:<?xml version="1.0" encoding="UTF-8"?> <PRODUCTINFO> <NAME/> <SHORTDESC/> <PRODUCTTYPE/> <PRICEINFO/> </PRODUCTINFO>Note that we have added a new
<PRICEINFO>XML element to the template file.Updated Rules file
Original_TemplateRules.xml:<?xml version="1.0" encoding="UTF-8"?> <rules> <tagcontent tag_name="NAME"> <textline instruction="Please enter a name" label="Product name:" required="Y"> </textline> </tagcontent> <tagcontent tag_name="SHORTDESC"> <content instruction="please provide a short description for product" label="Product Description:" lines="5"> </content> </tagcontent> <tagcontent tag_name="COST"> <textline instruction="Please enter cost in dollars" label="Cost:"> </textline> </tagcontent> <tagcontent tag_name="PRODUCTTYPE"> <choice instruction="Please choose a type" label="Product Type:" values="Type A,Type B,Type C"> </choice> </tagcontent> <tagcontent tag_name="PRICEINFO"> <textline charlength="50" instruction="Please enter a price for the product" abel="Enter price:"> </textline> </tagcontent> </rules>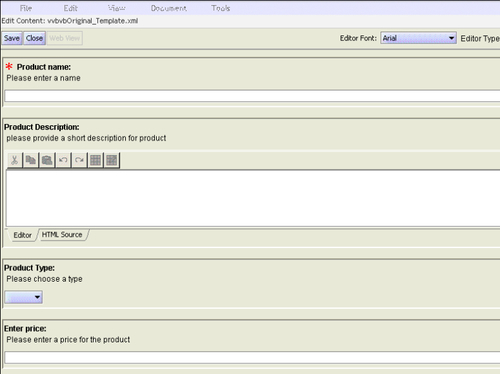
Figure 17.13: Web Publisher editor shown while creating new content
- Using any XML editor, create an Instruction File (
Add_Element_Instruction.xml) that updates content XML files by adding a new<PRICEINFO>XML element.The following Instruction file (
Add_Element_Instruction.xml) can be used in such a scenario:<?xml version="1.0" encoding="UTF-8"?> <instructions xmlns ="http://www.documentum.com/wp" xmlns:xsi="http://www.w3.org/2001/XMLSchema-instance" xsi:schemaLocation="http://www.documentum.com/wp instructions.xsd"> <insert-element> <path>/PRODUCTINFO</path> <nodename>PRICEINFO</nodename> <value>$ 100</value> <comments>testing insert element PRICEINFO</comments> </insert-element> </instructions>
Anatomy of the above Instruction File:
<insert-element>:Instruction File element to add an XML element to an XML content file<path>:XPath expression to identify the path where the XML element to be inserted/added currently exists<nodename>:Name of the target node (XML element) to be inserted<value>:Text value of the XML element to be set<comments>:Optional comments stating the purpose of the Instruction File
- Browse to Site Manager | Instructions from the left tree pane in Web Publisher as an administrator and import the
Add_Element_Instruction.xmlInstruction File by choosing the File | Import option. Complete all the steps described in the previous example. - Update the content file
Testing1_Original_Template.xmlwith the Instruction FileAdd_Element_Instruction.xml. You can verify that the version of theTesting1_Original_Template.xmlfile has been updated.Choose the file and click on File | Export to export the updated content file on your client machine.
Here is the updated content file
Testing1_Original_Template.xmlafter theAdd_Element_Instruction.xmlInstruction File has been applied:<?xml version="1.0" encoding="UTF-8"?> <PRODUCTINFO> <NAME>Prod A</NAME> <SHORTDESC> <p> This is of type A </p> </SHORTDESC> <PRODUCTTYPE>Type A</PRODUCTTYPE> <PRICEINFO>$ 100</PRICEINFO> </PRODUCTINFO>Notice that the
<PRICEINFO>XML element has been added in this content file with the value$ 100.The other content file (
Testing2_Original_Template.xml) is still in version 1.0 since it was not updated via the Instruction File.If you edit the content
Testing1_Original_Template.xmlusing Web Publisher editor, the Enter price: field will be shown as per the updated template structure (refer to figure 17.14).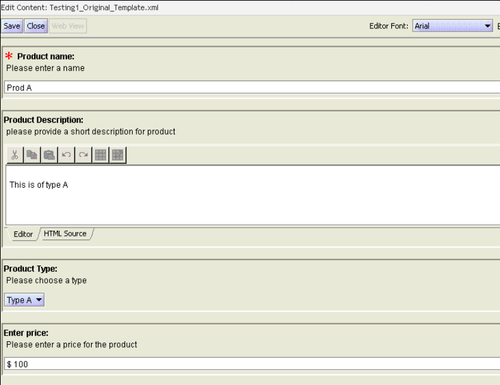
Figure 17.14: Enter price field shown as per updated template file
Let us now take an example where content is created from a simple template XML file and then the value of an XML element in content files is to be updated. The existing content is updated via an Instruction File using the <update-element-value> instruction.
- Using any XML editor, create an Instruction File
Update_Element_Value_Instruction.xmlthat updates content XML files by updating the value of their<PRICEINFO>XML element.The following Instruction File (
Update_Element_Value_Instruction.xml) can be used in such a scenario:<?xml version="1.0" encoding="UTF-8"?> <instructions xmlns ="http://www.documentum.com/wp" xmlns:xsi="http://www.w3.org/2001/XMLSchema-instance" xsi:schemaLocation="http://www.documentum.com/wp instructions.xsd"> <update-element-value> <path>/PRODUCTINFO</path> <nodename>PRICEINFO</nodename> <value>Price Not available</value> <comments>Updating the value of PRICEINFO element</comments> </update-element-value> </instructions>
Anatomy of this Instruction File:
<update-element-value>:Instruction File element to set a new text value for the specified XML element in an XML content file<path>:XPath expression to identify the path where the XML element to be updated currently exists<nodename>:Name of the target node (XML element) whose value needs to be updated<value>:The new text value that needs to be set for the XML element in question<comments>:Optional comments stating the purpose of the Instruction File
- Browse to Site Manager | Instructions from the left tree pane in Web Publisher as an administrator and import the
Update_Element_Value_Instruction.xmlInstruction File by choosing the File | Import option. Complete all the steps as described in the first example. - Update the content file
Testing1_Original_Template.xmlwith the Instruction FileUpdate_Element_Value_Instruction.xml. You can verify that the version of theTesting1_Original_Template.xmlfile has been updated. - Choose the file and click on File | Export to export the updated content file on your client machine.
The updated content file
Testing1_Original_Template.xmlafterUpdate_Element_Value_Instruction.xmlInstruction File has been applied:<?xml version="1.0" encoding="UTF-8"?> <PRODUCTINFO> <NAME>Prod A</NAME> <SHORTDESC> <p> This is of type A </p> </SHORTDESC> <PRODUCTTYPE>Type A</PRODUCTTYPE> <PRICEINFO> Price Not available </PRICEINFO> </PRODUCTINFO>
Notice that the value of the
<PRICEINFO>XML element has been updated in this content file with the valuePrice Not available.The other content file (
Testing2_Original_Template.xml) is still in version 1.0 since it was not updated via the Instruction File.If you edit the content
Testing1_Original_Template.xmlusing Web Publisher editor, the Enter price: field will be shown as per the updated template structure (refer to figure 17.15).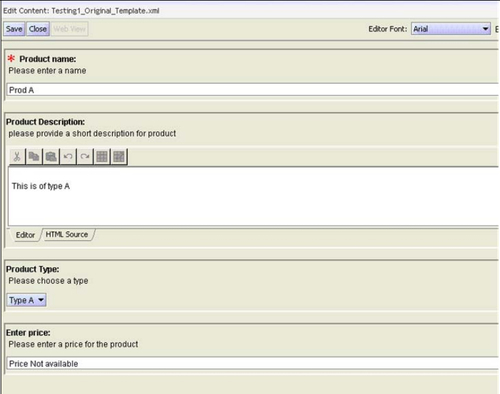
Figure 17.15: Updated value of Enter price field in Web Publisher editor
This should give you all a fairly good understanding of Instruction Files and their usage scenarios. For a comprehensive understanding of Instruction Files, go through the Documentum Web Publisher Administration guide.
