Once you have created your custom object type and included it as an acceptable object type in your custom lifecycle, you are all set to go ahead and create a Template for the object type. Recall our earlier discussions about templates and object types: object types are the definitions for objects with information such as creator of object, last modified time, title, subject, description, and some custom attributes.
Whenever an object is created from a particular object type, it inherits all its attributes and allows users to assign specific values for each attribute. An object type simply serves as a template for all real-time objects created from it. However, this covers just the metadata or properties for objects. What about the actual content data of such objects (web pages), such as the associated images, the paragraphs/text abstracts, associated hyperlinks and other pieces of information that can be classified as actual content that is seen on the website and not metadata? This is where Web Publisher Templates (or loosely speaking UI forms) step in.
Using Web Publisher Templates, you can design and create forms with placeholder fields for the actual data that your business users can fill in for the created objects. The same Template can be used by multiple business users while creating content, to fill in the appropriate values in the template fields as per the specific business scenario.
In a nutshell, if we take up our dummy news website example, we are talking about two types of information:
- Content: The HTML content/web page (news article) that shows up on the website displaying actual news information such as headline image, main news content, etc.
- Properties: Meta-information/properties of the news article, such as who created the news article, when it was created, whether this is a press release news article, and other related attribute information.
If you are still confused, do not worry but proceed further. We will take up detailed examples in this chapter to understand what Templates are and how they fit in the Documentum architecture. For now, just understand that a Documentum developer simply creates different Templates with placeholder fields for different kinds of web pages on the website. Business users use the appropriate templates for creating the numerous categories of web pages on the website without having to understand any web languages or scripting methodologies such as HTML and JavaScript. The Documentum templates transform the entered data into HTML web pages with the desired look and feel via presentation files (stylesheets).
You may want to refer to Chapter 10 for a quick recap of what Templates are and how they couple with other Web Publisher files in Documentum.
For your convenience, let us discuss the Web Publisher template-rules-presentation architecture (refer to figure 13.1) once again to fix up any missing bolts and loose ends.

Figure 13.1: Web Publisher template-rules-presentation architecture
Web Publisher Template files can be created in Documentum as XML files with elements corresponding to the various fields in the template.
A Rules file is created in Documentum as an XML file with semantics added for the template field elements. Field type (checkbox, text box, etc.), field length, and field validations (mandatory, read-only, etc.), are defined in a Rules file.
Web Publisher internally interprets Template and Rules XML files to create and show the template fields in Web Publisher in a form that users can use to create web pages. The actual values filled in the Web Publisher editor template fields create a content file that is nothing but data assigned to the template XML elements.
Presentation files (XSL stylesheets) style the content XML files using Documentum's Xerces XSL Transformation engine to create web pages in the desired format/rendition (such as HTML, WML, etc.)
If you were to talk about division of responsibilities between the business users (content creators) and the IT development team, then it can be summed up as follows:
The IT development team creates object types, lifecycles, Templates, Rules files, presentation files, and other Documentum configuration items/related objects, while the business users simply use these objects and templates to fill in and create content for their website without the need to understand any programming languages/scripting/configuration settings!
A Web Publisher Template uses the following support files in Documentum:
- Rules files: Used for defining template fields for editing in Web Publisher editor.
- Presentation files: Used for styling and generating web formats/renditions from content files.
- Previews: These are graphical representations (thumbnail images) of templates and let content authors easily identify the templates.
It is worthwhile at this juncture to discuss the relationship between an object type and a template. Figure 13.2 should give you an idea about how these two are related and how they work in tandem during the content creation process.
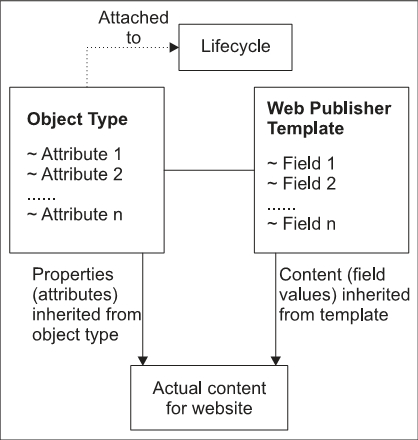
Figure 13.2: Object Type and Web Publisher template
An object type, as we discussed earlier, is associated with a lifecycle (in our example the cust_ newsarticle object type is associated with the Custom_Lifecycle lifecycle). A Template in turn is linked to a particular object type in Documentum. Whenever content is created from an object type:
- The newly created content inherits the attributes (or metadata) defined in the object type definition with the actual values specified by content authors.
- The actual web page content is inherited from the values that business users specify while filling template fields.
Having discussed this, let us now begin our tour by creating a Template for our dummy news website example. We will see how simple it is to create Templates and supporting files for use within Documentum.
The first step before creating a Template is to create a category (or taxonomy) in Web Publisher with which the template will be associated.
It is wise to first sort out all the kinds of web pages on the website and then come up with the numerous categories of content. Based on each of the categories, Templates can be created so that content authors know exactly which category to look into in order to find the relevant Templates to create web page content.
- Log in to Web Publisher as an administrator or a web developer user. Note that Web Publisher Templates reside in the Site Manager | Templates folder within the Docbase. Go to Site Manager | Templates in Web Publisher and click on File | New | Category. The New Category screen is as shown in the figure 13.3.
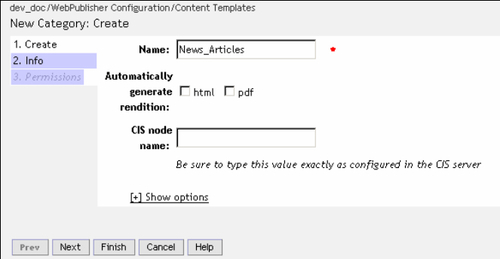
Figure 13.3: Creating a category for templates
Provide an informative and self-explanatory name for the category and click on Finish. If required, set up security settings for the category by going to the Permissions tab as well. Within the Permissions tab, you can assign a Permission Set (ACL) to the category allowing only certain groups to access the category and disallowing/restricting others from accessingthe same.
- The next and unarguably the most important step is to create the Template XML file so that it can be associated with the category created in the previous step.
A Template file can be created in any of the numerous and varied flavors of XML editors and web authoring applications available in the market such as XML Spy®, Dreamweaver, or even text editors such as WordPad or Notepad.
Tip
Even though Web Publisher allows you to create HTML-based Templates as well as XML Templates, it is wiser to use XML Template files. Using XML Templates gives you more flexibility to style and parse the content XML files using XSL stylesheets, which is not the case when using HTML Template files.
Provide some rational name to the Template XML file (say
cust_news_art_templ.xml) to signify it is a custom Template file for news articles.Whenever new content is created using this Template file, content creators can provide some valid name to the content file, such as
news_article_oct31_2005.xml.There could be scenarios where the name of the content file is not of any consequence to the business team or where they could want some system-generated auto-naming scheme for the content files created from a Template file to avoid the hassles of providing names manually.
Under such circumstances, you could create a Template file with the following name convention, for example
cust_news_art_templ_###.xml.Whenever content is created using this Template, at run time Documentum substitutes the hash signs (#) with auto-generated numeric values in sequential order and names the content files as follows:
cust_news_art_templ_001.xmlcust_news_art_templ_002.xml…and so on.This feature is termed auto-naming in Web Publisher Templates.
A sample Template XML file created for our news article example is shown below:
<?xml version="1.0" encoding="UTF-8"?>
<NEWSART>
<BANNERIMG></BANNERIMG>
<IMGALTTEXT></IMGALTTEXT>
<DATE></DATE>
<BODYTEXT></BODYTEXT>
<REPEATBLOCK>
<NEXTLINKNAME></NEXTLINKNAME>
<NEXTLINKURL></NEXTLINKURL>
</REPEATBLOCK>
</NEWSART>
Let's discuss the anatomy of a typical XML template file:
<?xml version="1.0" encoding="UTF-8"?>
This is the standard XML declaration tag with character encoding. Specifying encoding as UTF-8 can support extended characters such as ®, © and not just ASCII characters.
<NEWSART>is the root tag of the XML file. The other XML elements denote individual fields within the template editor. For example,<DATE>denotes a field to enter the date in the template editor while<BANNERIMG>denotes the field for providing the banner image in the template editor.Tip
Use character references and not HTML entity references when using special characters in Web Publisher XML files (Template files, Rules files, Presentation files).
For example, use
£to denote Pound symbol (£) instead of£This is due to the limitation of the Xerces XML parser, which Documentum internally uses to parse XML files.
- Copy the template file created in the previous step to some location on your machine's local drive. Go to the newly created category (in step 1 above) and choose menu option File | Import. Click on Add Files (refer to figure 13.4) and browse your machine's local drives till you find the Template file to be imported. Then click on the Next button.
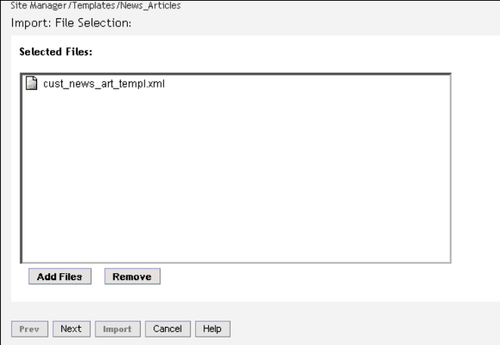
Figure 13.4: Importing Template file in Docbase
- The Import: Object Definition screen is shown in figure 13.5. Provide some informative descriptive name for the template file in question and choose the object type with which it needs to be associated. Select the
cust_newsarticleobject type that we created earlier for our news article example.After you select the object type, the Lifecycle dropdown gets populated with all the existing installed lifecycles in the Docbase that have the chosen object type as their acceptable primary/subtype.
Select Custom_Lifecycle from the Lifecycle dropdown and click the Import button.
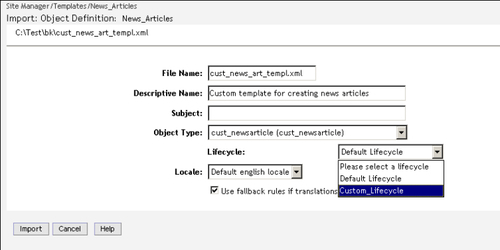
Figure 13.5: Associating Template file with object type
- The imported Template file is shown in the associated category in an Unavailable state as shown in figure 13.6. This signifies that even though it has been imported into the Docbase, it is not yet ready to be used by content creators.

Figure 13.6: Template file in Unavailable state
Run the following DQL query using the IDQL utility or through the DQL editor in Documentum Administrator:
DQL> select object_name, a_is_template, r_version_label, r_object_type from cust_newsarticle where a_is_template = '1'Note
Note that all content objects created from
cust_newsarticleobject type will have theira_is_templatesystem attribute set to0, while only the Template file will have this value set as1.Result of the above DQL query:
The
r_version_labelattribute will have the valueCURRENT,1.0.Now make the Template file available to content authors by choosing it and clicking the Make Available button shown in the tool bar (refer to figure 13.6).
Run the above DQL query again and note that now the
r_version_labelattribute of the Template file will have the valueApproved,WIP,CURRENT,1.0. - The Template file is now ready to be used by content authors, but it still needs to be associated with its supporting files such as Rules and Presentation files.
Choose the Template file and select View | Associations to look at the associated supporting files, as shown in figure 13.7.
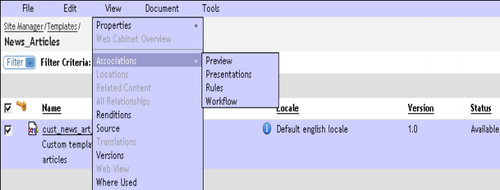
Figure 13.7: Template file associations with supporting files
Congrats! You have successfully created a Template file in Documentum that can be used by content authors for entering content for their websites. Before we proceed any further and start associating the Template file with its supporting files, it is critical to first create the supporting files for the above Template file. Move over to the next chapter in order to learn how to create a Rules file for the Template file we created in this chapter.
