We will now create the above custom workflow template using the Documentum Workflow Manager tool.
Follow the steps mentioned below to create, save, validate, and install your custom workflow template:
- Launch Workflow Manager and log in to Docbase as an administrator. Once you have been authenticated, the blank workflow template editor screen is shown to you, as in figure 19.3.
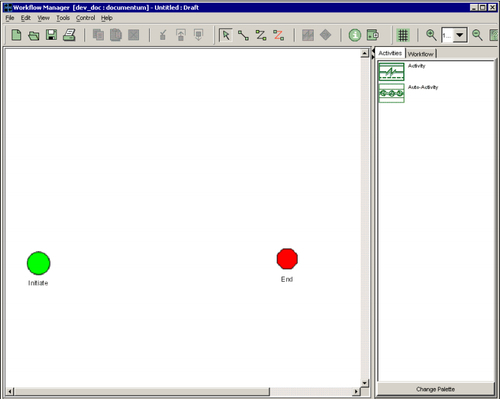
Figure 19.3: Blank editor for creation of a workflow template
Note that the start (Initiate) and End activities are already available in any workflow template that you create using this tool. The system prevents you from removing these two activities from the workflow.
- A workflow template is created by combining numerous Activities (which translate into workflow tasks at run time) and connecting them by flows. You then add packages to the flows to route the content via workflows. Do not be worried about these terminologies right now. We will cover them in detail as we continue creating the workflow in this chapter.
The Activities tab in the right-hand panel shows two kinds of activities (refer to figure 19.4):
- Activity: Performed manually by group(s) or individual user(s)
- Auto-Activity: Automatically performed by the system and does not require manual intervention
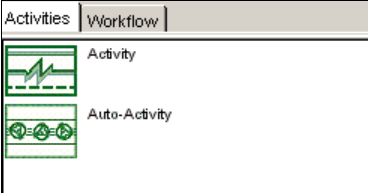
Figure 19.4: Workflow activities
You simply need to drag and drop the activities (manual or automatic) from the Activities palette onto the workflow template creation screen. Include these custom activities between the Initiate and End activities. Now you need to connect these activities with flows.
There are different kinds of flows:
- Single segment flows: Shown next to the arrow icon in figure 19.5. Used for connecting two activities with a single straight line in a forward flow.
- Multi-segment flows: Connects two activities with a line consisting of multiple segments in a forward flow.
- Reject flows: Connects two activities in a backward flow (used when a group/user rejects workflow tasks).
The arrow sign is used to select an object in the workflow template editor pane.

Figure 19.5: Workflow template flows
Double-clicking the activity opens up an Activity Inspector window allowing you to provide configuration details for it. Double-clicking on the connecting flow opens up a Flow Inspector allowing you to add packages to the flow and define other details such aspackage types and versions.
Figure 19.6 is the final visual representation of our custom workflow as it will be created in the workflow template editor:
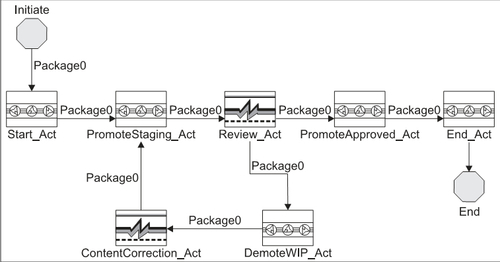
Figure 19.6: Custom workflow template (visual representation)
Note that some activities such as Review_Act and ContentCorrection_Act are manual while others such as Start_Act, PromoteStaging_Act, PromoteApproved_Act, DemoteWIP_Act, and End_Act are automatic. The activities have been connected by flows and are routing content in a package by the name Package0 as shown in figure 19.6.
We will be creating this custom workflow template through the series of steps mentioned subsequently and will define individual activities as you continue reading.
- Choose menu option File | Template Properties to define some basic information about the custom workflow template in question. Using the workflow template properties screen (refer to figure 19.7), you could specify:
- Workflow template owner: By default you are the owner of the workflow templates that you create. If you are a superuser, you can change the owner of a workflow template.
- Description: You could specify a brief description of the workflow template.
- Default alias set: You could optionally specify an alias set for the workflow template in question.
- Workflow template instructions: You could provide instructions to activity performers regarding the tasks they are entitled to perform.
- Template Audit Trail Setting: You could turn on or off the audit trail for workflow instances created from the workflow template.
- Always show validate and install prompts after save: Choose this checkbox if you want the system to automatically ask you to validate and then install the workflow template whenever you make changes to it and save it.
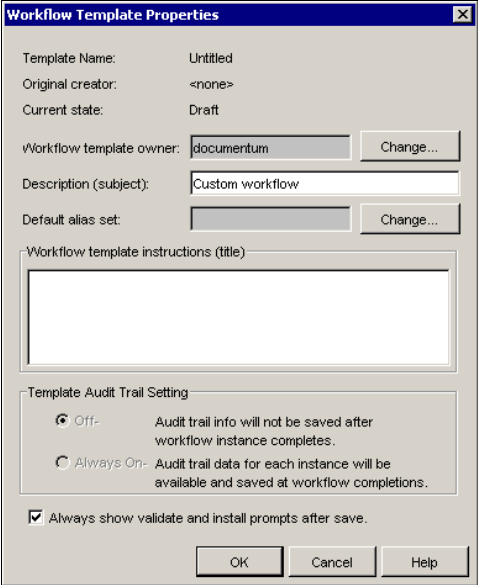
Figure 19.7: Workflow template properties screen
- After you have created the workflow template by defining all its activities and flows, choose the menu option File | Save (refer to figure 19.8) to save the workflow template at some convenient location in the Docbase.
Provide a unique name for the workflow template (say
Custom_Workflow) and browse through/select the Docbase cabinet path to save it. We have saved it at the following Docbase location:/System/Applications/TestDocApp/Custom_Workflow.Note that
TestDocAppis the name of our custom DocApp in the Docbase.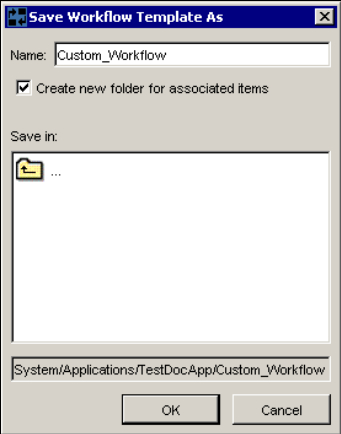
Figure 19.8: Saving the custom workflow template in Docbase
Refer to figure 19.9; after saving the workflow template, the system will prompt you to validate the template and then install it once all validation tests are complete.
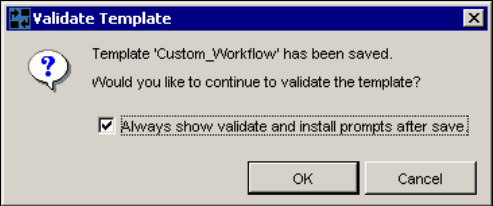
Figure 19.9: Workflow template system validation
Note that it is important to install a workflow template if you want it to be used by Docbase users. An uninstalled workflow can not be used for routing content by users in the different lifecycle states.
- An installed workflow template further needs to be made Available in Web Publisher so that Web Publisher users can use it to create workflow instances.
Log in to Web Publisher as an administrator user and go to the section Administration | Web Publisher Admin | Workflow Templates.
The newly created custom workflow template (
Custom_Workflow) in the installed state is shown as not available in Web Publisher (refer to figure 19.10).Choose the checkbox against the custom workflow template and click on Make Available in the tool bar as shown in figure 19.10. This makes the custom workflow template available for use within Web Publisher.
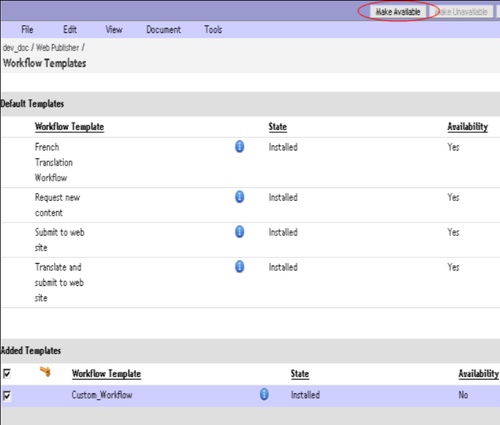
Figure 19.10: Making the custom workflow template available in Web Publisher
- You need to further set an appropriate Permission Set template (ACL) for the newly created workflow template. The system assigned ACL for the custom workflow template might prevent certain users from submitting content to workflow instances created from this template due to inappropriate permissions. Choose the checkbox against the custom workflow template and select View | Properties | Permissions.
Click on the Select link shown against the Active permissions set field and choose the correct Permission Set to be associated with the workflow template.
We have selected WebPublisher User Default ACL as the permission set for our template, as shown in figure 19.11.
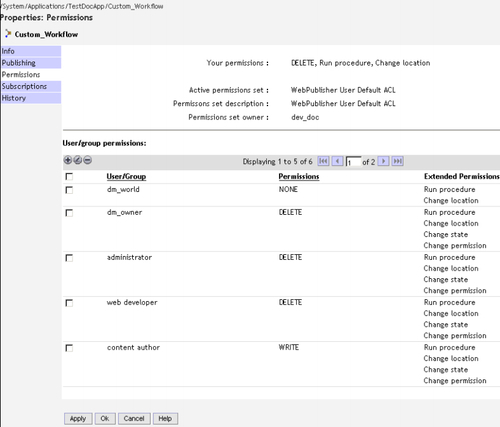
Figure 19.11: Assigning correct Permission Set to the workflow template
Click on Apply and then Ok. Your custom workflow can now be used by Web Publisher users.
