This section will cover in detail the steps for setting installation options for DocApp objects and explain how to create and install a DocApp archive.
- Check-out the DocApp and select menu option Insert | Object from Docbase | Object Type (say) to include an object type in your DocApp. Correspondingly, there are options available in Application Builder to insert other objects such as workflow templates, alias sets, etc. as well.
All object types are stored in the system cabinet corresponding to the name of the Docbase (
dev_docin our case). Select the object type to be included in the DocApp and click the Insert button (refer to figure 25.3).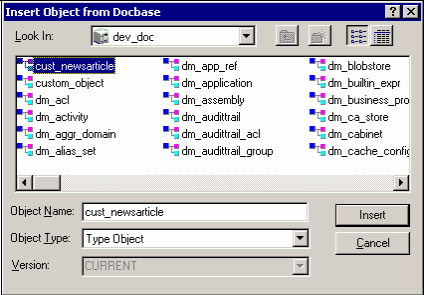
Figure 25.3: Inserting an object type from Docbase into a DocApp
Include all other objects that are to be deployed to the target Docbase via the menu option Insert | Object from the Docbase as depicted in figure 25.4:
Object
Menu option
Object Types
Object Type
Document Lifecycles
Document Lifecycle
Workflow Templates
Workflow Template
Permission Set Templates
Permission Set Template
Alias Sets
Alias Set
Formats
Format
XML Applications
XML Application
Data Objects
Custom Folder (
Custom_Fld)Folder
Presentation Files folder (
Custom_Presentations)Folder (If Presentation files need to be included selectively, choose menu option Document.)
Rules Files folder (
Custom_Rules)Folder (If Rules files need to be included selectively, choose menu option Document.)
Template Files folder (
News_Articles)Folder (IfTtemplate files need to be included selectively, choose menu option Document.)
Folder Map
Document
Web Cabinet (
Test_WebCabinet)Cabinet
After you have included all objects that need to be migrated, the left-hand pane of the Application Builder will appear as shown in figure 25.5:
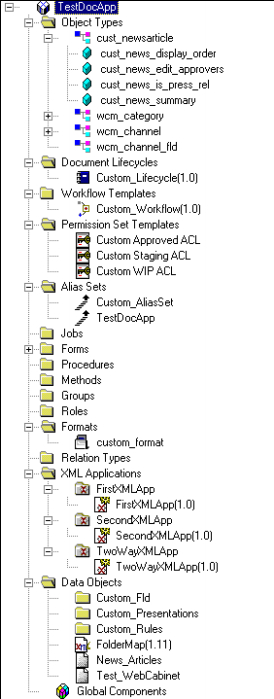
Figure 25.5: Included objects in custom DocApp TestDocApp
Note that we have included default Web Publisher object types such as
wcm_category, wcm_channel,andwcm_channel_fldsince we need to migrate template categories, content, and web cabinet (channel) folders from the source Docbase to the target Docbase.Tip
Documentum 5.3 Update
Documentum release 5.3 has introduced a new feature called Modules in Documentum Application Builder. Modules are nothing but elements of executable code that are represented in the Docbase repository as a
dmc_modulefolder object type. For example, Business Objects in Documentum can be treated as a kind of module. This allows you to package your business object classes and supporting files (in the form of JAR files) in a DocApp that can be installed via Documentum Application Installer on a target environment. - After you have included the objects in the DocApp, select individual objects in the left-hand pane and choose menu option DocApp | Set Installation Options to set their installation options.
Setting installation options is extremely important because by doing so you provide a lot of vital instructions to the Application Installer for installing objects in the target Docbase such as:
- Upgrade options: If DocApp Installer finds an object with the same name as in your source Docbase, it can be directed to perform one of the following options:
- Overwrite the corresponding object in the target Docbase with the version existing in the source Docbase.
- Update and create a new version of the object in the target Docbase, leaving the original version(s) intact.
- Do not overwrite the object in the target Docbase.
- Data object transfer: This option is available in the case of XML Applications, Folders, and Cabinets and it directs the installer to include or exclude objects in the manner described as follows:
- All content: Installer will install the specified cabinets, folders, and sub-folders and all objects contained within them.
- Top level content: Installer will install the specified XML Application folder or folder and the objects contained within it.
- Hierarchical structure: Installer will install only the specified cabinets, folders, and sub-folders but no objects.
- Object only: Installer will install only the specified XML Application folder, cabinet, or folder.
Let us take an example of custom lifecycle object
Custom_Lifecycleand set its installation options. - Upgrade options: If DocApp Installer finds an object with the same name as in your source Docbase, it can be directed to perform one of the following options:
- Select the
Custom_Lifecycleobject from the left-hand pane and choose menu option DocApp | Set Installation Options to set the installation options for the custom lifecycle object (refer to figure 25.6).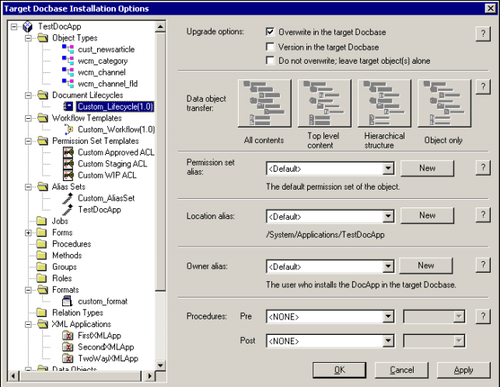
Figure 25.6: Setting installation options for the Custom_Lifecycle object
As shown in figure 25.6, select the Upgrade options checkbox for overwriting the
Custom_Lifecycleobject in case it already exists in the target Docbase.After the lifecycle object is installed in the target Docbase, Documentum assigns a system-generated ACL (Permission Set of the user who installs the DocApp) to it. You can, however, direct the system to assign a specific ACL to the lifecycle in the target Docbase by defining a Permission Set for it.
This can be done by clicking on the New button shown against the Permission set alias field, which opens up an Alias Object Dialog screen.
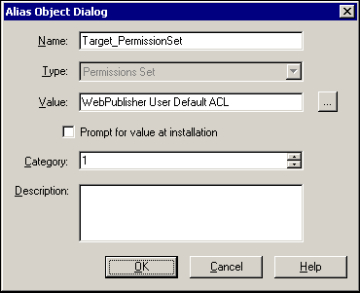
Figure 25.7: Using the Alias Object Dialog screen to specify an ACL for the lifecycle object in the target Docbase
In the Alias Object Dialog screen shown in figure 25.7, fill in the following fields:
- Name: Provide a self-explanatory name to the Permission Set alias.
- Value: Specify the actual ACL that the system needs to assign to the lifecycle object after it has been installed in the target Docbase. We have assigned WebPublisher User Default ACL as shown in figure 25.7.
- Category: This is simply an application-specific flag you can add for categorizing the various aliases in your system. Documentum internally does not use this flag.
- Description: Provide a brief explanatory description for the alias setting.
Figure 25.8 shows the access permissions (rights) available to the various Web Publisher groups within the WebPublisher User Default ACL.
Note that you can even leave the Value field blank and instead select the checkbox so that the system prompts you to specify an ACL at run time when you are installing the DocApp in your target Docbase via the Documentum Application Installer tool.
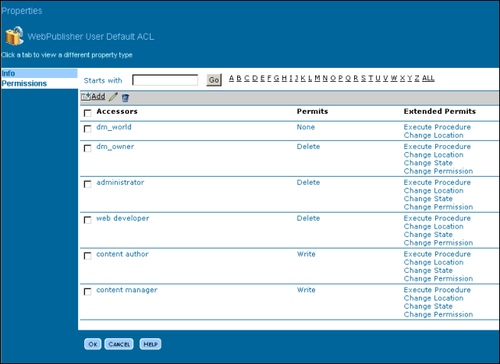
Figure 25.8: Permission levels for various groups in WebPublisher User Default ACL
After filling in the various fields, click on OK.
Similar to the way you have specified a Permission Set for the object in the target Docbase, you can specify the following:
- Location alias: The cabinet/folder path in the target Docbase where the object should be installed
- Owner alias: The user or group in the target Docbase who should be the owner of this object after installation.
- Pre- and post-installation procedures: The procedures that need to be executed by the Application Installer before it starts DocApp installation and after it finishes installing it. You could, for example, write custom procedures (and include them in your DocApp) to create some application-specific groups in the target Docbase and get them executed as pre-installation scripts. This will ensure that the system first creates the specified groups in the target Docbase before installing the other DocApp objects.
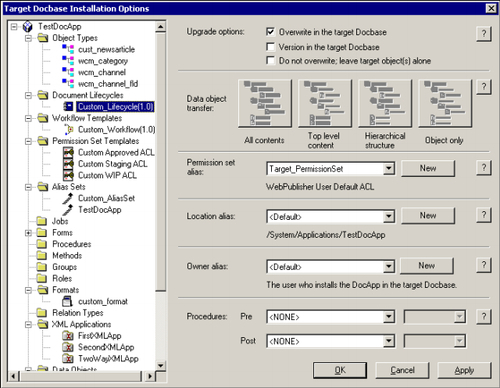
25.9: Installation options set for the Custom_Lifecycle object
Refer to figure 25.9; after specifying the installation options, click on Apply and OK. Figure 25.10 lists the correct Location Alias installation options for the other objects included in your custom DocApp. You could additionally specify particular Permission set alias and Owner alias values for each of these, if need be.
Do not forget to check-in the DocApp after you have completed setting installation options for all included objects in your custom DocApp.
Object
Location Alias
Object Types
N/A
Document Lifecycles
/System/Applications/TestDocAppWorkflow Templates
/System/Applications/TestDocAppPermission Set Templates
N/A
Alias Sets
N/A
Formats
N/A
XML Applications
/System/Applications/TestDocAppData Objects
Custom Folder
/Custom_CabinetPresentation Files
/WebPublisher Configuration/Supporting Templates/Editor PresentationsRules Files
/WebPublisher Configuration/Supporting Templates/Editor RulesTemplate Files
/WebPublisher Configuration/Content TemplatesFolder Map
/WebPublisher Configuration/CommonWeb Cabinet
/ - Choose menu option DocApp | Create DocApp Archive in order to have a DocApp archive created by the system. The system will prompt you to specify a folder location (refer to figure 25.11) on your local machine drive where the DocApp archive will be created.
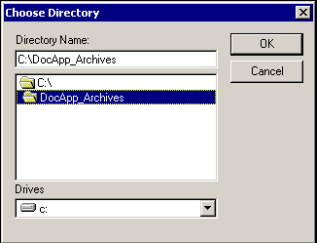
Figure 25.11: Specifying folder location for creation of DocApp archive

Figure 25.12: System prompt for commencing DocApp archive creation process
Refer to figure 25.12; click on OK, allowing the system to create an archive of your custom DocApp in the specified folder location. Usually the archive creation process takes a few minutes but can vary substantially if the number of objects included in your DocApp is very large. Archiving time can even go up to 5 hours for DocApps containing around 1000 objects.
Once the DocApp archive has been created, browse to the specified location on your machine and open the archive log file (
<Your DocApp name>_ArchiveLog.html) to locate any system errors/warnings. It is advisable to look for warnings with the keywordunableto find out any serious failures.Once you have the DocApp archive of the source Docbase, you can install it on the target Docbase via Documentum Application Installer. Before installing the archive, you may want to clean up the target Docbase and perform any pre-installation steps specific to your application.
It is better to set up Cabinets, Folders, Web Cabinets, Users/Groups, etc. in the target Docbase before you install the DocApp archive. If you want to avoid such manual activities, you can write pre-installation procedures and include them in the DocApp as we saw in step 3 earlier.
- After the target Docbase is ready, you are all set to install the source Docbase DocApp archive over it. Set up the
dmcl.inifile to point to the correct DocBroker host for the target Docbase.Launch Documentum Application Installer from your machine and choose the target Docbase name from the Docbase dropdown (PN6549 Docbase in this example).
Provide Docbase user credentials for login authentication purposes and click on OK (refer to figure 25.13).
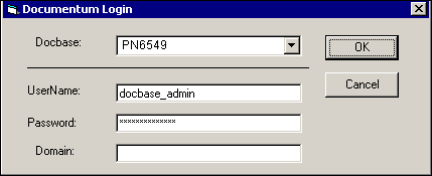
Figure 25.13: Documentum Application Installer login screen
- In the Select DocApp Archive screen (refer to figure 25.14), click on the Browse button and choose the DocApp archive (created in step 4 above) from your local machine. You can optionally provide a path and file name for the log file created during the DocApp archive installation process. The default DocApp installation log file name and its folder path are shown in figure 25.14.
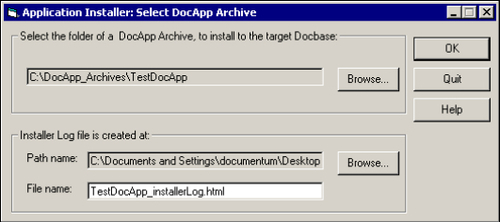
Figure 25.14: Choosing DocApp archive for installation on target Docbase
Click on OK.
- The target Docbase name, installation user name, and the name and path of the DocApp archive are shown as in figure 25.15. Click the Start Installation button to commence DocApp installation.
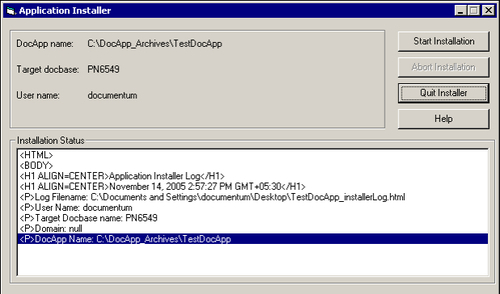
Figure 25.15: Installation of DocApp archive on the specified target Docbase
If there are users connected to the target Docbase, the system will prompt you a message stating this. Click the Yes button to continue with the DocApp installation procedure.
- The DocApp installation process takes several minutes as we saw in the case of the DocApp archive creation process. It has been observed that with 1000 objects, the installation process can take more than an hour!
After the installation has been completed, click the Quit Installer button to exit the DocApp Installer application. Open the installation log file to check for errors or warnings during the installation procedure.
- That's it! The DocApp has been installed on the target Docbase, which means that the specified objects in source Docbase have been migrated to the target Docbase. You now need to perform Web Publisher-specific tasks for your application to work correctly. For example, you might want to create Site Publishing Configurations in the target Docbase or make migrated workflows Available through the Web Publisher menu option Administration | Web Publisher Admin | Workflow Templates.
