In this section, we will discuss the detailed steps for creating a custom Lifecycle.
- In our custom DocApp TestDocApp, choose menu option Insert | Document Lifecycle to create a new Lifecycle. Provide some unique name (such as
Custom_Lifecycle) for the custom Lifecycle (refer to figure 12.6) along with some short description to explain its purpose.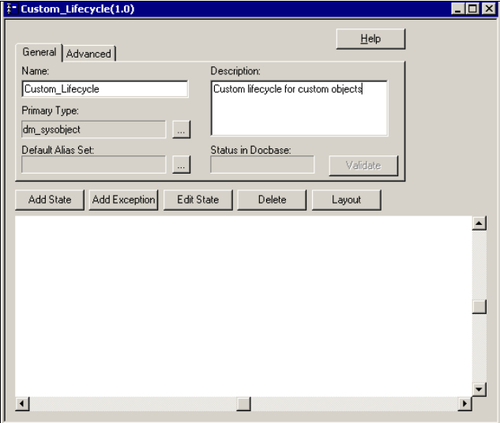
Figure 12.6: Creating a new Lifecycle object
The Lifecycle Editor is used to create a Lifecycle State Diagram wherein you create the various states of a Lifecycle along with their specific behavior/attributes.
Note that the Validate button is disabled at this point of time. The Lifecycle is under creation and hence is said to be in the Draft state. When you have completed the creation of the Lifecycle and checked it into the Docbase, the Validate button gets enabled. Clicking on the Validate button amounts to system validation to check if the Lifecycle parameters are consistent or not. If the validation checks pass, the Lifecycle is Validated and the Install button gets enabled. After clicking on the Install button, the Lifecycle gets installed in the Docbase and is finally ready to be used by the appropriate objects.
- Attach an Alias Set to the Lifecycle by clicking on the ellipsis button corresponding to the option Default Alias Set. The Select Alias Sets dialog box is shown as in figure 12.7.
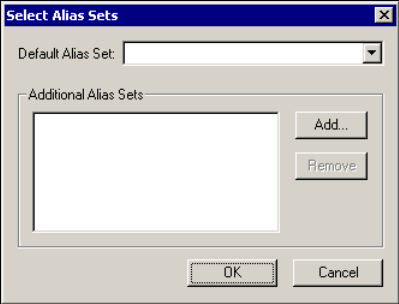
Figure 12.7: Specifying the default Alias Set for the Lifecycle
Choose the Alias Set Custom_AliasSet we created earlier from the dropdown. You can additionally attach some other Alias Sets existing in the Docbase to the Lifecycle, by clicking on the Add… button.
- Now you need to provide the object types, the object instances of which can be attached to the custom Lifecycle. Say for example, we require our custom Lifecycle to be attached to News Article objects.
Click on the ellipsis button corresponding to Primary Type field and choose
dm_documentas the Primary Type (refer to figure 12.8). This means that object instances ofdm_documentobject types can be attachable to our custom Lifecycle. Further, the subtypes of the primary object type (dm_documentin our case) are shown under the Available Subtypes list. Choose the subtypes ofdm_document, the object instances of which can also be attached to the Lifecycle in question. Clicking on the button will include the
 dm_documentsubtype under the Acceptable Subtypes list. Click the OK button.Note that, as shown in the figure 12.8, we have specified
dm_documentas the primary object type of our custom Lifecycle andcust_newsarticleobject type as the acceptable subtype ofdm_documentfor the Lifecycle.This ensures that content objects created from the News Article type can be attached to our custom Lifecycle.
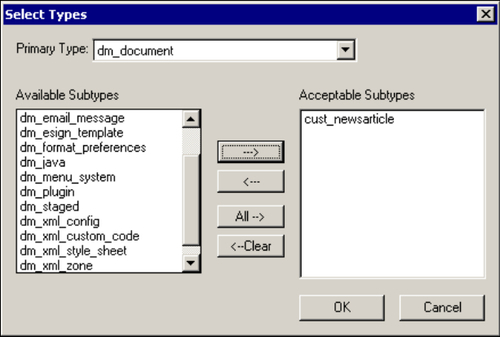
Figure 12.8: Specifying primary object type and acceptable subtypes
We now prepare a Lifecycle State Diagram comprising four normal Lifecycle states:
- Start
- WIP
- Staging
- Approved
Mark the word normal that has been used to describe the Lifecycle states. There could also be exception states in a Lifecycle to represent an abnormal flow or diversions in the otherwise sequential and linear normal flow of the states.
You can introduce states in a Lifecycle by clicking on Add State and providing some unique understandable name for the state. Clicking on Add State adds a pentagon shaped state in the Lifecycle State Diagram as shown in figure 12.9.
The first state is called the base state while the end state is termed the final state. Our custom Lifecycle has four normal states, including a base state (called
Start) and a final state (calledApproved).When you attach a document to a Lifecycle, you actually associate the document with the Lifecycle. Doing this allows you to promote the document to the next sequential linear normal state or demote it back to its previous normal state. Let us take a quick example.
We create a Word document
abc.docand associate it with our custom Lifecycle. At this stage, the document is in the WIP state of the Lifecycle. Promoting the document would push it to the next normal state—Staging. At the Staging state, if you demote the document, it will come back to WIP state. Simple, isn't it?Although we will not be covering exception states in our custom Lifecycle, it is worth mentioning here that similar to promotion and demotion, moving from a normal to an xception state is termed suspension while moving back from an exception state to normal state is termed resumption.
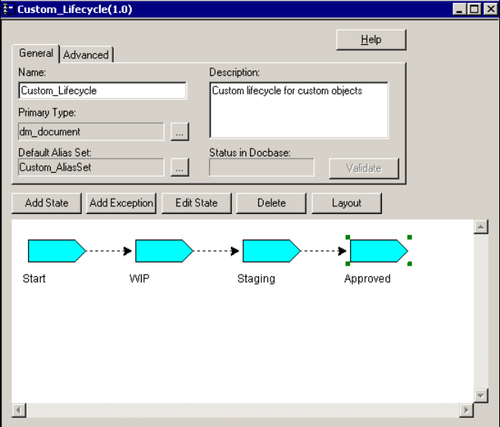
Figure 12.9: A Lifecycle State Diagram
- Double-click on the added state or select the state and click the Edit State button to open the Lifecycle state editor. We will take an example of creating the WIP state of the Lifecycle. Similarly, other states of the Lifecycle can be created using the Lifecycle editor.
Under the General tab (refer to figure 12.10), you can specify the name and description of the Lifecycle state and provide some state transition (state change) settings as follows:
- Allow attachment directly to this state: If the objects meet the Lifecycle state's entry criteria, this Lifecycle state will be their initial state.
- Allow demotion to previous state: This allows demotion from this state to its previous normal state. For the first state of the Lifecycle, this option is disabled.
- Allow scheduled transitions from this state: This allows Lifecycle state changes based on a time schedule without requiring any explicit action initiated by the user.
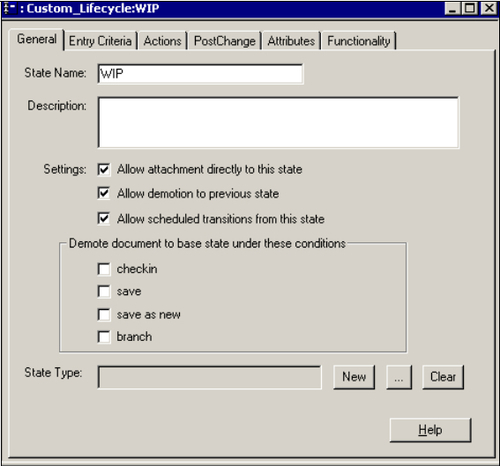
Figure 12.10: Lifecycle state editor General tab
- Demote document to base state under these conditions: This option allows demoting documents to the base state in the Lifecycle if the mentioned conditions are met (such as save, check-in, etc.).
- Under the Entry Criteria tab (refer to figure 12.11), you can specify some conditions or checks that the system performs before a document enters a particular state in the Lifecycle.
Note that during demotion, Documentum does not check the entry criteria for the Lifecycle state.
The entry criteria checks can be performed via attribute values and expression tests. You can specify multiple conditions that are evaluated by Documentum from top to bottom of the list. Additionally, the system ensures that the moment one condition fails, the other conditions are not evaluated, thus saving execution time.
Click the Add Value Test button, choose attribute name and relational operator (=, <, >, <>, <=, and >=) and specify a value against which the attribute needs to be evaluated. Click on Add Expression Test…, choose an attribute and click on Validate followed by OK to introduce an expression that the system needs to check while entering this particular Lifecycle state.
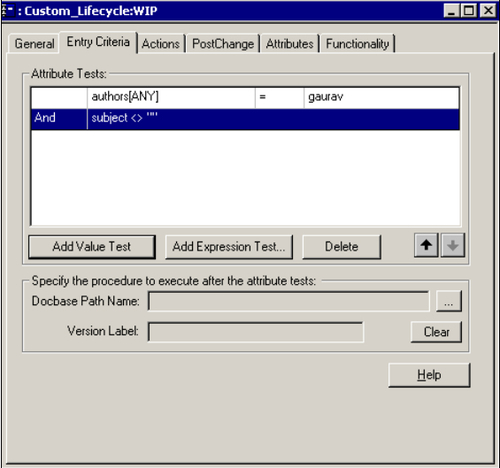
Figure 12.11: Lifecycle state editor Entry Criteria tab
You can even write a custom Docbasic procedure that the system can run after the attribute expressions have been evaluated. The custom procedure can programmatically evaluate certain conditions in the Docbase that must be true before a document enters this particular state in the Lifecycle.
You can optionally specify a Documentum out-of-the-box procedure by clicking on the ellipsis button against Docbase Path Name field and browsing to the procedure under the correct Docbase location.
- Let's move over to the Actions tab in the Lifecycle state editor now. After the system has evaluated the entry criteria for a Lifecycle state, the set of actions to be performed by the system in the given Lifecycle state are specified within the Actions tab.
The actions are performed by Documentum in the following order of execution:
- The standard actions are evaluated first
- The optional Docbasic action procedure is run
Clicking on the Add Action... button in the Actions tab shows the Define Action screen (refer figure to 12.12) allowing users to choose one of the numerous action types and define a specific action to be performed by the system. Defining an action is simple via a GUI wizard.
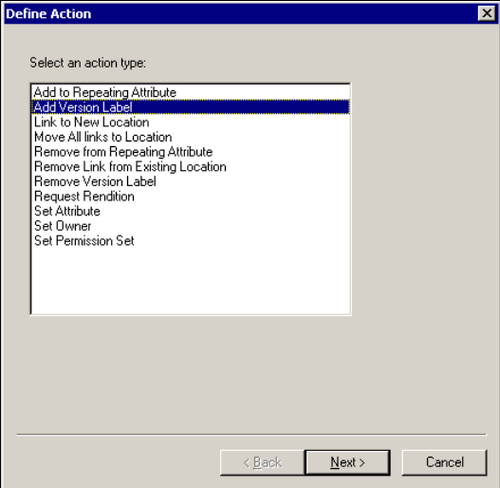
Figure 12.12: Define Action wizard under Actions tab
Using the Define Action wizard, you can specify multiple actions, such as adding a particular version label to or removing a particular version label from a document when it is in the given Lifecycle state.
You could additionally set the document's owner or a particular value for one of its attributes, apart from several other action definitions.
To add a WIP version label to a document when it is in the WIP state of the Lifecycle, choose the Add Version Label option from the Define Action wizard and enter the value WIP in the subsequent screen (refer to figure 12.13).
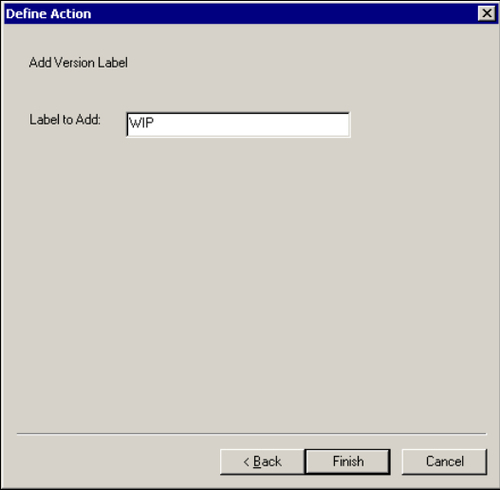
Figure 12.13: Providing a value for version label for the given Lifecycle state
Similarly you can specify that the following version labels need to be removed from the document when it is in the WIP Lifecycle state: Approved, Active, Expired. This can be achieved by choosing the Remove Version Label option from the Define Action wizard.
Also, you can attach the custom Permission Set (Custom WIP ACL) we created earlier to the document when it is in the WIP Lifecycle state by using the same Define Action wizard.
As we saw earlier while setting up the Entry Criteria tab, a Docbasic procedure can be specified for the system to execute after the specified standard actions have been performed.
Figure 12.14 shows all the standard actions added for the WIP Lifecycle state.
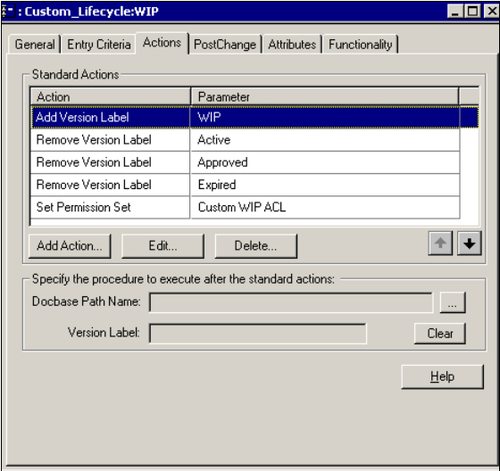
Figure 12.14: Specified actions listed under the Actions tab of Lifecycle state editor
- Under the PostChange tab (refer to figure 12.15), you can specify a post-change Docbasic procedure that the system can execute after the state transition has been completed.
Click on the ellipsis button shown against the Docbase Path Name field and browse to the correct Docbase location to specify a Docbasic procedure.
Note that for the WIP Lifecycle state, we have specified the execution of the out-of-the-box procedure
wcmLifecycleScriptthat is responsible for several standard Lifecycle operations and system checks for documents.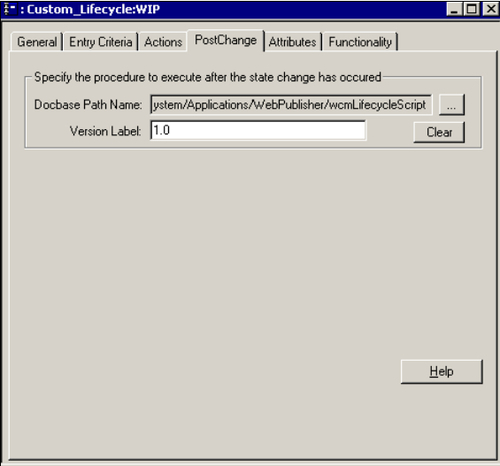
Figure 12.15: Lifecycle state PostChange tab
- After specifying the PostChange procedure, you can move over to the Attributes tab in the Lifecycle state editor (refer to figure 12.16). This feature allows you to modify certain properties of the selected attribute(s) of the document, whenever the document reaches the particular Lifecycle state.
Select the document attribute whose properties you desire to modify. Let us take an example here by selecting the attribute subject and clicking on Change Properties… button.
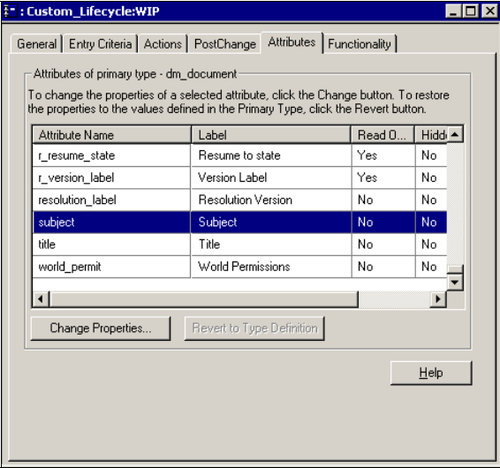
Figure 12.16: Lifecycle state Attributes tab
The Properties window opens (refer to figure 12.17) displaying the selected attribute and allowing users to alter the following in any desired combination:
- Label Text: The text (depicting the name of the attribute) shown against the attribute in the client application (e.g. in Web Publisher).
- Help Text: Some help text for the attribute in question.
- Comment: A short description or comment for the attribute.
- Other properties such as making it read-only, hidden, etc.
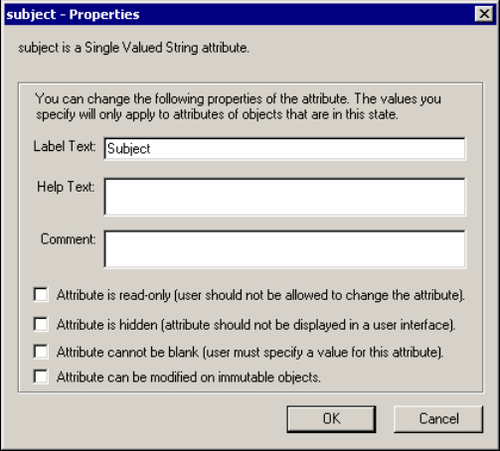
Figure 12.17: Changing properties of the selected attribute
- Documents in a Lifecycle are manipulated via some client applications such as Desktop Client, Web Publisher, etc. The client programs match the documents' capabilities (for example: checking out, linking it to a location, etc.) with the actual components (functionality classes) that implement these capabilities.
If you remember our discussion about object types, we saw how an object type definition includes certain functionality classes that implement its capabilities.
Using Lifecycle state editor, you can modify the associated functionality classes associated with the object type definition, add a new component and its implementation classes, and other such operations.
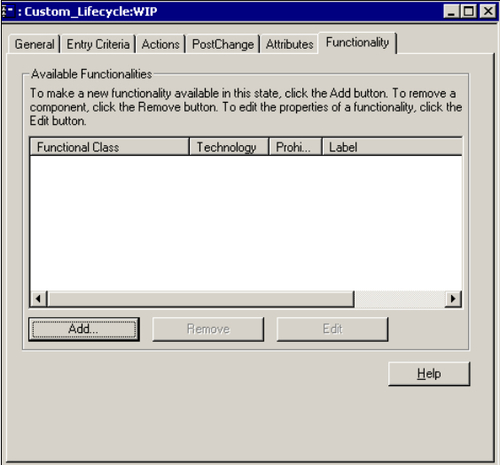
Figure 12.18: Lifecycle state editor Functionality tab
- Similar to setting up the WIP state, create the Start, Staging, and Approved Lifecycle states as per the definitions shown in figure 12.19. These are based on Documentum's Default Lifecycle and can certainly be altered as per your specific business needs.
After creating all the Lifecycle states, you can check-in the Custom Lifecycle in the Docbase similar to Permission Sets and Alias Sets.
Documentum allows you to version documents as well as Lifecycles. At a given point of time, multiple versions of documents can be attached to multiple versions of the same Lifecycle.
Say, for example, you have a News Article document
news_story001.xmlcreated from News Article object typecust_newsarticleand associated with our custom LifecycleCustom_Lifecycle.The document is associated with version 1.0 of the Lifecycle at this point of time. A developer modifies the Lifecycle and checks in the modified Lifecycle into the Docbase as version 1.1.
However, this does not mean that the document
news_story001.xmlnow automatically gets associated with version 1.1 of the Lifecycle. It is still linked to version 1.0 of the Lifecycle and this might create confusion in some cases.Note
Unless absolutely required in your business scenario, do not check-in the Lifecycle in either a minor or a major version into the Docbase. Instead, check-in the Lifecycle as the same version it was prior to modification so that documents do not lose associations.
Figure 12.19 shows Lifecycle State Definitions for our Custom Lifecycle:
Lifecycle State
General
Entry Crit eria
Actions
Post Change
Attrib-utes
Funct-ionality
Start
Allow attachment: Yes
Allow demotion: No
Allow scheduled Transitions: Yes
N/A
N/A
N/A
N/A
N/A
WIP
Allow attachment: Yes
Allow demotion: Yes
Allow scheduled Transitions: Yes
N/A
Add Version Label: WIP Remove Version Label: Active, Approved, Expired Set Permission Set: Custom WIP ACL
Procedure Docbase Path Name: /System/ Applications/ WebPublisher/ wcmLifecycle Script
N/A
N/A
Staging
Allow attachment: Yes
Allow demotion: Yes
Allow scheduled Transitions: Yes
N/A
Add Version Label: Staging Remove Version Label: Approved Set Permission Set: Custom Staging ACL
N/A
N/A
N/A
Approved
Allow attachment: Yes
Allow demotion: Yes
Allow scheduled Transitions: Yes
Add Version Label: Approved Set Permission Set: Custom Approved ACL
Procedure Docbase Path Name: /System/ Applications/ WebPublisher/ wcmLifecycle Script
N/A
N/A
- After checking in the Lifecycle into the Docbase, install the Lifecycle as we discussed earlier in this chapter so that it is ready to be used by applications.
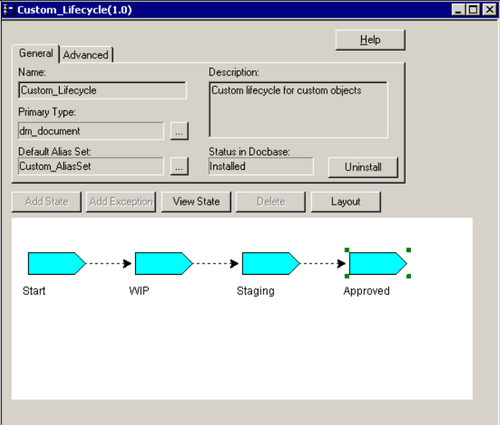
Figure 12.20: Completed installed Lifecycle
