Choose the object type in question within the DocApp and select Insert | Attribute. We will first take an example by creating the attribute cust_news_summary for the object type cust_newsarticle.
Fill in the relevant fields in the new attribute creation screen as shown in the figure 11.17.
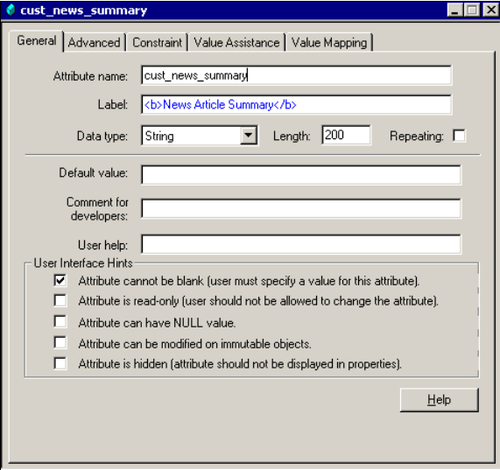
Figure 11.17: Attribute General tab
Similar to object type names, attribute names have certain restrictions that need to be carefully adhered to. Figure 11.18 lists down some limitations for attribute names.
|
Limitations |
|---|
|
Should be in lowercase |
|
Should not begin with: white space, single quote (') or a numeral |
|
Should not begin with 'dm_', 'i_', 'r_', and 'a_' since Documentum internally uses these for its object attribute naming scheme |
|
Should not have a name that matches with the following reserved words in Documentum: 'from', 'where' and 'select' |
The Label field will be the actual label shown against this attribute field in the properties page for the object. You can surround the text in HTML markup as well for a visual appeal when displaying the attribute in properties page. We will look more into this in Chapter 24.
Choose the data type for the attribute from the Data type dropdown. The available data types shown in the dropdown are:
- Boolean
- Integer
- String
- ID
- Time
- Double
The Length field is enabled only for attributes of the String data type. Note that using Application Builder, the maximum length that we can specify for a string attribute is 2000.
In order to specify an attribute as multi-valued, the Repeating checkbox can be selected. If left unchecked, it signifies a single-valued attribute.
Fill in the other attribute fields shown under the General tab as per your specific requirements. In our case we had identified the cust_news_summary attribute to be mandatory (refer to the attribute design in figure 11.16) and hence we checked the checkbox against the field Attribute cannot be blank.
Under the Advanced tab (refer to figure 11.19), you can specify the search parameters used by client applications to search an object in a Docbase, based on its attribute values. By default, every attribute is searchable. You can negate this condition by unchecking the Searchable checkbox shown in the figure.
You can provide some default search value that is always shown when using client applications for searching objects based on this particular attribute.
You can add/remove search operators that client applications will use for searching Docbase objects based on certain conditions for the attribute in question.
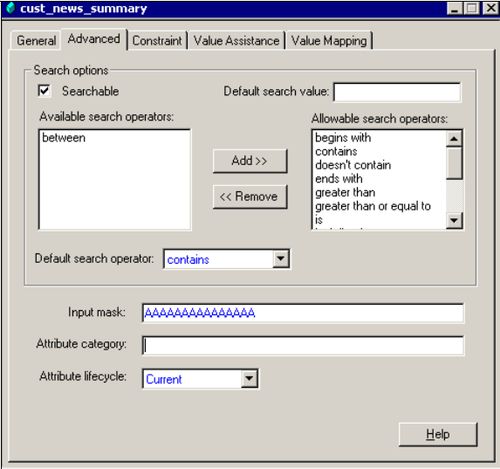
Figure 11.19: Attribute Advanced tab
There are numerous search operators provided by Documentum, such as:
- contains
- ends with
- greater than
- is
- less than
This is an important field and if utilized well, can do wonders for you. The input mask field can serve as a useful validation mechanism for the object properties.
Say for example, as per your business needs, you want the content creators to provide an alphanumeric value only 15 characters long for the attribute cust_news_summary. The following input mask in the attribute can achieve the desired condition without any need for scripting/coding of any sort:
AAAAAAAAAAAAAAA
The fifteen A's in a row signify that only 15 characters are allowed of the nature A, i.e. alphanumeric. Please refer to figure 11.20 for all available mask characters and symbols provided by Documentum:
|
Symbol |
Interpretation |
|---|---|
|
A |
Only alphanumeric character allowed. i.e. a-z, A-Z, and 0-9 |
|
# |
Only purely numeric values allowed. i.e. 0-9 |
|
? |
Only purely alphabetic values allowed. i.e. a-z and A-Z |
|
& |
Any ASCII character is allowed |
|
U |
Uppercase alphabetic character allowed |
|
L |
Lowercase alphabetic characters allowed |
- Similar to what we saw in Object Types, within the Constraint tab (refer to figure 11.21), you can specify consistency checks using Docbasic expressions for the object type's attribute values.
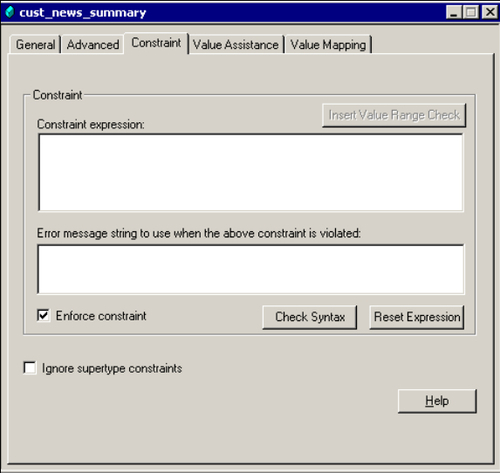
Figure 11.21: Attribute Constraint tab
- Value Assistance comes in handy when you want the users to choose some pre-defined values for the attribute. Using Value Assistance, you can turn the attribute field into a dropdown (pick-list) in the property screens, from where the user can choose existing values while creating new objects. Click the Add Default button (refer to figure 11.22) to add values for the attribute. The Default Value Assistance popup shows up (figure 11.23).
It is worth mentioning here that the Value Assistance feature is not available when an attribute is of the data type Boolean. The Add Default button is grayed out in such a scenario.
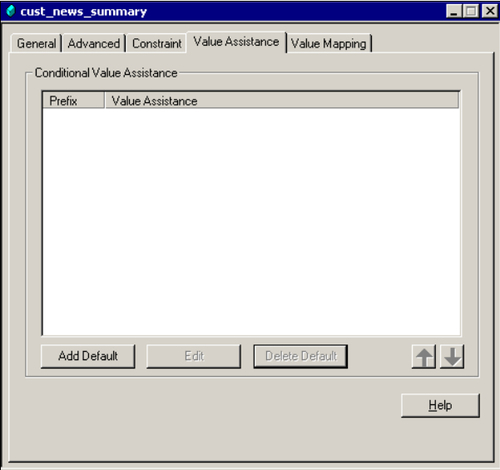
Figure 11.22: Attribute Value Assistance tab
- You can provide the individual values, each in a new line (by pressing the Enter key), and mark the pick-list as complete by checking the checkbox List is complete. Please refer to figure 11.23 for details.
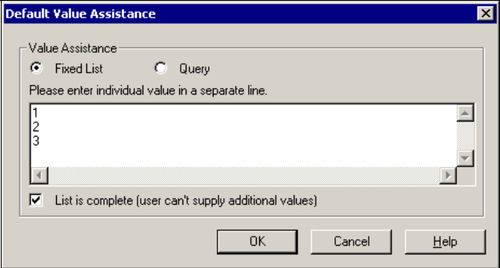
Figure 11.23: Value Assistance Fixed List popup
- Alternatively, you could choose the radio button shown against the Query option instead of the Fixed List option (refer to figure 11.24). This will allow you to dynamically populate the dropdown with values queried (via DQL) from an object type or a registered table in Documentum. We will cover this in detail later in this chapter. For now, please do not be bothered about how the Query option is used for querying registered tables. For the
cust_news_summaryattribute, we do not need to display any pre-defined values in a dropdown. However, for thecust_news_display_ orderattribute, we will query a registered table and explain the usage of the Query option in detail.
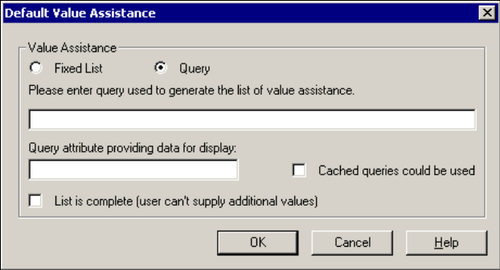
Figure 11.24: Value Assistance popup for Query option
Documentum improves further on the Value Assistance functionality by allowing developers to configure the dropdown values conditionally, based on certain attribute values. Let us take a quick example to understand how conditional value assistance works in Documentum.
After you have provided a Default Value Assistance for the attribute, the Add Conditional button is enabled, as shown in figure 11.25.
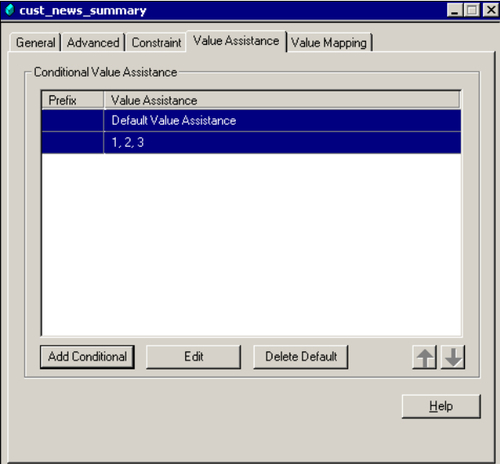
Figure 11.25: Using Conditional Value Assistance
Clicking on the Add Conditional button shows the Value Assistance Clause popup as shown in figure 11.26. The condition can be provided in the form of a Docbasic expression (as we saw earlier in the Constraints tab while creating object types). The entered Docbasic expression can be verified by clicking on the Check Syntax button. Based on the evaluation of the entered Docbasic expression (attribute condition), a dropdown list (under the Value Assistance section in the popup) is provided to the users.
In our case, for example, if the value of the title attribute for the object is alphabets, the dropdown shown to the users will be A,B,C (refer to figure 11.26).
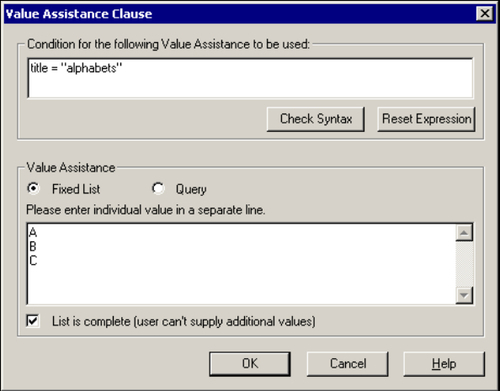
Figure 11.26: Value Assistance Clause popup
You can provide additional conditions and clauses by providing additional Docbasic expressions in the same way you had entered the first conditional clause. All the existing conditions are shown in the form of 'If Then…' clauses as shown in figure 11.27.
It says that if the value of the title attribute is alphabets, the dropdown will show the values: A, B, C.
If the value of the title attribute is numbers, the dropdown will show the values: 1, 2, 3, 4, 5.
If none of the conditions are met, the default values shown in the dropdown are: 1, 2, 3.
However, keep in mind that due to Docbasic limitations, you cannot provide more than 35 such conditional values assistance statements in Application Builder.
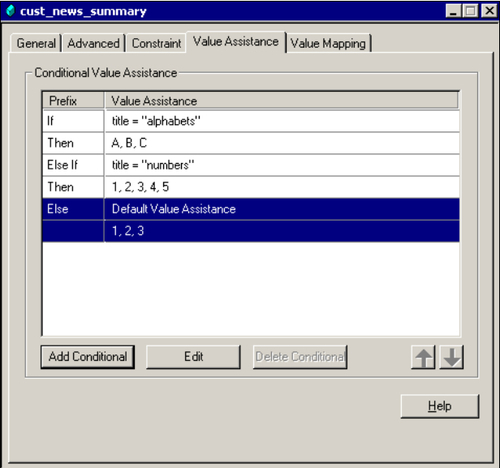
Figure 11.27: Existing condition clauses
One of the frequent requirements is to display some user-friendly text in the dropdown values, along with short codes saved for each of these values for applications to read and understand.
In our example, we might want the users to see the values in the dropdown as 'One, Two, Three', while actually saving them behind the scenes in the Docbase as 1, 2, and 3 respectively.
Under the Value Mapping tab, enter the Docbase value in the Data column and its mapped dropdown display value in the Display String column as shown in figure 11.28.
The values under Display String will only be used for visually display in the dropdown. The values in the Data column would be saved within the Docbase as the value for the attribute.
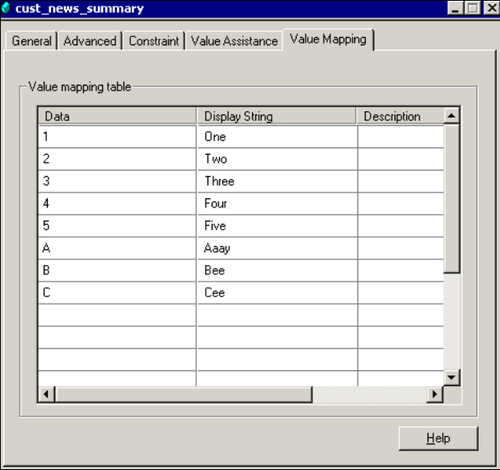
Figure 11.28: Attribute Value Mapping tab
After you have filled in the relevant data in all the necessary tabs, right-click on the object type cust_newsarticle (in the left tree pane) and choose the option Check in selected object(s) to checkin the object type (along with its attributes) in Docbase. Doing so makes the newly created attribute available in the Docbase for applications.
Create the other attributes cust_news_is_press_rel and cust_news_edit_approvers as per the specifications in attribute design table 11.16. We will now take up the example of conditional value assistance using the Query option by creating the attribute cust_news_display_order as follows.
Tip
You may want to jump back to Chapter 3 to quickly go through our earlier discussion on registered tables before you continue with the following section.
