Content created and attached to a Lifecycle can be progressed through the various Lifecycle states via one of the following mechanisms:
- Web Publisher Promote and Demote menu options
- Workflows
- Server API commands:
promoteanddemote BATCH_PROMOTEadministration method
We will create sample content in Web Publisher and see how to promote and demote it through its various Lifecycle states using the above mechanisms.
Create a News Article attached to Custom_Lifecycle in Web Publisher using one of the following methods:
- Using the News Article Web Publisher template that we will cover in Chapter 13
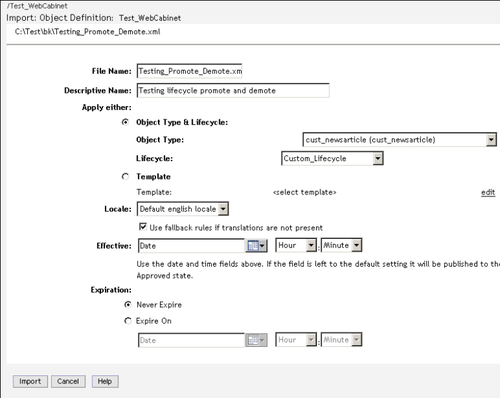
- Importing a content file within a Web Publisher web cabinet through the menu option File | Import and attaching it to custom object type cust_newsarticle and Lifecycle Custom_Lifecycle (refer to figure 12.21)

Figure 12.21: Importing a content file and attaching it to Custom_Lifecycle
You can verify from the Status column shown in figure 12.22 that the newly created/imported content is in the WIP Lifecycle state. Choose the checkbox against the content and select the menu option Document | Lifecycle | Promote.

Figure 12.22: Promoting content
The system will take a short while to promote the content to its next normal state in the Lifecycle. You can click on the Task Status button to view the status of the Lifecycle promote operation. Once the system has promoted the content, the content can be seen in its next normal Lifecycle state (Staging in the case of Custom_Lifecycle) as shown in figure 12.23.

Figure 12.23: Demoting content
In order to demote content from its current normal Lifecycle state, choose the checkbox against the content and select the menu option Document | Lifecycle | Demote (refer to figure 12.23).
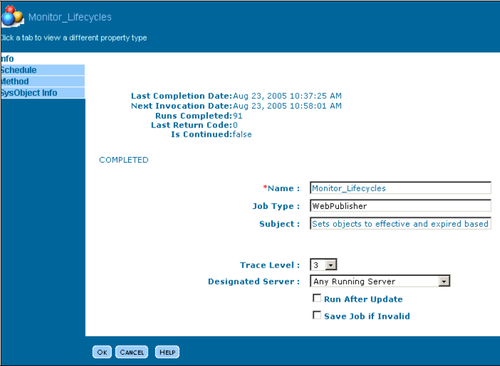
In order to power-promote the content, choose the checkbox against the content and select the menu option Document | Lifecycle | Power promote. Power promotion pushes the content directly to its Approved Lifecycle state (i.e. the last state in the Lifecycle). At this point it iscritical to discuss the Web Publisher Monitor_Lifecycles Job (refer to figure 12.24).

Figure 12.24: Monitor_Lifecycles job in Documentum
The Monitor_Lifecycles job in Documentum runs at pre-defined intervals and performs the following functions:
If an Approved object's effective date (a_effective_date attribute) matches the current system date, the Monitor_Lifecycles job turns the object active, by changing its version label to Active.
If an Active object's expiration date (a_expiration_date attribute) matches the current system date, the Monitor_Lifecycles job expires the object, by changing its version label to Expired.
By default, if the effective date for the content is blank, power promotion immediately turns the file active and the content is published. However, by providing a Web Publisher system setting, you can alter this behavior.
Log in to Web Publisher as an administrator and go to Administration | Web Publisher Admin | Settings under the Lifecycles section.

Figure 12.25: Delay Publish Active setting
As shown in figure 12.25, if you check the Delay Publish Active checkbox, power promotion to the Active state is taken care by the Monitor_Lifecycles Job.
The following API commands (executed via IAPI utility or API Tester in Documentum Administrator) can be used for promoting and demoting content as well. Refer to Chapter 26 to understand Server API commands better.
- Promoting Content
API>id,c,cust_newsarticle where object_name = Testing_Promote_Demote. xml
API commandsAPI commandscontent, promoting...
090015558000bc5b
Note that the API command
idreturns the object ID of the object matching the specified qualification. In our case,090015558000bc5bis the object ID (r_object_id attribute) of the News Article content with the nameTesting_Promote_Demote.xml.API>promote,c,090015558000bc5b ... OK - Demoting Content
API>demote,c,090015558000bc5b ... OK - Batch Promoting Content
The administrative method
BATCH_PROMOTEcan be used to promote multiple objects to their next Lifecycle state via a simple API command. The interesting thing aboutBATCH_PROMOTEis that it can be used on multiple objects existing in different Lifecycle states and attached to different lifecycles. You can promote up to 200 objects in a single execution ofBATCH_PROMOTE.Let us now promote two content files,
Testing_Promote_Demote.xmlandTesting_Promote_Demote002.xml, usingBATCH_PROMOTE:API>id,c,cust_newsarticle where object_name = Testing_Promote_Demote002.xml ... 090015558000bc71 API>id,c,cust_newsarticle where object_name = Testing_Promote_Demote.xml ... 090015558000bc5bOnce you have retrieved the
r_object_idsof the two content files, issue the following simple API command for batch promotion.API> apply,c,NULL,BATCH_PROMOTE,ARGUMENTS,S,090015558000bc71, 090015558000bc5bThe
BATCH_PROMOTEmethod in turn calls thedm_bp_batchDocumentum method and returns a collection with one result object after execution.
