We have already created a custom lifecycle and associated it with our custom News Article object type in Chapters 11 and 12. This means that content created from the News Article object type (and template) can be routed through the different states of the lifecycle, such as WIP, Staging, and Approved. Have you ever thought about how content automatically progresses through the different lifecycle states? You can certainly select content items and manually promote, demote or power-promote them to move them across various linear lifecycle states. However, in an actual scenario your business users would want an automated process to achieve this. What the business teams typically want is a controlled and automated mechanism whereby content created by a group of users can be sent across electronically to a reviewer group for an initial round of review. The number of sequential/parallel groups of reviewers or approvers could be specific to a particular business. Once the content is finally reviewed and approved, it should be made available on the live website and should be in the terminal lifecycle state (say Approved/Active). At any point of time during the review and approval process, the content should be in the intermediate lifecycle states such as WIP or Staging.
This automated business process required to route content through its numerous lifecycle stages before publishing it to the production website is termed workflow in Documentum lingo.
A workflow goes hand in hand with a lifecycle and defines business policies for teams by having the content creators and reviewers adhere to the norms laid down by the organization.
Note that while a lifecycle simply defines the different stages in the life of a content item, a workflow actually defines how content moves through these different stages, who makes it move under various activities, what actions are performed by individual groups and users during the different activities, etc.
In Documentum, a workflow template is used to create various workflow instances (dm_workflow) for routing content in lifecycle stages and exists in the Docbase as a dm_process object. The Documentum Workflow Manager tool used to create and manage workflow templates is available once you install/configure Documentum Application Builder. (Please refer to Chapter 8 for further details.)
You could create a custom workflow as per your specific business needs or use one of the following workflows available out-of-the-box in Web Publisher:
- French Translation Workflow
- Request new content
- Submit to website
- Translate and submit to website
Launch Documentum Application Builder and open the WebPublisher DocApp under /System/Applications/WebPublisher to view the default Web Publisher workflows as shown in figure 19.1.

Figure 19.1: Workflow templates available by default in Web Publisher
Double-clicking on the above workflow templates launches the Workflow Manager tool and displays the workflow process definition in the form of a GUI layout.
It is essential to design your workflows well before jumping off to creating them. Understand the need for workflows from your business (end) users. Understand how many levels of review they need and what actions need to be formed on content by which groups/users before publishing the content to a running website.
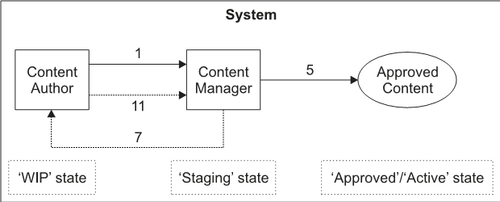
We will take a simple example in this chapter and create a workflow with the activities/tasks mentioned below. (Make sure that you customize/extend this sample workflow as per your business requirements by removing/altering existing activities or adding some more activities if need be.)
- Content created by content authors will be submitted to the workflow.
- The system automatically promotes the content to the Staging lifecycle state at this point.
- Content (in the form of workflow tasks) reaches the Inboxes of all content manager group users for a round of review.
- The first content manager user to acquire the workflow task gets to review it.
- The content manager can review the content and, if it is fine, can submit it.
- The system automatically promotes the content to the Approved lifecycle state, marking it finally approved and ready to be turned Active based on the specified effective date for the content.
- If the content manager reviews the content and does not find it satisfactory, he/she can reject it back to the content author group, asking for specific corrections.
- The system automatically demotes the content to the WIP lifecycle state at this point.
- Content (in the form of workflow tasks) reaches the Inboxes of all content author group users for correction purposes.
- The first content author user to acquire the workflow task gets to work on it.
- The content author can edit and modify the content and submit it again to the content manager group users for review purposes.
- The system automatically promotes the content to the Staging lifecycle state at this point.
- The sequence of activities from point 3 is then repeated.
Figure 19.2 depicts the workflow steps mentioned above.

Figure 19.2: Pictorial representation of a custom workflow
