
Calibrating the Accelerometer
,The built-in Accelerometer does not provide calibration support out of the box. Moreover, there is no systemwide calibration setting that your app can update. It is up to your app to have the user place the phone in a level position, calculate an offset value, and save the offset value in isolated storage.
The custom EnhancedAccelerometer provides support for calibrating a device placed on a level surface. It includes the following two calibration related methods:
![]()
bool CanCalibrate()
![]()
bool Calibrate()
CanCalibrate determines whether the device is stable enough for calibration to take place and is determined by measuring the variation of the last several readings and whether the current X, Y, and Z axes do not stray too far from the ideal level position. The level of allowed variation can be specified using the MaximumStabilityTiltDeltaAngle property, which is set to half a degree (0.5 * Math.PI / 180.0) by default.
The ideal level vector is (0,0,−1). The allowed variation from the ideal vector can be specified using the EnhancedAccelerometer’s MaximumCalibrationTiltAngle property, which is set to 20 degrees (20.0 * Math.PI / 180.0) by default.
Sample Accelerometer View
The sample for this section is located in the Sensors/Accelerometer directory of the WPUnleashed.Examples project in the downloadable sample code. It uses the EnhancedAccelerometer via a custom IAccelerometer interface. This enables a mock accelerometer to be supplanted for testing purposes.
The AccelerometerView page presents four sliders for viewing the various readings from the EnhancedAccelerometer. Its viewmodel, the AccelerometerViewModel class, contains the following three commands:
![]()
StartCommand
![]()
StopCommand
![]()
CalibrateCommand
StartCommand subscribes to the IAccelerometer.ReadingChanged event and calls the IAccelerometer’s Start method, whereas StopCommand unsubscribes from the event and calls IAccelerometer’s Stop method (see Listing 16.1).
CalibrateCommand uses the IAccelerometer.CanCalibrate method to determine whether the command can execute, which in turn sets the enabled state of the view’s AppBar button.
LISTING 16.1. AccelerometerViewModel Constructor
public AccelerometerViewModel(IAccelerometer accelerometer) : base("accelerometer")
{
startCommand = new DelegateCommand(
obj =>
{
accelerometer.ReadingChanged -= HandleReadingChanged;
accelerometer.ReadingChanged += HandleReadingChanged;
accelerometer.Start();
});
stopCommand = new DelegateCommand(
obj =>
{
accelerometer.ReadingChanged -= HandleReadingChanged;
accelerometer.Stop();
});
calibrateCommand = new DelegateCommand(
obj => MessageService.ShowMessage(accelerometer.Calibrate()
? "Successfully calibrated."
: "Unable to calibrate."),
obj => accelerometer.CanCalibrate());
}
When a new reading is received, the viewmodel’s HandleReadingChanged handler sets the viewmodel’s Reading property to the IAccelerometer’s EnhancedAccelerometerReading, as shown:
void HandleReadingChanged(object sender, EventArgs e)
{
IAccelerometer accelerometer = (IAccelerometer)sender;
Reading = accelerometer.Reading;
UpdateCommands();
}
The UpdateCommands method calls calibrateCommand.RaiseCanExecuteChanged(), which updates the enabled state of an AppBar button.
The view executes the viewmodel’s Start command within the OnNavigatedTo method and the Stop command in the OnNavigatedFrom method, thus ensuring that the native Accelerometer is disposed when another page is shown or the app is deactivated (see Listing 16.2).
LISTING 16.2. AccelerometerView Class
public partial class AccelerometerView : PhoneApplicationPage
{
public AccelerometerView()
{
InitializeComponent();
DataContext = new AccelerometerViewModel(
new EnhancedAccelerometer(new IsolatedStorageUtility()));
}
AccelerometerViewModel ViewModel
{
get
{
return (AccelerometerViewModel)DataContext;
}
}
protected override void OnNavigatedTo(NavigationEventArgs e)
{
base.OnNavigatedTo(e);
ViewModel.StartCommand.Execute(null);
}
protected override void OnNavigatedFrom(NavigationEventArgs e)
{
base.OnNavigatedFrom(e);
ViewModel.StopCommand.Execute(null);
}
}
The view’s XAML contains a custom AppBar with an AppBarIconButton that is bound to the viewmodel’s CalibrateCommand, as shown:
<u:AppBar>
<u:AppBarIconButton
Command="{Binding CalibrateCommand}"
Text="Calibrate"
IconUri="/Sensors/Accelerometer/Icons/Calibrate.png" />
</u:AppBar>
The view’s main content panel contains several grids, each displaying a value from the EnhancedAccelerometerReading:
<Grid>
<TextBlock Text="raw"
Style="{StaticResource PhoneTextGroupHeaderStyle}" />
<Slider Value="{Binding Reading.RawAcceleration.X,
Converter={StaticResource SquashConverter}}"
Style="{StaticResource SliderStyle}" Margin="0" />
<Slider Value="{Binding Reading.RawAcceleration.Y,
Converter={StaticResource SquashConverter}}"
Style="{StaticResource SliderStyle}" Margin="0,30,0,0" />
<Slider Value="{Binding Reading.RawAcceleration.Z,
Converter={StaticResource SquashConverter}}"
Style="{StaticResource SliderStyle}" Margin="0,60,0,0" />
<TextBlock Text="{Binding Reading.RawAcceleration}"
Margin="16,90,0,0" />
</Grid>
The SquashConverter is a custom IValueConverter that ensures the Slider always has a positive value that is within the range of 0 and 2, thus preventing binding failures.
The AccelerometerView page allows you to get a feel for the behavior of the accelerometer and to experiment with the various smoothing functions provided by the custom EnhancedAccelerometer (see Figure 16.4).
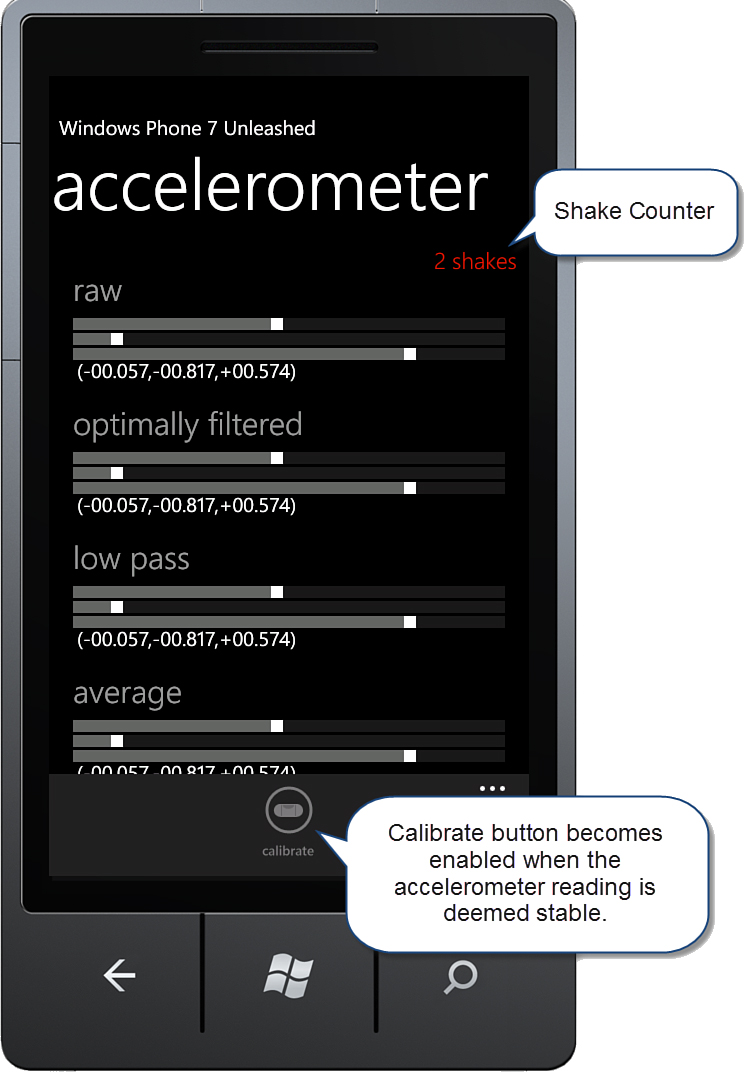
By placing your phone device face up on a flat surface, the calibrate button becomes enabled.