
Creating a Helium Voice App
,They are a dime a dozen, and you may be surprised by just how simple it is to create a helium voice app, which can modulate the pitch of the user’s voice. This section creates a page that allows the user to record audio, which is saved to isolated storage, and to play back the sample with the option to change the pitch of the playback using a slider.
The code for this section is located in the Sensors/Microphone directory of the WPUnleashed.Examples project in the downloadable sample code.
The MicrophoneViewModel class includes the following two commands:
![]() ToggleRecordCommand—Starts the microphone recording if not recording; otherwise, recording is stopped and the sample is saved to isolated storage.
ToggleRecordCommand—Starts the microphone recording if not recording; otherwise, recording is stopped and the sample is saved to isolated storage.
![]() PlayCommand—Plays the previously saved sample, if it exists, from isolated storage.
PlayCommand—Plays the previously saved sample, if it exists, from isolated storage.
MicrophoneViewModel initializes the default Microphone instance to a BufferDuration of 1 second. A byte array field is initialized using the microphone’s sample size (see Listing 22.1).
LISTING 22.1. MicrophoneViewModel Class (excerpt)
public class MicrophoneViewModel : ViewModelBase
{
readonly Microphone microphone = Microphone.Default;
readonly byte[] buffer;
const string fileName = "MicrophoneSample.bytes";
MemoryStream stream = new MemoryStream();
readonly object fileLock = new object();
public MicrophoneViewModel() : base("microphone")
{
microphone.BufferDuration = TimeSpan.FromSeconds(1);
microphone.BufferReady += HandleBufferReady;
int sampleSizeInBytes = microphone.GetSampleSizeInBytes(
microphone.BufferDuration);
buffer = new byte[sampleSizeInBytes];
toggleRecordCommand = new DelegateCommand(obj => ToggleRecording());
playCommand = new DelegateCommand(obj => Play(), obj => !recording);
}
...
}
Recording Audio
The viewmodel’s ToggleRecording method either calls the StopRecording or StartRecording method, depending on the current recording state, as shown:
void ToggleRecording()
{
if (recording)
{
StopRecording();
}
else
{
StartRecording();
}
}
The viewmodel’s StartRecording method instantiates a new MemoryStream, which is used to copy the sample data each time the Microphone.BufferReady event is raised. When the Microphone object is started, the BufferReady event is raised after 1 second of recording time. See the following excerpt:
void StartRecording()
{
stream = new MemoryStream();
microphone.Start();
Recording = true;
UpdateCommands();
}
The UpdateCommands method disables the play command if playback is in progress, as shown:
void UpdateCommands()
{
playCommand.RaiseCanExecuteChanged();
}
The viewmodel’s StopRecording method tests the state of the microphone. The Microphone.Stop method is not in the StopRecording method because doing so would prevent the last BufferReady event from being raised, which can cause the audio to be cut off. See the following excerpt:
void StopRecording()
{
if (microphone.State != MicrophoneState.Stopped)
{
Recording = false;
UpdateCommands();
}
}
The stop request is, instead, dealt with in the viewmodel’s HandleBufferReady method, in which the sample data is read into the buffer byte array and then written to a MemoryStream. If a stop recording request has been made at this point, the stream is flushed, the microphone stopped, and the MemoryStream is written to isolated storage; as shown:
void HandleBufferReady(object sender, EventArgs e)
{
microphone.GetData(buffer);
stream.Write(buffer, 0, buffer.Length);
if (!recording)
{
stream.Flush();
microphone.Stop();
WriteFile(stream);
}
}
Writing the sample to isolated storage involves retrieving an IsolatedStorageFileStream and writing the MemoryStream to it, as shown:
void WriteFile(MemoryStream memoryStream)
{
lock (fileLock)
{
using (var isolatedStorageFile
= IsolatedStorageFile.GetUserStoreForApplication())
{
using (IsolatedStorageFileStream fileStream
= isolatedStorageFile.OpenFile(fileName, FileMode.Create))
{
memoryStream.WriteTo(fileStream);
}
}
}
}
Playback of the audio begins with the retrieval of the sample bytes from isolated storage, as shown:
void Play()
{
byte[] bytes = null;
lock (fileLock)
{
using (var userStore
= IsolatedStorageFile.GetUserStoreForApplication())
{
if (userStore.FileExists(fileName))
{
using (IsolatedStorageFileStream fileStream
= userStore.OpenFile(fileName,
FileMode.Open,
FileAccess.Read))
{
bytes = new byte[fileStream.Length];
fileStream.Read(bytes, 0, bytes.Length);
}
}
}
}
if (bytes != null)
{
PlayAudio(bytes);
}
}
Playback
An XNA SoundEffect instance is used to play the sample bytes. The microphone’s sample rate is used to match the sample rate of the SoundEffect. A SoundEffectInstance field is used to vary the pitch of the audio during playback. See the following excerpt:
SoundEffectInstance effectInstance;
void PlayAudio(byte[] audioBytes)
{
if (audioBytes == null || audioBytes.Length == 0
|| effectInstance != null
&& effectInstance.State == SoundState.Playing)
{
return;
}
var soundEffect = new SoundEffect(audioBytes,
microphone.SampleRate,
AudioChannels.Mono);
if (effectInstance != null)
{
effectInstance.Dispose();
}
effectInstance = soundEffect.CreateInstance();
effectInstance.Pitch = (float)pitch;
effectInstance.Play();
}
The Pitch property adjusts the playback of the SoundEffectInstance during playback, as shown:
double pitch;
public double Pitch
{
get
{
return pitch;
}
set
{
Assign(ref pitch, value);
if (effectInstance != null)
{
effectInstance.Pitch = (float)value;
}
}
}
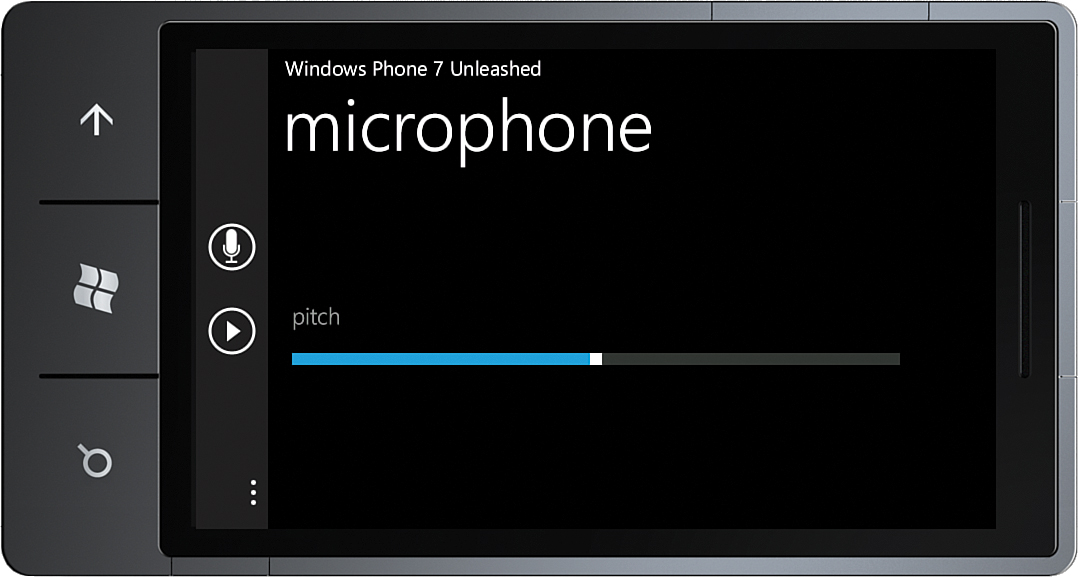
MicrophoneView
The MicrophoneView page includes a custom AppBar definition, with buttons bound to the commands in the view. The first button is an AppBarToggleButton, which changes its icon according to the value of the viewmodel’s Recording property. See the following excerpt:
<u:AppBar>
<u:AppBarToggleButton
Command1="{Binding ToggleRecordCommand}"
Toggled="{Binding Recording}"
Text1="Record"
Text2="Stop"
Icon1Uri="/Sensors/Microphone/Icons/Record.png"
Icon2Uri="/Sensors/Microphone/Icons/StopRecording.png" />
<u:AppBarIconButton
Command="{Binding PlayCommand}"
Text="Play"
IconUri="/Sensors/Microphone/Icons/Play.png" />
</u:AppBar>
The main content panel includes a Slider that is bound to the viewmodel’s Pitch property, as shown:
<StackPanel x:Name="ContentPanel" Grid.Row="1" Margin="12,0,12,0">
<TextBlock Text="pitch"
Style="{StaticResource LabelTextIndentedStyle}" />
<Slider Value="{Binding Pitch, Mode=TwoWay}" Minimum="-1" Maximum="1" />
</StackPanel>
By moving the slider to the left, the pitch decreases during playback; by moving it to the right, the helium voice effect is achieved (see Figure 22.1).
The Microphone class provides an easy way to capture audio and provides interesting opportunities for adding voice-enabled services such as voice recognition and streaming communications.