
To-Do List Scheduled Task Sample
,This section looks at creating a to-do list app that uses periodic tasks in conjunction with a scheduled task agent. The app allows the user to enter a to-do item, which is stored in a local database, and which can be pinned as a live tile on the start experience. We look at using a periodic task to update the status of the to-do item live tiles.
TodoItem
To-do items are represented by the TodoItem class, which contains three properties: Id, Description, and DueDate. DueDate is of type DateTime and indicates when the to-do item should be considered overdue. TodoItem objects are persisted using LINQ to SQL. The TodoItem class is decorated with a Table attribute, and its properties with Column attributes (see Listing 32.2).
[Table]
public class TodoItem : NotifyPropertyChangeBase
{
int id;
[Column(
IsPrimaryKey = true,
DbType = "INT IDENTITY NOT NULL",
IsDbGenerated = true,
UpdateCheck = UpdateCheck.Never)]
public int Id
{
get
{
return id;
}
set
{
Assign(ref id, value);
}
}
string description;
[Column]
public string Description
{
...
}
DateTime dueDate;
[Column]
public DateTime DueDate
{
...
}
}
For more information on LINQ to SQL and using databases in Windows Phone, see Chapter 29, “Storing App Data in a Local Database.”
We now look briefly at the app’s data layer, before moving on to its viewmodels. Persistence of TodoItem objects is performed using a LINQ to SQL DataContext instance, and an intermediary service that decouples the data context from the app’s viewmodels.
TodoDataContext
To retrieve and store TodoItem objects in a database, we use a custom DataContext class called TodoDataContext. This class allows TodoItem objects to be retrieved via its TodoItems property (see Listing 32.3).
LISTING 32.3. TodoDataContext Class
public class TodoDataContext : DataContext
{
public TodoDataContext(string connection)
: base(connection)
{
}
public Table<TodoItem> TodoItems
{
get
{
return GetTable<TodoItem>();
}
}
}
In the sample app, viewmodels do not directly interact with the TodoDataContext, but perform all CRUD operations via a to-do service. This decouples the data context from the viewmodels, allowing you to replace the to-do service with an implementation that could, for example, use a cloud service rather than a local database. Decoupling the data context also means that you have the flexibility to unit test the code outside an emulator, perhaps on a build server.
TodoService
A custom service provides for all CRUD operations for the TodoItem objects. It serves as an intermediary between the LINQ to SQL DataContext for TodoItems and viewmodel logic.
When the TodoService is instantiated, a TodoDataContext is created. TodoItem objects can then be retrieved using the GetTodoItem method, shown in the following excerpt:
public TodoItem GetTodoItem(int itemId)
{
TodoItem item = dataContext.TodoItems.Where(
todoItem => todoItem.Id == itemId).FirstOrDefault();
if (item == null)
{
throw new KeyNotFoundException(
string.Format("Item with key '{0}' was not found.", itemId));
}
return item;
}
Conversely, inserting a new TodoItem into the database is done using the service’s AddOrUpdateItem method.
If the TodoItem has an Id that is less than 1, it indicates that the TodoItem does not already exist in the database. If greater than 0, it is indicative of an update. See the following excerpt:
public void AddOrUpdateItem(TodoItem todoItem)
{
ArgumentValidator.AssertNotNull(todoItem, "todoItem");
if (todoItem.Id <= 0)
{
dataContext.TodoItems.InsertOnSubmit(todoItem);
}
dataContext.SubmitChanges();
}
The third method of the TodoService worth noting is GetTodoItems, which retrieves all TodoItem objects via the TodoItems property of the data context, like so:
public IEnumerable<TodoItem> GetTodoItems()
{
return dataContext.TodoItems;
}
As you see in a moment, GetTodoItems is used by the TodoListViewModel.
With the TodoService in place we now look at how the service is used by the app’s viewmodels to display all to-do items and to create new to-do items.
TodoItemViewModel
The TodoItemView page retrieves all TodoItem objects for the user and displays them in a list. Its viewmodel relies on the to-do service being passed as a constructor argument.
Retrieving the TodoItem objects is performed in the viewmodel’s PopulateItems method. The to-do service is used to retrieve the items, and then, using a LINQ expression, the items are grouped by the TodoItem.DueDate property. This allows the list to be bound to a LongListSelector in the view. See the following excerpt:
void PopulateItems()
{
try
{
IEnumerable<TodoItem> items = todoService.GetTodoItems();
IEnumerable<CustomGrouping<TodoItem>> groups
= from todoItem in items
orderby todoItem.DueDate
group todoItem by todoItem.DueDate.Date
into grouping
select new CustomGrouping<TodoItem>(
new DateGroupingKey(grouping.Key),
grouping.AsEnumerable());
GroupedTodoItems = groups.ToList();
}
catch (Exception ex)
{
Message = "Unable to retrieve items.";
Console.WriteLine(ex);
}
}
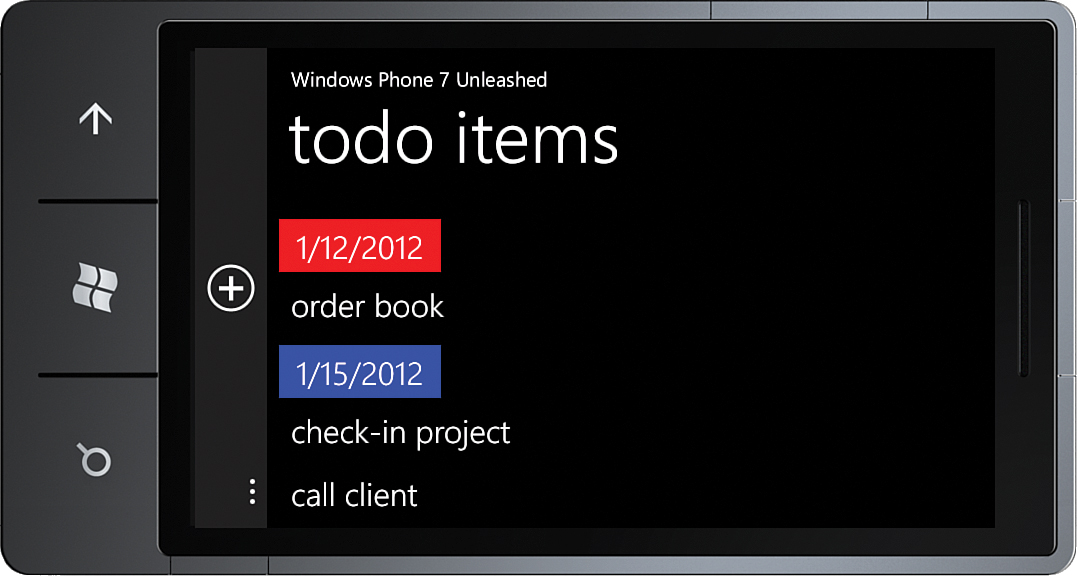
TodoItems are grouped using a custom class called DateGroupingKey, which allows us to provide some additional logic to the item groupings, namely an Overdue property (see Listing 32.4). This allows you to change the background for the grouping header to red if the to-do items in the group have due dates occurring in the past.
Alternatively, you may choose to use a value converter for determining whether the date is overdue. The example uses a custom key class, however, because it better encapsulates the date value and the logic for determining whether it is overdue.
LISTING 32.4. DateGroupingKey Class
public class DateGroupingKey
{
public DateTime DateTime { get; private set; }
public DateGroupingKey(DateTime dateTime)
{
DateTime = dateTime;
Overdue = DateTime.Now > dateTime;
}
public bool Overdue { get; private set; }
}
The viewmodel’s Load method commences population of the to-do items asynchronously, using a thread from the thread pool. This prevents blocking the UI thread during a potentially long-running operation.
A PeriodicTask is registered with the ScheduledActionService. If the PeriodicTask has already been registered, it is first removed. This resets the task’s expiration date. See the following excerpt:
public void Load()
{
ThreadPool.QueueUserWorkItem(delegate { PopulateItems(); });
PeriodicTask periodicTask = new PeriodicTask(agentName)
{
Description = "Updates a tile.",
ExpirationTime = DateTime.Now.AddDays(14)
};
if (ScheduledActionService.Find(agentName) != null)
{
ScheduledActionService.Remove(agentName);
}
/* This can only be called when the app
* is running in the foreground. */
ScheduledActionService.Add(periodicTask);
}
The TodoListViewModel constructor calls its Load method after initializing various ICommands (see Listing 32.5). NewItemCommand uses the ViewModelBase class’s Navigate method to open the TodoItemView page. EditItemCommand also navigates to the TodoItemView page, but passes the Id of the TodoItem, provided as a command argument.
LISTING 32.5. TodoListViewModel Constructor
public TodoListViewModel(
ITodoService todoService, IDeviceProperties deviceProperties)
{
this.todoService = ArgumentValidator.AssertNotNull(
todoService, "todoService");
this.deviceProperties = ArgumentValidator.AssertNotNull(
deviceProperties, "deviceProperties");
editItemCommand = new DelegateCommand<int>(
todoItemId => Navigate(todoItemViewUrl + "?TodoItemId=" + todoItemId));
testAgentCommand = new DelegateCommand(
obj => ScheduledActionService.LaunchForTest(
agentName, TimeSpan.Zero));
backupDatabaseCommand = new DelegateCommand(obj => BackupDatabase());
restoreDatabaseCommand = new DelegateCommand(obj => RestoreDatabase());
Load();
}
BackupDatabaseCommand and RestoreDatabaseCommand are discussed later in this chapter.
Debugging Scheduled Tasks
Debugging a task agent is done by calling the ScheduledActionService.LaunchForTest method. Calling LaunchForTest is a way of forcing the OS to run your task agent. LaunchForTest accepts two parameters: the name of the scheduled task and a TimeSpan that indicates the delay before the task agent is invoked. By specifying TimeSpan.Zero, the task agent is invoked immediately.
With the TestAgentCommand wired up to the UI, you can instruct the OS to launch the task agent, allowing you to step into the task agent’s OnInvoke method. The task agent for the sample is discussed later in this section.
The viewmodel relies on a custom IDeviceProperties interface, which allows the viewmodel to retrieve the Windows Live anonymous ID. Windows Live anonymous IDs are discussed further in Chapter 33, “Performing Background File Transfers.”
TodoListView XAML
The TodoListView XAML contains a LongListSelector that is bound to the GroupedTodoItems property of the viewmodel (see Listing 32.6). The LongListSelector’s ItemTemplate uses a TextBlock to display the Description property of each TodoItem. When the user taps the description, the EditItemCommand is executed, and the Id of the TodoItem is passed as a command parameter. This is done using the custom commanding infrastructure, introduced in Chapter 8, “Taming the Application Bar.”
The LongListSelector's GroupHeaderTemplate contains a Border whose background is determined by the Overdue property of the group key, which is a DateGroupingKey instance.
LISTING 32.6. TodoListView.xaml (excerpt)
<StackPanel x:Name="ContentPanel" Grid.Row="1" Margin="12,0,12,0">
<phone:LongListSelector
ItemsSource="{Binding GroupedTodoItems}"
IsGroupingEnabled="True"
Background="Transparent"
Height="600">
<phone:LongListSelector.ItemTemplate>
<DataTemplate>
<StackPanel Orientation="Horizontal">
<TextBlock Text="{Binding Description}"
Margin="12,10,0,10"
Style="{StaticResource PhoneTextLargeStyle}"
c:Commanding.Event="Tap"
c:Commanding.Command="{Binding DataContext.EditItemCommand,
ElementName=page}"
c:Commanding.CommandParameter="{Binding Id}" />
</StackPanel>
</DataTemplate>
</phone:LongListSelector.ItemTemplate>
<phone:LongListSelector.GroupHeaderTemplate>
<DataTemplate>
<Border Background="Transparent">
<Border Background="{Binding Key.Overdue,
Converter={StaticResource BooleanToBrushConverter}}"
Padding="5"
HorizontalAlignment="Left"
Margin="0,10,0,0">
<TextBlock
Text="{Binding Key.DateTime, StringFormat={0:d}}"
Foreground="{StaticResource PhoneForegroundBrush}"
Style="{StaticResource PhoneTextLargeStyle}"
VerticalAlignment="Bottom" />
</Border>
</Border>
</DataTemplate>
</phone:LongListSelector.GroupHeaderTemplate>
</phone:LongListSelector>
</StackPanel>
The custom BooleanToBrushConverter is used to transform the Overdue property of type bool to a brush. For more information about the BooleanToBrushConverter, see Chapter 9, “Enriching the User Experience with the Windows Phone Toolkit Controls.”
The BooleanToBrushConverter is defined as a page resource as shown:
<phone:PhoneApplicationPage.Resources>
<ValueConverters:BooleanToBrushConverter
x:Name="BooleanToBrushConverter"
BrushIfTrue="Red"
BrushIfFalse="Blue" />
</phone:PhoneApplicationPage.Resources>
Overdue groups are shown with a red header, and regular groups have a blue header (see Figure 32.11).
The custom AppBar for the page includes an AppBarHyperlinkButton, which takes the user to the TodoItemView page and allows the user to create a new to-do item. The other viewmodel commands are bound to AppBarMenuItems, as shown:
<u:AppBar>
<u:AppBarHyperlinkButton
NavigateUri="/TodoList/TodoItemView.xaml"
Text="New"
IconUri="/Images/ApplicationBarIcons/Add.png" />
<u:AppBar.MenuItems>
<u:AppBarMenuItem
Command="{Binding BackupDatabaseCommand}"
Text="Backup" />
<u:AppBarMenuItem
Command="{Binding RestoreDatabaseCommand}"
Text="Restore" />
<u:AppBarMenuItem
Command="{Binding TestAgentCommand}"
Text="test agent" />
</u:AppBar.MenuItems>
</u:AppBar>
You have seen how the list of to-do items is displayed; the next section examines how new to-do items are created.
TodoItemView and ViewModel
The TodoItemView allows the user to perform the following three tasks:
![]() Create a new todo item
Create a new todo item
![]() Update an existing todo item
Update an existing todo item
![]() Delete a todo item
Delete a todo item
The TodoItemViewModel constructor receives the ITodoService, initializes commands, and registers persistent state, as shown:
public TodoItemViewModel(ITodoService todoService)
{
this.todoService = ArgumentValidator.AssertNotNull(
todoService, "todoService");
saveCommand = new DelegateCommand<bool>(SaveItem);
loadItemCommand = new DelegateCommand<int>(LoadItem);
deleteCommand = new DelegateCommand(obj => DeleteItem());
RegisterStatefulProperty(ApplicationStateType.Transient,
() => TodoDescription);
RegisterStatefulProperty(ApplicationStateType.Transient,
() => TodoDueDate);
}
The viewmodel contains a Description property and a DueDate property, which coincide with the properties of the TodoItem class. When the SaveCommand is executed, the SaveItem method is called. SaveItem uses the ITodoService to persist the TodoItem to the database, and to optionally create a live tile representing the to-do item.
Creating the To-Do Item Shell Tile
To create a shell tile, you must pass a StandardTileData instance to the static ShellTile.Create method. Because this is performed in several places in the sample, the code for creating the StandardTileData has been placed into a class called TodoTileDataCreator (see Listing 32.7). This class uses the to-do item’s due date to determine the numeric icon shown on the tile. If it exceeds 99 days, it is not shown. The tile has a foreground and a background image, and shows the description and due date of the to-do item.
LISTING 32.7. TodoTileDataCreator Class
public static class TodoTileDataCreator
{
public static StandardTileData CreateTile(
string todoItemDescription, DateTime dueDate)
{
/* The Count property of the tile data is set
* to the number of days remaining.
* It must be between 0 and 99 inclusively. */
int daysUntilDue = 0;
bool overdue = DateTime.Now > dueDate;
if (!overdue)
{
int temp = (int)(DateTime.Now - dueDate).TotalDays;
if (temp < 100)
{
daysUntilDue = temp;
}
}
const string tilesDirectory = "/TodoList/Images/Tiles/";
string backgroundUrl = overdue
? tilesDirectory + "Overdue.jpg"
: tilesDirectory + "Ok.jpg";
StandardTileData tileData = new StandardTileData
{
Title = todoItemDescription,
BackgroundImage = new Uri(backgroundUrl, UriKind.Relative),
Count = overdue ? 0 : daysUntilDue,
BackTitle = dueDate.ToShortDateString(),
BackContent = todoItemDescription,
BackBackgroundImage = new Uri(
tilesDirectory + "Background.jpg", UriKind.Relative)
};
return tileData;
}
}
Saving a To-Do Item
Saving an item involves instantiating a new item and sending it to the ITodoService to be stored in the database (see Listing 32.8).
If a shell tile is created for the to-do item, the NavigationUri of the tile is set to the TodoItemView page, and the Id of the TodoItem is placed in the query string of the URI, so that by tapping the tile, the user is brought back to the TodoItemView page, which allows editing or deletion of the to-do item.
Note
Calling ShellTile.Create immediately deactivates your app.
The final task of the SaveItem method is to navigate the user back to the TodoItemList page.
LISTING 32.8. TodoItemViewModel SaveItem Method
void SaveItem(bool createTile)
{
if (string.IsNullOrWhiteSpace(todoDescription))
{
MessageService.ShowError("Please enter a description.",
"Required Field Missing");
return;
}
if (todoItem == null)
{
todoItem = new TodoItem();
}
todoItem.Description = todoDescription;
todoItem.DueDate = todoDueDate;
todoService.AddOrUpdateItem(todoItem);
StandardTileData tileData = TodoTileDataCreator.CreateTile(
todoItem.Description, todoItem.DueDate);
string url = string.Format("/TodoList/TodoItemView.xaml?{0}={1}",
TaskScheduler.TodoItemIdQueryKey,
todoItem.Id);
if (createTile)
{
/* Creating a shell tile takes the user to the start experience. */
ShellTile.Create(new Uri(url, UriKind.Relative), tileData);
}
else
{
ShellTile shellTile = ShellTile.ActiveTiles.Where(
tile => tile.NavigationUri.ToString()
.Contains(url)).FirstOrDefault();
if (shellTile != null)
{
shellTile.Update(tileData);
}
Navigate(todoListUrl);
}
}
Editing an Existing To-Do Item
The TodoItemViewModel can be in one of two modes: creation mode or edit mode. Either a new item is to be created, or an existing to-do item is being edited. This is indicated to the view using a VisualState property, which is of type string. By default, the viewmodel is in creation mode. When the user taps a to-do shell tile, or a to-do item on the TodoListView page, the view is placed in edit mode.
If in edit mode, the viewmodel’s LoadItem method is used to retrieve the TodoItem with the specified Id from the ITodoService. The viewmodel’s TodoDescription and TodoDueDate are populated using the retrieved item’s values, as shown in the following excerpt:
TodoItem todoItem;
void LoadItem(int itemId)
{
try
{
todoItem = todoService.GetTodoItem(itemId);
}
catch (KeyNotFoundException)
{
MessageService.ShowError("Item not found.");
}
TodoDescription = todoItem.Description;
TodoDueDate = todoItem.DueDate;
VisualState = "Update";
}
As you see later in this section, the VisualState property is used by the TodoItemView page to hide or reveal elements on the page.
When in edit mode, the user also has the ability to delete the to-do item. The DeleteItem method uses the ITodoService to perform the data operation. Any shell tiles whose NavigationUri contains the query string corresponding to the to-do item are also removed. See the following excerpt:
void DeleteItem()
{
if (todoItem == null)
{
throw new InvalidOperationException("Not in edit mode.");
}
todoService.RemoveTodoItem(todoItem);
string tileQueryString = string.Format("{0}={1}",
TaskScheduler.TodoItemIdQueryKey,
todoItem.Id);
ShellTile tile = ShellTile.ActiveTiles.FirstOrDefault(
x => x.NavigationUri.ToString().Contains(tileQueryString));
if (tile != null)
{
tile.Delete();
}
Navigate(todoListUrl);
}
The TodoItemView page uses the IoC container to resolve the ITodoService instance. If it has not been defined in the container, a TodoService is instantiated.
For more information on Inversion of Control and IoC containers, see Chapter 24, “Unit Testing Apps.”
The following excerpt shows the TodoItemView constructor and fields:
readonly TodoItemViewModel viewModel;
bool initialized;
public TodoItemView()
{
InitializeComponent();
var todoService = Dependency.Resolve<ITodoService, TodoService>();
DataContext = viewModel = new TodoItemViewModel(todoService);
}
The Id of the TodoItem is passed as a query string parameter, which causes the view to be placed in edit mode. This is determined in the OnNavigatedTo method of the view. If the TodoItem Id has been supplied, the viewmodel’s LoadItemCommand is executed.
When the LoadItemCommand completes, the visual state of the view is updated according to the VisualState property of the viewmodel, as shown in the following excerpt:
protected override void OnNavigatedTo(NavigationEventArgs e)
{
base.OnNavigatedTo(e);
if (initialized)
{
return;
}
initialized = true;
string itemId;
if (NavigationContext.QueryString.TryGetValue("TodoItemId", out itemId))
{
/* Custom commanding infrastructure performs automatic conversion
* from a string to an int. */
viewModel.LoadItemCommand.Execute(itemId);
}
VisualStateManager.GoToState(this, viewModel.VisualState, true);
}
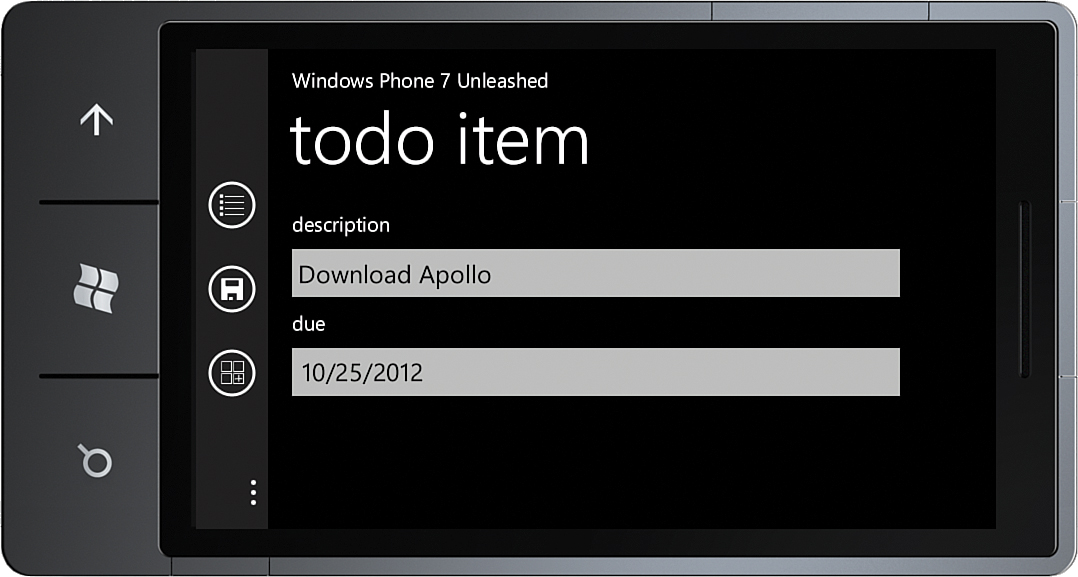
The TodoItemView page contains a TextBox to edit the viewmodel’s TodoDescription property and a Windows Phone Toolkit DatePicker to edit the TodoDueDate property.
To force the TextBox to update the viewmodel when the text changes, the custom UpdateSourceTriggerExtender is used. This prevents changes to the description from being missed if the user taps an application bar item without first tapping elsewhere on the page to lose focus. See the following excerpt:
<StackPanel x:Name="ContentPanel" Grid.Row="1" Margin="12,0,12,0">
<TextBlock Text="description"
Style="{StaticResource PhoneTextNormalStyle}" />
<!-- UpdateSourceTriggerExtended causes the value
to be updated in the viewmodel as soon as the text changes. -->
<TextBox Text="{Binding TodoDescription, Mode=TwoWay}"
u:UpdateSourceTriggerExtender.UpdateSourceOnTextChanged="True" />
<TextBlock Text="due"
Style="{StaticResource PhoneTextNormalStyle}" />
<toolkit:DatePicker Value="{Binding TodoDueDate, Mode=TwoWay}" />
</StackPanel>
For more information on the UpdateSourceTriggerExtender, see Chapter 26, “Validating User Input.”
The view contains an AppBar with an AppBarHyperlinkButton that links back to the TodoListView page and AppBarIconButtons that are bound to the various viewmodel commands, as shown:
<u:AppBar>
<u:AppBarHyperlinkButton
NavigateUri="/TodoList/TodoListView.xaml"
Text="Items"
IconUri="/Images/ApplicationBarIcons/List.png" />
<u:AppBarIconButton
x:Name="Button_Delete"
Command="{Binding DeleteCommand}"
Text="Delete"
IconUri="/Images/ApplicationBarIcons/Delete.png" />
<u:AppBarIconButton
Command="{Binding SaveCommand}"
CommandParameter="False"
Text="Save"
IconUri="/Images/ApplicationBarIcons/Save.png" />
<u:AppBarIconButton
Command="{Binding SaveCommand}"
CommandParameter="True"
Text="Save & Pin"
IconUri="/Images/ApplicationBarIcons/AddTile.png" />
</u:AppBar>
The visibility of the Delete button is determined by the VisualState property of the viewmodel. When the VisualState property is equal to Update, the Delete button is shown; if equal to Create, it is collapsed (see Figure 32.12). See the sample code if you are interested in the visual state group XAML.
When tapping the Save & Pin button, the app is deactivated and the tile is displayed on the Start Experience (see Figure 32.13).
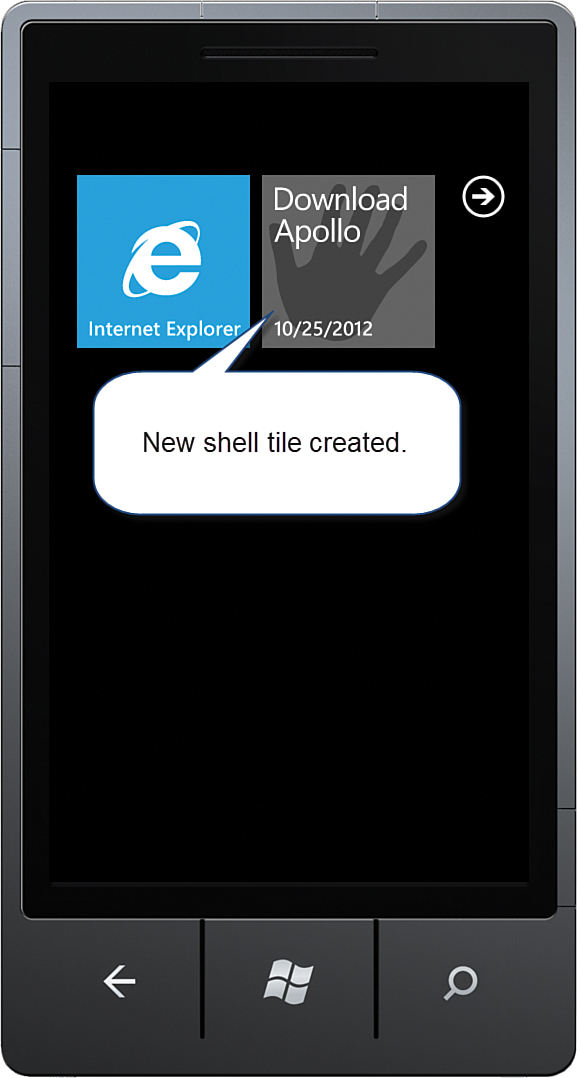
Tapping the tile returns the user to the TodoItemView, where the item can be edited or deleted.
When the tile is overdue, a different image is displayed. Changing the properties of the tile can be done from your foreground app or from a background agent, which is demonstrated in the following section.