
Bullets
Creating a bullet itself is really quite simple. You can use an image from a 3D modeling program, but in most cases, spheres or cylinders work just fine. You can fancy up your bullet by applying a bright texture or giving it a color. One idea would be to have the bullet flash by randomly changing its color as it flies. Regardless of how you create your bullet, the tricky part is to make it fly, create multiple bullets, and have them go in the right direction. That’s what I’ll be covering in this section. The method I describe here is not the only way to create and fire bullets, but it’s one of the easiest. We’ll explore different options for bullets, including setting a maximum number of bullets, reloading, and changing the direction of the bullets.
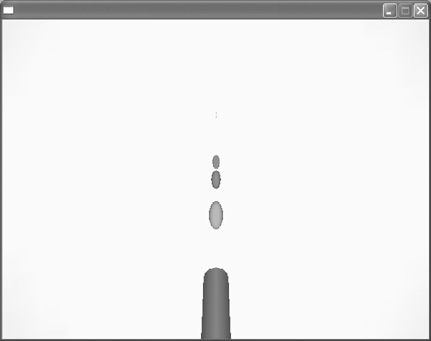
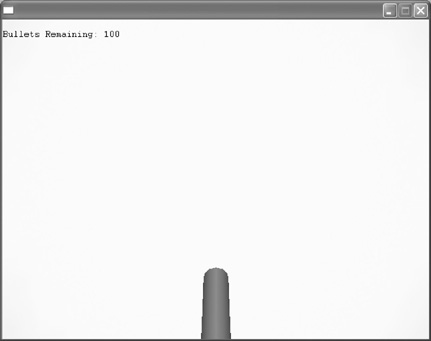
For this example, we’ll use a program similar to the one we created in the previous section, with just a few positioning differences. Start by opening the file called demo13-09.bb. Once you have the file open, save it with a new name. If you ran the program now, you’d see a gun made from a cylinder with controls that move the camera (which the gun is attached to), as seen in Figure 13.21.
Figure 13.21. You can move this gun around by pressing the left and right arrow keys.

The goal of our program is to create a bullet that flies out of our gun when the mouse button is pressed. We want the bullet to fly for a few seconds and then disappear. It sounds fairly simple, but there are a few steps involved. We are going to put the code for the bullet firing in the main game loop. Whenever the space bar is pressed, a bullet will fire. Let’s start by adding the following code in bold to execute this command:
MoveEntity camera, 0,cy#,cz#
RotateEntity camera, 0,rx#,0
;Firing bullets
						If KeyDown(SPACE_BAR) Then
						EndIf
What we have done here is said that whenever the space bar is pressed, then run the following code, until the EndIf is reached. We haven’t added the code to actually fire any bullets yet; we’ll do that shortly and place the code in between those two lines. To do this, we will create an array. Arrays were discussed in Part I. Remember that arrays are used to create multiple variables with just a few lines of code. The bullets themselves are simply spheres that are slightly stretched out. Enter the following code in bold to create the bullets, and then I’ll explain:
EntityOrder gun, -1
EntityParent gun,camera
EntityColor gun, 100,100,100
;Creating the bullets
						fullcart=100
						Dim bullet(fullcart)
						For i=0 To fullcart
						bullet(i)=CreateSphere()
						EntityColor bullet(i), 100,100,100
						ScaleEntity bullet(i),0.2,0.4,0.2
						HideEntity bullet(i)
Next
Let’s take a look at the code we just entered.
fullcart=100—Here we are creating a variable called fullcart to represent a full cartridge of bullets. In this case, we are saying that the cartridge has 100 bullets available.
Dim bullet(fullcart)—This is how we create an array. This array, which is started with the code Dim, will help create and control the 100 available bullets.
For i=0 To fullcart—This is the start of a For...Next statement. These statements will also be discussed in full detail in the next chapter. Here we are telling Blitz3D to loop the next statements 100 times.
bullet(i)=CreateSphere()
EntityColor bullet(i), 100,100,100
ScaleEntity bullet(i),0.2,0.4,0.2
These three lines of code create the bullets. Notice the letter i in parentheses beside each bullet name. This i corresponds with the i in the statement For i=0 To fullcart, which allows us to create 100 individual bullets.
HideEntity bullet(i)—This will hide the bullets until we are ready to fire them.
Next—This ends the For...Next loop.
So now that we’ve got 100 bullets loaded, we need to create the code to fire them. We will add this code in between the code we created earlier that starts an action whenever the space bar is pressed. So let’s add the following code in bold that will fire our bullets:
MoveEntity camera, 0,cy#,cz#
RotateEntity camera, 0,rx#,0
;Firing bullets
						If KeyDown(SPACE_BAR) Then
						ShowEntity bullet(t)
						PositionEntity bullet(t),EntityX(gun,1),EntityY(gun,1),EntityZ(gun,1)
						EntityColor bullet(t),Rand(0,255),Rand(0,255),Rand(0,255)
						t=t+1
EndIf
Let’s take a look at the four lines of code to see what we’ve done:
ShowEntity bullet(t)—When the bullets were first created we hid them. This command will show the bullets. Notice the letter t in parentheses after the word bullet. This is a variable that we made up for each individual bullet, and we’ll need to use this variable in a moment. We used the letter t, but you can use any variable name.
PositionEntity bullet(t),EntityX(gun,1),EntityY(gun,1),EntityZ(gun,1)— This places the bullet right at the position of the gun.
EntityColor bullet(t),Rand(0,255),Rand(0,255),Rand(0,255)—For a neat little effect, we’ll have each bullet be a different color as it comes out of the gun.
t=t+1—This bumps up the variable t by one so that a new bullet is created whenever the space bar is pressed. If this code wasn’t there, each time you pressed the space bar, the same bullet would be fired, replacing the existing one. We’ll experiment with this code in a moment.
So far, when the space bar is pressed, a bullet will appear at the location of the gun. The bullet will be behind the gun, so you won’t be able to see it. In order to make the bullet move, we are going to add another For...Next statement. This time, we’ll create a new variable, the letter q, that will move each of our 100 bullets as they are fired. Add the following code in bold:
;Firing bullets
If KeyDown(SPACE_BAR) Then
ShowEntity bullet(t)
PositionEntity bullet(t),EntityX(gun,1),EntityY(gun,1),EntityZ(gun,1)
EntityColor bullet(t),Rand(0,255),Rand(0,255),Rand(0,255)
t=t+1
EndIf
For q = 0 To fullcart
						MoveEntity bullet(q), 0,1,3
Next
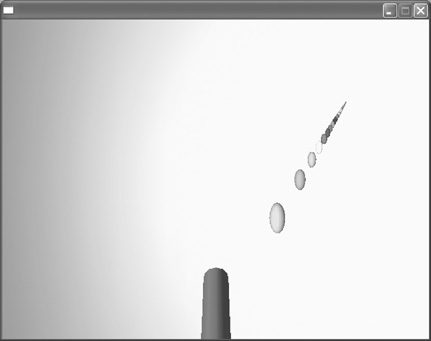
So the code we created here will move the bullets whenever they are fired. It’s time to run our program. When you press the space bar, you should see bullets fly, as in Figure 13.22.
Figure 13.22. When you press the space bar, different color bullets will fly out of the gun.
Our code isn’t quite done for a couple of reasons. If you move the left or right arrow keys as you fire, you’ll notice a problem. The bullets won’t follow the direction of the gun. The gun has moved, but the bullets continue to fly in their original direction, as shown in Figure 13.23.
Figure 13.23. When you move the gun, the bullets still fly in their original direction.
We need to alter the direction of the bullet to follow the gun by rotating the bullet based on the rotation angle of the gun. Here’s how:
If KeyDown(SPACE_BAR) Then
ShowEntity bullet(t)
PositionEntity bullet(t), EntityX(gun,1), EntityY(gun,1), EntityZ(gun,1)
RotateEntity bullet(t), EntityPitch#(gun,1)-
						35, EntityYaw#(gun,1), EntityRoll#(gun,1)
EntityColor bullet(t), Rand(0,255), Rand(0,255), Rand(0,255)
t=t+1
EndIf
Run the program now, and you’ll see that the bullets follow the direction of the gun, as seen in Figure 13.24.
Figure 13.24. After adding the RotateEntity bullet(t) code, the bullets now follow the direction of the gun.

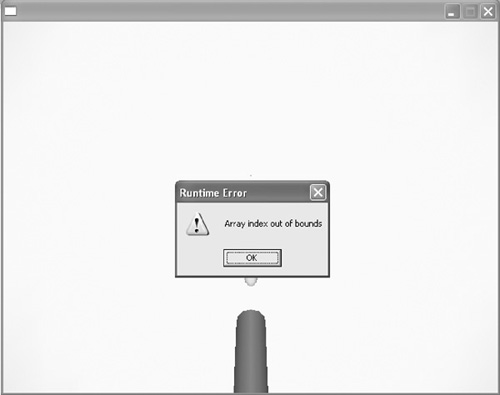
If you continue to fire, you will notice that after 100 bullets have been fired, an error message appears, as shown in Figure 13.25.
Figure 13.25. When you run out of bullets, a Runtime Error dialog box appears.
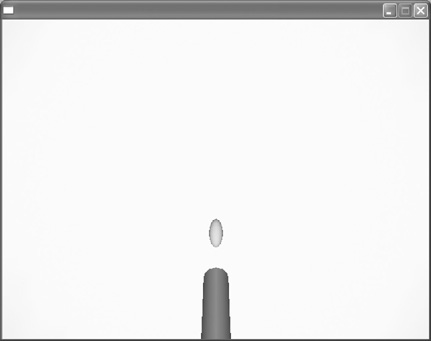
The reason for this is that the cartridge we created has only 100 bullets (fullcart=100). We can either increase this number to be incredibly high so that the player will never run out of bullets, or we can have our cartridge reload. I’ll cover reloading in a moment, but for now, let’s experiment a little with the code we’ve already created. Remember earlier that we added the code t=t+1. I want you to temporarily delete this code and then run the program. Notice now that you can fire only one bullet at a time (as seen in Figure 13.26) because the same bullet is being reused. Go ahead and put that code back into the program.
Figure 13.26. You’ll only be able to fire one bullet when you remove the t=t+1 code.
You can also experiment with the direction of the bullets. You can have them fly higher or lower by changing the y variable in the code MoveEntity bullet(q), 0,1,3. You can also make the bullets fly faster or slower by changing the z variable—in this case, changing the number 3.
Reloading
As just discussed, once you hit 100 bullets, an error will occur because you go beyond the cartridge total. Let’s start by getting a better idea of how many bullets we have fired, which we’ll do by adding the following code in bold:
bulletcount=100-t
RenderWorld
Color 0,0,0
							Text 0,15,"Bullets Remaining: "+ bulletcount
Here we create a variable called bulletcount, which is created by subtracting the value of t (the variable we associated with each bullet) from the total number of bullets in our cartridge, 100. We then added a line of text that will display the value of the bulletcount. When you run the program now, you’ll see the bullets that you have remaining listed at the top left of the screen, as seen in Figure 13.27. Although this is nice, it doesn’t solve our problem of the error that appears when we run out of bullets.
Figure 13.27. The text you entered (Bullets Remaining:) will appear on the screen.
The variable t that we created represents each individual bullet. By adding an If statement, we can say that whenever t reaches 100 bullets fired, it should revert back to 1; this way we won’t run out of bullets and the error won’t appear. Enter the following code in bold:
bulletcount=100-t
If t=100 Then
							t=1
							Endif
RenderWorld
Run the program now, and you’ll see that whenever the bullet count gets down to 1, it will revert back to 100. We purposely put this If . . . Then statement on three different lines so that we can add to it in the next section. So we’ve now gotten rid of the error, but it’s not really an authentic reload. Usually a player will have to press a button in order to have his weapon reload. In this case, we’ll make it so that when the player presses the letter R on the keyboard, his cartridge will be reloaded. We can accomplish this by adding a condition to the firing process and creating a new variable. The new variable we are going to create is called reload. We’ll change the code so that in order to be able to fire a bullet, reload has to be equal to 0; otherwise, we can’t fire. Start by adding this line in bold to the “Firing bullets” area of the code:
If KeyDown(SPACE_BAR) And reload=0 ThenBy adding the code And reload=0 Then we’ve made it so that two conditions have to be true in order for a bullet to be fired. First, the space bar needs to be pressed, and secondly, the variable we just created called reload needs to equal 0. By default, all variables equal zero unless something changes them, so the program will run just the same at this point.
Now we need to change the value of the reload variable once we run out of bullets. Remember that we run out of bullets when the variable t equals 100. Since we already have an If statement with the variable t=100, we’ll just add to it by entering the following code in bold:
If t=100 Then
t=1
reload=1
Endif
What we’ve said here is that once 100 bullets have been fired, the reload variable will equal 1. Since the reload variable needs to equal 0 in order to fire, you will no longer be able to fire. Go ahead and run the program now and press the space bar until you run out of bullets. You’ll notice that once the counter reaches 0, you’ll no longer be able to fire.
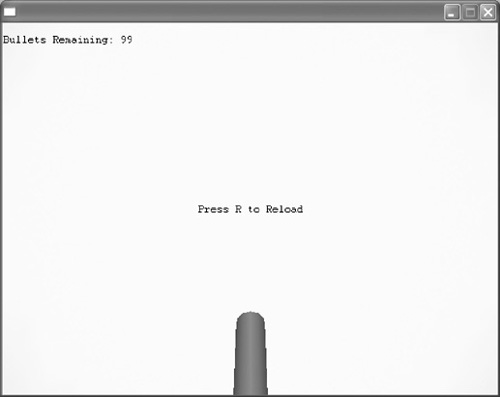
Let’s now incorporate a message to the player, letting him know that he has run out of bullets and that he needs to press the letter R in order to reload. We do this by adding the following Text code in bold:
UpdateWorld
RenderWorld
Color 0,0,0
Text 10,15,"Bullets Remaining: "+bulletcount
If reload=1 Then Text GraphicsWidth()/2, GraphicsHeight()/2,"Press R to
							Reload",1,1
Flip
Wend
End
This code tells Blitz3D to display the text "Press R to Reload" when the reload variable is equal to 1. Rather than putting in coordinates for where to place the text, we entered the code GraphicsWidth()/2, GraphicsHeight()/2, which places the text halfway on the screen both vertically and horizontally, or, in other words, we put the text in the center of the screen. When you run the program now, a message will appear on the screen, as shown in Figure 13.28, when you run out of bullets.
Figure 13.28. The player will see this message as he’s reloading.
Now we need to add the code that will reload our cartridge back to 100 bullets and let us fire again. We can accomplish this with a simple If statement:
If KeyDown (R_KEY) = True then
							t=1
							reload=0
							EndIf
RenderWorld
Here we are telling Blitz3D that when the letter R is pressed, the variable t should equal 1, or in other words, load 100 bullets. We also change the variable called reload so that it will equal 0 and we can fire again.
Note: Bullet Timing
The bullets that we’ve created so far in this program come out at rapid fire. As the space bar is pressed, bullets seem to flow out of the gun at Mach speed, and after a moment you are out of bullets. The easiest way around this is to change the code for firing bullets from If KeyDown(SPACE_BAR) to If KeyHit(SPACE_BAR). This will require the player to actually press and let go of the space bar in order to fire another bullet. In other words, holding down the space bar will fire only one bullet.
Note: Now You Try
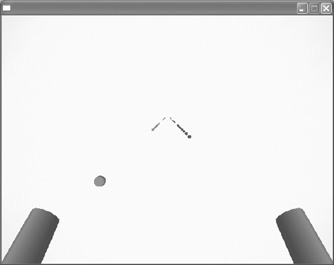
Take a look at Figure 13.29. Try to create two different guns that appear out of the bottom corners of the screen. Make it so that the gun on the left fires red bullets when the left mouse button is pressed, and the gun on the right fires blue bullets when the right mouse button is pressed. Once you are done, compare your program to the following code:
Figure 13.29. Try to create these two guns that fire different color bullets.
;Double Gun Fire
;_________________
Graphics3D 640,480
SetBuffer BackBuffer()
; Create camera
camera=CreateCamera()
;Create light
light=CreateLight()
; Creating the background
background=CreateSphere(32)
ScaleEntity background, 200,200,200
FlipMesh background
EntityColor background, 255,214,100
;Creating the gun
gun=CreateCylinder(12)
ScaleEntity gun,0.2,0.6,0.4
RotateEntity gun,45,0,0
PositionEntity gun, EntityX(camera)+2.5,EntityY(camera)-2, EntityZ(camera)+3
EntityOrder gun, -1
EntityParent gun,camera
EntityColor gun, 100,100,100
maxbull=100
;Creating the gun
gun1=CreateCylinder(12)
ScaleEntity gun1,0.2,0.6,0.4
RotateEntity gun1,45,0,0
PositionEntity gun1, EntityX(camera)-2.5,EntityY(camera)-2, EntityZ (camera)+3
EntityOrder gun1, -1
EntityParent gun1,camera
EntityColor gun1, 100,100,100
;Creating the bullets
Dim bullet(maxbull)
For i=0 To maxbull
bullet(i)=CreateSphere()
EntityColor bullet(i), 100,100,100
ScaleEntity bullet(i),0.2,0.2,0.2
HideEntity bullet(i)
Next
Function Fire()
End Function
While Not KeyDown( 1 )
;Camera Controls
If KeyDown(200)= True Then cz#=cz#+.01
If KeyDown (208)= True Then cz#=cz#-.01
If KeyDown(205)= True Then rx#=rx#-1
If KeyDown (203)= True Then rx#=rx#+1
If KeyDown(30)= True Then cy#=cy#+.01
If KeyDown (44)= True Then cy#=cy#-.01
If KeyDown (48) Then cy#=0 cz#=0
;Control camera turning radius
If rx# > 180 Then rx#=-180
If rx# < -180 Then rx# = 180
MoveEntity camera, 0,cy#,cz#
RotateEntity camera, 0,rx#,0
;Firing bullets
If MouseDown(1)
ShowEntity bullet(t)
PositionEntity bullet(t),EntityX(gun,1),EntityY(gun,1),EntityZ(gun,1)
RotateEntity bullet(t),EntityPitch#(gun,1)-
35,EntityYaw#(gun,1),EntityRoll#(gun,1)
EntityColor bullet(t),0,0,255
t=t+1
EndIf
If MouseDown(2)
ShowEntity bullet(t)
PositionEntity bullet(t),EntityX(gun1,1),EntityY(gun1,1),EntityZ(gun1,1)
RotateEntity bullet(t),EntityPitch#(gun1,1)-
35,EntityYaw#(gun1,1),EntityRoll#(gun1,1)
EntityColor bullet(t),255,0,0
t=t+1
EndIf
For q = 0 To maxbull
MoveEntity bullet(q), 0,1,3
Next
If t=100 Then
t=1
EndIf
RenderWorld
Flip
Wend
End