
Taking Apart the iMac G5
At each stage of the Take Apart procedure, if there are special notes and information, we'll let you know; otherwise, we proceed component to component, from the outside in.
Back Cover
The back cover is the large piece of plastic (with attached metal foot) that you must remove to gain access to the insides of the iMac G5.
1. | Turn off the computer by choosing Shut Down from the Apple menu. |
2. | |
3. | Place a soft, clean towel or cloth on the desk or surface. Hold the sides of the computer and slowly lay the computer face down on the towel.
|
4. | |
5. | Holding the back cover by the metal foot, tilt the cover up and lift it off the computer. Set the back cover aside.
|
6. | |
7. | Ground yourself. Touch the metal surface of the power supply on the inside of the computer to discharge any static electricity. |


NOTE
Always discharge static electricity before you touch any parts or install any components inside the computer. To avoid generating static electricity, do not walk around the room until you have finished working inside and closed the computer.

Serial ATA Hard Drive
Though capacities may vary, all iMac G5 models come standard with a single internal 3.5-inch serial ATA hard drive. To remove the inverter, you must first disconnect a cable from the side of the hard drive, but the drive itself remains in place.
8. | |
9. | Disconnect the black connector from the side of the hard drive. |

NOTE
Do not disconnect the other end of the cable from the board. Leave the hard drive in place.

Memory (DIMMs)
All iMac G5 models have two 184-pin dual inline memory module (DIMM) slots, though the number and size of installed memory modules will vary. To remove the inverter, you must first remove the memory.
10. | Locate the memory module(s).
|
11. | Rotate the computer counterclockwise so the memory is in the position shown in the following figure. |
12. |


Inverter
The LCD used in the iMac G5 uses a cold cathode fluorescent tube (CCFT) for the display backlight. This is essentially a miniature version of the tube used for overhead lighting. The inverter transforms the low DC voltages used inside the iMac into the higher AC voltages that these tubes need to illuminate. You must disconnect the hard drive and remove the memory modules to gain access to the inverter.
13. | Locate the inverter.
|
14. | |
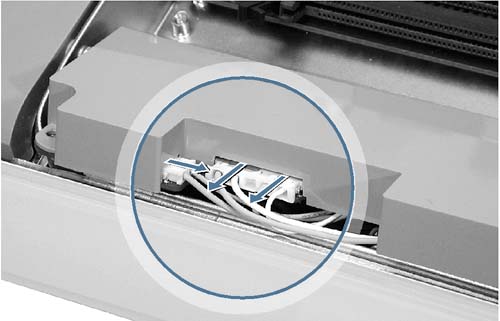
15. | Rotate the computer clockwise so you see the inverter cables as shown in the following figure. Tilt the inverter to access the two white cable connectors with the pink and blue cables. |
16. | Disconnect the cables. Pull on the connectors, not on the cables. Disconnect the smaller connector first.
|
17. | |
18. | Locate the small, gray inverter cable cover.
|
19. | |
20. | Disconnect the two white connectors underneath the cover. Pull on the connectors, not on the cables. Free the cables from the clips inside the cover. Set the inverter and cable cover aside.
|
21. | |
22. | Set the plastic cover aside. This cover will be placed on the replacement inverter board.
|


When You Are Finished
1. | Return the faulty inverter to Apple in the packaging provided. |
2. | Install the replacement inverter following the instructions in the Service Source manual. |
3. | Verify that the system works correctly by starting up the system, running AHT, and doing a few user tasks (such as printing a file). |
NOTE
You can use the Take Apart checklist (takeapartlist.pdf) on the CD to verify proper reassembly.