6.3 A Program Example
We are now ready to write our first machine-language program, which will be to write “Hi” to the screen. We’ll need five machine-language instructions to do this: two loads, two stores, and one to stop the program execution.
First consideration: should we store the character data in memory and load it using direct addressing mode, or should we store it in the operand specifier and use immediate addressing mode? We’ll use immediate addressing in this example and leave direct addressing as an exercise. So, for this example, when we load the characters the addressing mode specifier will be 000 and the ASCII code for each letter will go directly in the operand specifier (the second and third byte of the load instruction—and because an ASCII character takes up only 1 byte, it really affects only the third byte).
Here are the program statements written in both binary and hexadecimal:
| Action | Binary Instruction | Hex Instruction |
| Load ‘H’ into accumulator | 1101 0000 0000 0000 0100 1000 |
D0 00 48 |
| Store byte from accumulator to output device | 1111 0001 1111 1100 0001 0110 |
F1 FC 16 |
| Load ‘i’ into accumulator | 1101 0000 0000 0000 0110 1001 |
D0 00 69 |
| Store byte from accumulator to output device | 1111 0001 1111 1100 0001 0110 |
F1 FC 16 |
| Stop | 0000 0000 | 00 |
Remember that the binary and hex columns represent the same values. The hex version is just a more succinct way to represent the data. The binary digits are shown in groups of four so that it’s easier to see how they map to their hexadecimal equivalent.
For each binary instruction, the first row represents the 8-bit instruction specifier and the second row represents the 16-bit operand specifier. As before, the instruction opcode is shown in blue and the addressing mode in green.
As discussed in the previous section, to perform character output we use store instructions that write the character data from the accumulator directly to the address that represents the output device (FC16). Furthermore, we have to use the version of the store instruction that stores a single byte. Similarly, the load instructions used in this program are the version that load a single byte.
Pep/9 Simulator
Recall that Pep/9 is a virtual machine, meaning it doesn’t exist as a physical computer in real life. However, we can make use of the Pep/9 simulator, which is a program that behaves the way the virtual machine is designed to behave. The Pep/9 simulator can be downloaded for free.
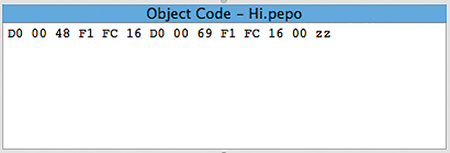
To run a Pep/9 machine-language program, we enter the hexadecimal code for the program byte by byte into a window labeled Object Code. (We’ll explore that term in the next section.) The format of this program must have exactly one blank between each byte, and end the program with “zz”. The simulator uses two z’s to indicate the end of the program. Here is a screenshot of the Pep/9 machine-language program we wrote in the previous section:
Before a machine-language program can be executed, it must be loaded into memory. This is accomplished by a software tool called a loader. In the Pep/9 simulator, you load a program by selecting the Build > Load menu option. After loading the program into memory, it can be executed by selecting the Build > Execute menu option.
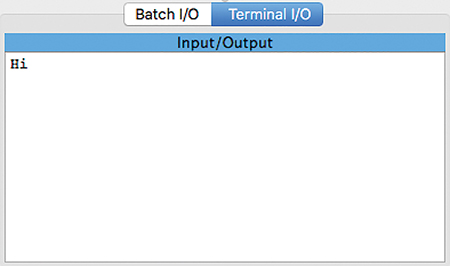
If all goes as planned, when you execute the program, the output will appear in the Input/Output window of the simulator. (Make sure the Terminal I/O tab is selected.)
When the simulator executes a program, it is carrying out the program commands one at a time just as a real machine would, following the fetch-execute cycle discussed in Chapter 5:
Fetch the instruction from the memory location specified by the Program Counter.
Decode the instruction and update the Program Counter.
Get the operand (if needed).
Execute the instruction.
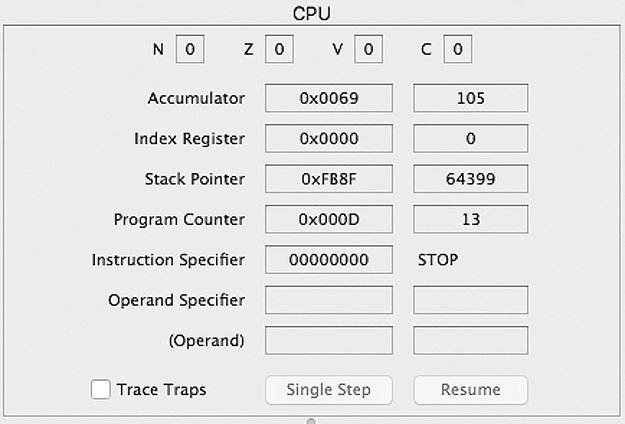
The Program Counter, Instruction Register, and Accumulator (A register) are all displayed in the CPU window of the simulator, along with several other registers we haven’t discussed:
In the next section, we’ll look at an example that performs character input and output.
Another Machine-Language Example
Let’s look at another example of a machine-language program in Pep/9. The following code reads two characters as input and prints them in reverse order.
| Action | Binary Instruction | Hex Instruction |
| Read first character from input device into accumulator | 1101 0001 1111 1100 0001 0101 |
D1 FC 15 |
| Store character from accumulator to memory | 1111 0001 0000 0000 0001 0011 |
F1 00 13 |
| Read second character from input device into accumulator | 1101 0001 1111 1100 0001 0101 |
D1 FC 15 |
| Print second character to output device | 1111 0001 1111 1100 0001 0110 |
F1 FC 16 |
| Load first character from memory | 1101 0001 0000 0000 0001 0011 |
D1 00 13 |
| Print first character to output device | 1111 0001 1111 1100 0001 0110 |
F1 FC 16 |
| Stop | 0000 0000 | 00 |
The first instruction is a load byte instruction that reads from memory location FC15, which is the input device, and stores the character in the accumulator. The next instruction does a store byte operation to temporarily store that character in memory at location 0013. The character could be put anywhere in memory as long as we don’t overwrite a part of our program or the operating system. When loaded, our program resides in memory from byte 0000 to 0012, so location 0013 is the first unused byte after the program itself.
The third instruction is identical to the first, using a load byte operation to read the second character from the input device and store it in the accumulator. The fourth instruction prints that character to the output device using a store byte operation.
The fifth instruction loads the first character, which we had previously stored in memory at location 0013, back into the accumulator. The sixth instruction is identical to the fourth, printing that character. Then the program is stopped using the unary stop instruction.
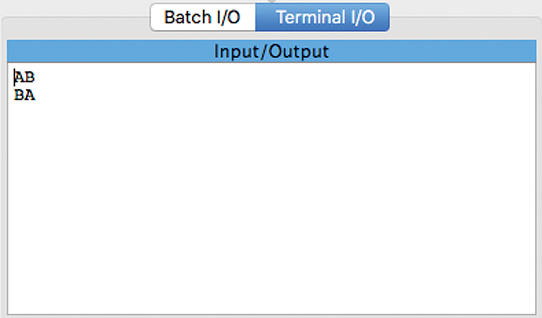
Here is the Terminal I/O window when this program is run, showing the input the user types in (AB) and the output the program produces (BA):