Hosting Multiple Application Bars with the Pivot
,Particular PivotItems within your Pivot may require differing capabilities with separate sets of application bar menu items and buttons. The ability to associate a different application bar with each PivotItem is not natively supported by the Windows Phone FCL. You can, however, achieve this by using the custom AppBar control (discussed in Chapter 8, “Taming the Application Bar”).
This section looks at the relevant changes made to the AppBar that have been made to support this capability, and then at an example of creating a page containing a Pivot, whose items each contain an independent application bar that is swapped into place when the PivotItem becomes active.
Code has been added to the AppBar’s Attach method, which detects whether the AppBar is located within a Pivot. This method is called when AppBar is first loaded and is shown in the following excerpt:
public void Attach()
{
var page = this.GetVisualAncestors<PhoneApplicationPage>()
.FirstOrDefault();
var pivot = this.GetVisualAncestors<Pivot>().FirstOrDefault();
if (pivot != null)
{
pivot.SelectionChanged -= pivot_SelectionChanged;
pivot.SelectionChanged += pivot_SelectionChanged;
UpdateApplicationBar(pivot);
}
else if (page != null)
{
page.ApplicationBar = applicationBar;
Build();
}
}
If the AppBar is located within a Pivot, each time a different PivotItem is displayed within the Pivot, the SelectionChanged event is raised, which in turn calls the UpdateApplicationBar method, shown here:
protected virtual void UpdateApplicationBar(Pivot pivot)
{
var page = this.GetVisualAncestors<PhoneApplicationPage>()
.FirstOrDefault();
if (pivot == null || page == null)
{
return;
}
bool assignBar = false;
if (pivot.SelectedItem == DataContext)
{
assignBar = true;
}
else
{
var frameworkElement = pivot.SelectedItem as FrameworkElement;
if (frameworkElement != null
&& frameworkElement.DataContext == DataContext)
{
assignBar = true;
}
}
if (assignBar)
{
page.ApplicationBar = applicationBar;
Build();
}
else if (page.ApplicationBar == applicationBar)
{
page.ApplicationBar = null;
}
}
A custom extension method called GetVisualAncestors (located in the VisualTree class) is used to locate the parent page.
We then determine whether the AppBar is located in the currently selected PivotItem. This is done by either comparing the Pivot’s SelectedItem or the DataContext of the SelectedItem with the DataContext of the AppBar. If equal, you know that the AppBar should be shown.
Note
When a Pivot’s ItemsSource is used to populate the Pivot, PivotItems are generated implicitly, much like ListBoxItems are for the ListBox (see Chapter 5, “Using Content Controls, Items Controls, and Range Controls”).
With these changes in place you can display a different application bar depending on the selected PivotItem. To demonstrate its use, the following example creates a simple messaging app that allows the user to send a message via one PivotItem and view received messages via another.
The example code for this section is located in the PivotView.xaml page and the PivotViewModel class in the downloadable sample code.
The PivotViewModel class bootstraps two other viewmodels: SendMessageViewModel and MessagesViewModel, both of which become the viewmodels for two different PivotItems in the PivotView page (see Listing 11.1).
LISTING 11.1. PivotViewModel Class
public class PivotViewModel : ViewModelBase
{
public PivotViewModel() : base("Pivot")
{
MockChatService chatService = new MockChatService();
sendMessageViewModel = new SendMessageViewModel(chatService);
messagesViewModel = new MessagesViewModel(chatService);
}
SendMessageViewModel sendMessageViewModel;
public SendMessageViewModel SendMessageViewModel
{
get
{
return sendMessageViewModel;
}
private set
{
Assign(ref sendMessageViewModel, value);
}
}
MessagesViewModel messagesViewModel;
public MessagesViewModel MessagesViewModel
{
get
{
return messagesViewModel;
}
private set
{
Assign(ref messagesViewModel, value);
}
}
}
A class implementing the custom IChatService allows messages to be sent and received. The MockChatService class implements the custom IChatService, which has two members:
![]() SendMessage—A method that accepts a single string parameter and sends the message to all subscribers
SendMessage—A method that accepts a single string parameter and sends the message to all subscribers
![]() MessageReceived—An event that is raised when the chat service receives a message
MessageReceived—An event that is raised when the chat service receives a message
For the purposes of the demonstration, a simple loopback implementation of the IChatService is used; when the SendMessage method is called, the MessageReceived event is raised.
The SendMessageViewModel uses the IChatService to send messages via the SendCommand (see Listing 11.2). When the messageBody field has been populated, the IChatService.SendMessage method is called.
LISTING 11.2. SendMessageViewModel Class
public class SendMessageViewModel : ViewModelBase
{
public SendMessageViewModel(IChatService chatService) : base("Send")
{
ArgumentValidator.AssertNotNull(chatService, "chatService");
sendCommand = new DelegateCommand(
obj =>
{
if (!string.IsNullOrEmpty(messageBody))
{
chatService.SendMessage(messageBody);
MessageBody = null;
Feedback = "Message sent";
}
});
}
string emailAddress = "[email protected]";
public string EmailAddress
{
get
{
return emailAddress;
}
set
{
Assign(ref emailAddress, value);
}
}
string messageBody = "Sample message";
public string MessageBody
{
get
{
return messageBody;
}
set
{
Assign(ref messageBody, value);
}
}
readonly DelegateCommand sendCommand;
public ICommand SendCommand
{
get
{
return sendCommand;
}
}
string feedback;
public string Feedback
{
get
{
return feedback;
}
private set
{
Assign(ref feedback, value);
}
}
}
The purpose of the MessagesViewModel class is to listen for the MessageReceived event of the IChatService and to place incoming messages into an ObservableCollection, which is displayed in the view (see Listing 11.3). The RefreshCommand merely emulates a refresh by populating its Feedback property.
LISTING 11.3. MessagesViewModel Class
public class MessagesViewModel : ViewModelBase
{
public MessagesViewModel(IChatService chatService): base("Received")
{
ArgumentValidator.AssertNotNull(chatService, "chatService");
chatService.MessageReceived
+= (sender, args) =>
{
if (args == null)
{
return;
}
messageItems.Add(new MessageItem(args.Message));
Feedback = "Message received.";
};
refreshCommand = new DelegateCommand(
obj =>
{
Feedback = "Refresh command executed.";
});
}
ObservableCollection<MessageItem> messageItems
= new ObservableCollection<MessageItem>();
public ObservableCollection<MessageItem> MessageItems
{
get
{
return messageItems;
}
internal set
{
Assign(ref messageItems, value);
}
}
string feedback;
public string Feedback
{
get
{
return feedback;
}
private set
{
Assign(ref feedback, value);
}
}
readonly DelegateCommand refreshCommand;
public ICommand RefreshCommand
{
get
{
return refreshCommand;
}
}
}
The PivotView page instantiates the PivotViewModel, assigning it to its own DataContext:
public partial class PivotView : PhoneApplicationPage
{
public PivotView()
{
InitializeComponent();
DataContext = new PivotViewModel();
}
}
The view’s XAML contains a Pivot with two PivotItems: one for allowing the user to send messages using the SendMessageViewModel; the other for viewing received messages using the MessagesViewModel.
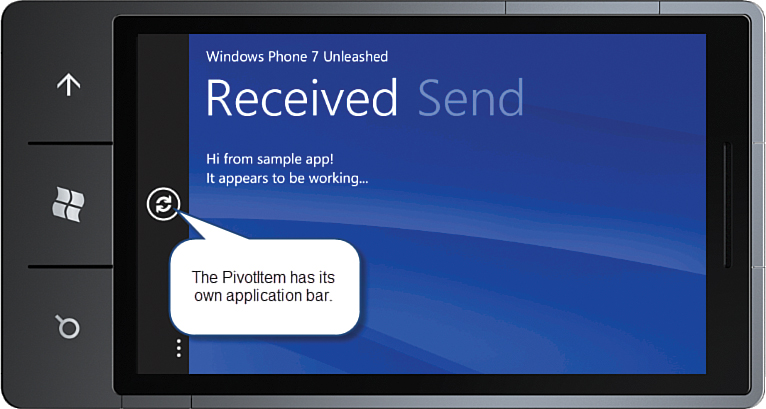
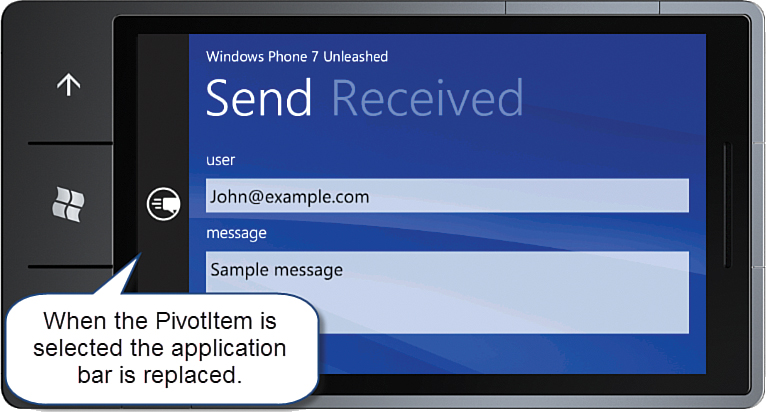
An independent AppBar is present in both PivotItems. The PivotItem showing the received messages allows the user to refresh the list using the viewmodel’s RefreshCommand via its AppBar, while the PivotItem for sending a message allows the user to dispatch a message using a SendCommand via a different AppBar. Listing 11.4 shows an excerpt from the PivotView.xaml page containing the Pivot.
LISTING 11.4. PivotView.xaml (excerpt)
<Grid x:Name="LayoutRoot" Background="Transparent">
<controls:Pivot x:Name="pivot"
Title="Windows Phone 8 Unleashed">
<controls:Pivot.Background>
<ImageBrush ImageSource="../../../Images/PivotBackground.png"/>
</controls:Pivot.Background>
<controls:PivotItem DataContext="{Binding MessagesViewModel}"
Header="{Binding Title}">
<StackPanel>
<u:AppBar>
<u:AppBarIconButton
Command="{Binding RefreshCommand}"
Text="Refresh"
IconUri="/Images/ApplicationBarIcons/AppBarRefresh.png" />
</u:AppBar>
<ListBox ItemsSource="{Binding MessageItems}">
<ListBox.ItemTemplate>
<DataTemplate>
<TextBlock Text="{Binding Body}"
Style="{StaticResource PhoneTextNormalStyle}" />
</DataTemplate>
</ListBox.ItemTemplate>
</ListBox>
<TextBlock Text="{Binding Feedback}"
Style="{StaticResource PhoneTextAccentStyle}"
Margin="12,30,12,0" />
</StackPanel>
</controls:PivotItem>
<controls:PivotItem DataContext="{Binding SendMessageViewModel}"
Header="{Binding Title}">
<StackPanel>
<u:AppBar>
<u:AppBarIconButton
Command="{Binding SendCommand}"
Text="Send"
IconUri="/Images/ApplicationBarIcons/AppBarMessageSend.png"/>
</u:AppBar>
<TextBlock Text="user"
Style="{StaticResource PhoneTextTitle3Style}" />
<TextBox InputScope="EmailSmtpAddress"
Text="{Binding EmailAddress, Mode=TwoWay}" />
<TextBlock Text="message"
Style="{StaticResource PhoneTextTitle3Style}" />
<TextBox Text="{Binding MessageBody, Mode=TwoWay}"
TextWrapping="Wrap"
Height="140" />
<TextBlock Text="{Binding Feedback}"
Style="{StaticResource PhoneTextAccentStyle}"
Margin="12,30,12,0" />
</StackPanel>
</controls:PivotItem>
</controls:Pivot>
</Grid>
An image is used as the background for the Pivot. It is usually recommended to set the Build Action of image files to Content so as to minimize the size of the assembly and thereby decrease your app’s startup time. In the case of the Pivot and Panorama, this is not the case.
Note
If you use a background image in a Pivot or Panorama control, set its Build Action to Resource to ensure that it is shown as soon as the control is shown. When the Build Action is set to Content, it causes the image to be loaded asynchronously, and may leave your Pivot or Panorama momentarily sitting on a plain white or black background.
The DataContext of each PivotItem is set to a different property in the viewmodel. The Header for each PivotItem is then resolved to the Title property of the ViewModelBase class.
As an aside, while the PivotItem.Header property can be specified using either property attribute syntax, assigning it to a simple string; or property element syntax, assigning to a nested element, it can also be specified by using a DataTemplate defined at the Pivot element level, as shown in the following sample:
<controls:Pivot Title="Windows Phone 8 Unleashed">
<controls:Pivot.HeaderTemplate>
<DataTemplate>
<TextBlock Text="{Binding Title}"
Style="{StaticResource PhoneTextTitle2Style}" />
</DataTemplate>
</controls:Pivot.HeaderTemplate>
<controls:PivotItem DataContext="{Binding MessagesViewModel}">
<!--Content omitted. -->
</controls:PivotItem>
<controls:PivotItem DataContext="{Binding SendMessageViewModel}">
<!-- Content omitted. -->
</controls:PivotItem>
</controls:Pivot>
Continuing with the example, when the Received PivotItem is active, the Refresh button allows the user to simulate refreshing the data source (see Figure 11.5).
Conversely, when the Send PivotItem is active, the user can enter a message and use the Send button to dispatch the message (see Figure 11.6).
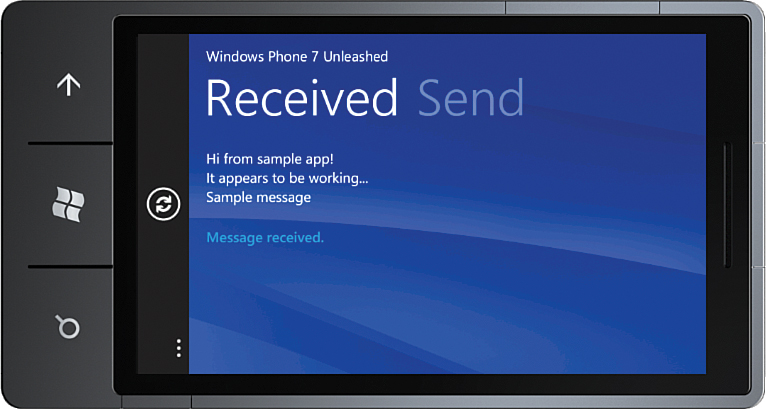
When the Send button is tapped, the SendMessageViewModel’s SendCommand is executed and the message is passed to the IChatService using its SendMessage method. On receipt, the chat service merely raises its MessageReceived event. Recall that the MessagesViewModel subscribes to this event. When it is raised, the new message is added to its MessageItems ObservableCollection, which causes the Received PivotItem to be updated with the new message (see Figure 11.7).