
Building a PhotoCamera App
,This section looks at using the PhotoCamera to create a custom camera app that allows the user to view live video from the camera and to take still image captures that are saved to the phone’s media library. You look at performing post-processing of the PhotoCamera’s preview buffer to create a live video effect. In addition, this section looks at extending the app to provide a page that includes a list of photo thumbnails that link to images saved in the media library images.
The sample code for this section resides in the /Sensors/Camera directory of the WPUnleashed.Examples project in the downloadable sample code.
The section begins with the custom PhotoCameraViewModel class, which contains a Start and a Stop method that allows the PhotoCamera instance to be created on demand and disposed as soon as it is no longer required (see Listing 21.1).
Some phone devices support a front facing camera. The Camera.IsCameraTypeSupported method is used to determine whether a particular camera type is available on the device. Devices are required to have at least one camera, and by using the parameterless constructor of the PhotoCamera class, the primary (non-front facing) camera is used.
LISTING 21.1. PhotoCameraViewModel Class (excerpt)
public class PhotoCameraViewModel: ViewModelBase
{
public PhotoCameraViewModel() : base("PhotoCamera")
{
/* Intentionally left blank. */
}
PhotoCamera photoCamera;
public Camera Camera
{
get
{
return photoCamera;
}
}
public void Start()
{
if (photoCamera != null)
{
return;
}
if (Camera.IsCameraTypeSupported(CameraType.FrontFacing))
{
photoCamera = new PhotoCamera(CameraType.FrontFacing);
}
else //if (PhotoCamera.IsCameraTypeSupported(CameraType.Primary))
{
photoCamera = new PhotoCamera(); /* Defaults to CameraType.Primary */
}
photoCamera.Initialized += HandlePhotoCameraInitialized;
}
...
}
When the PhotoCamera’s Initialized event is raised, the PhotoCamera is ready for configuration, and the resolution and flash mode of the camera are set (see Listing 21.2). The first element of the camera’s AvailableResolutions property indicates the lowest resolution that the camera supports. On my device, the available resolutions are 320×240, 640×480, 800×600, 1280×960, 1600×1200, 2048×1536, and 2592×1944.
When in operation, the AutoFocusCompleted event is raised indeterminately by the device itself whenever it decides to focus. The event is also raised following a call to the PhotoCamera.Focus method.
The CaptureImageAvailable and CaptureThumbnailAvailable events are raised after your code calls the camera’s CaptureImage method, providing the opportunity to process the captured image and to save it to isolated storage, for example. In the sample, two things are performed when an image is captured: We handle the CaptureImageAvailable event to save the image to the phone’s media library, and we handle the CaptureThumbnailAvailable event to save a thumbnail of the image to isolated storage.
The CaptureCompleted event is raised after the CaptureImageAvailable event, providing the opportunity to update the UI in response. In the sample app, we overlay the video stream with a custom focus indicator image when the user presses the hardware shutter button and hide the image when the CaptureCompleted event is raised.
LISTING 21.2. PhotoCameraViewModel.HandlePhotoCameraInitialized Method
void HandlePhotoCameraInitialized(
object sender, CameraOperationCompletedEventArgs e)
{
cameraInitialized = true;
PhotoCamera camera = (PhotoCamera)sender;
camera.Resolution = camera.AvailableResolutions.ElementAt(0);
camera.AutoFocusCompleted += HandleAutoFocusCompleted;
camera.CaptureImageAvailable += HandleCaptureImageAvailable;
camera.CaptureThumbnailAvailable += HandleCaptureThumbnailAvailable;
camera.CaptureCompleted += HandleCaptureCompleted;
FlashModes = flashModes.Where(
mode => photoCamera.IsFlashModeSupported(mode)).ToList();
if (camera.IsFlashModeSupported(FlashMode.Auto))
{
FlashMode = FlashMode.Auto;
}
CameraButtons.ShutterKeyPressed += HandleShutterKeyPressed;
CameraButtons.ShutterKeyHalfPressed += HandleShutterKeyHalfPressed;
CameraButtons.ShutterKeyReleased += HandleShutterKeyReleased;
}
The viewmodel contains a FlashModes property that is populated with a list of FlashMode enumeration values for which the camera supports. The potential FlashMode values are as follows:
![]() Auto
Auto
![]() Off
Off
![]() On
On
![]() RedEyeReduction
RedEyeReduction
FlashMode.Auto lets the device decide whether the flash is warranted. Bu using the Off and On values, you can force the camera to use or not use the flash. FlashMode.RedEyeReduction is the most commonly unsupported flash mode. With red eye reduction enabled, the camera performs a brief flash cycle before taking the photo, causing the subjects’ pupils to close and thereby eliminating the red eye effect.
PhotoCamera.IsFlashModeSupported allows you to determine whether a particular flash mode is supported and should be used before setting the camera’s FlashMode.
Note
Attempting to set the camera’s FlashMode to an unsupported value does not raise an exception but rather silently defaults the FlashMode to Off, effectively disabling the flash.
The CameraButtons class is used to monitor the device’s hardware camera button. The three events: ShutterKeyPressed, ShutterKeyHalfPressed, and ShutterKeyReleased, allow you to emulate the behavior of the phone’s built-in camera app. CameraButtons is independent of the PhotoCamera and can also be used in conjunction with the Silverlight webcam API if you so choose.
CameraButtons does nothing apart from allowing you to monitor the pressed state of the phone’s camera shutter button. It is up to you to subscribe to the CameraButtons events and to control camera behavior accordingly.
The PhotoCameraViewModel contains a VisualState property that determines the set of controls available in the view. The following excerpt shows that when the CameraButtons.ShutterKeyHalfPressed event is raised, the PhotoCamera.Focus method is called, which causes the device camera to attempt to automatically focus on the scene:
void HandleShutterKeyHalfPressed(object sender, EventArgs e)
{
VisualState = VisualStateValue.Focussing;
photoCamera.Focus();
}
When the user fully presses the hardware button, the CameraButtons.ShutterKeyPressed event is raised. The viewmodel’s event handler calls the camera’s CaptureImage method, which causes the camera to acquire the current frame as a still image and to raise the PhotoCamera.CaptureImageAvailable event.
Prior to calling CaptureImage, we take the opportunity to generate a filename (based on the current time), which is used for two image files: one stored in the phone’s media library and the other a thumbnail representation stored in isolated storage. Generating the filename at this point is necessary because the order in which the two PhotoCamera events, CaptureImageAvailable and CaptureThumbnailAvailable, are raised is indeterminable. See the following excerpt:
volatile string fileName;
void HandleShutterKeyPressed(object sender, EventArgs e)
{
fileName = string.Format(
"Unleashed_{0:yyyy-MM-dd-HH-mm-ss}.jpg", DateTime.Now);
photoCamera.CaptureImage();
}
The use of the volatile keyword prevents the CLR from caching the fileName value, so that all threads use the field’s most recent value.
When the user releases the hardware camera button, the camera’s CancelFocus method is called to halt any auto focusing that is underway, and the visual state is returned to NotFocusing, which hides the focus indicator image in the view. See the following excerpt:
void HandleShutterKeyReleased(object sender, EventArgs e)
{
photoCamera.CancelFocus();
VisualState = VisualStateValue.NotFocusing;
}
The PhotoCamera.CaptureImage method causes the PhotoCamera events CaptureImageAvailable and CaptureThumbnailAvailable to be raised on a non-UI thread. This means that event handler code must invoke any changes to UI elements on the UI thread. In the following excerpt, the viewmodel’s SaveImage method is invoked using the current Dispatcher instance:
void HandleCaptureImageAvailable(object sender, ContentReadyEventArgs e)
{
Deployment.Current.Dispatcher.BeginInvoke(
() => SaveImage(e.ImageStream,
(int)photoCamera.Resolution.Width,
(int)photoCamera.Resolution.Height));
}
Note
After the PhotoCamera.CaptureImage method is called, subsequent calls must occur after the CaptureCompleted event has been raised; otherwise, an InvalidOperationException is thrown.
The viewmodel’s SaveImage method uses the Microsoft.Xna.Framework.Media.MediaLibrary class to save the picture to the media library, making it available from the phone’s Pictures Hub. The built-in WritableBitmap.LoadJpeg extension method is used to place the captured image into an ObservableCollection, which is bound to a ListBox in the view. See the following excerpt:
void SaveImage(Stream imageStream, int width, int height)
{
ArgumentValidator.AssertNotNull(imageStream, "imageStream");
var mediaLibrary = new MediaLibrary();
mediaLibrary.SavePicture(fileName, imageStream);
imageStream.Position = 0;
var bitmap = new WriteableBitmap(width, height);
bitmap.LoadJpeg(imageStream);
CapturedImages.Add(bitmap);
}
The HandleCaptureThumbnailAvailable method saves the thumbnail of the image to isolated storage, allowing you to use the name to retrieve the image from the media library at a later time (see Listing 21.3). Building a page to view the thumbnails is discussed later in this chapter.
LISTING 21.3. PhotoCameraViewModel.HandleCaptureThumbnailAvailable Method
void HandleCaptureThumbnailAvailable(object sender, ContentReadyEventArgs e)
{
using (e.ImageStream)
{
/* Save thumbnail as JPEG to isolated storage. */
using (IsolatedStorageFile storageFile
= IsolatedStorageFile.GetUserStoreForApplication())
{
if (!storageFile.DirectoryExists(imageDirectory))
{
storageFile.CreateDirectory(imageDirectory);
}
using (IsolatedStorageFileStream targetStream
= storageFile.OpenFile(
imageDirectory + "/" + fileName,
FileMode.Create, FileAccess.Write))
{
/* Initialize the buffer for 4KB disk pages. */
byte[] readBuffer = new byte[4096];
int bytesRead;
/* Copy the thumbnail to isolated storage. */
while ((bytesRead = e.ImageStream.Read(
readBuffer, 0, readBuffer.Length)) > 0)
{
targetStream.Write(readBuffer, 0, bytesRead);
}
}
}
}
}
The viewmodel’s Stop method unsubscribes from the various PhotoCamera events and calls Dispose on the PhotoCamera instance to free all managed and unmanaged resources, as shown:
public void Stop()
{
cameraInitialized = false;
if (photoCamera == null)
{
return;
}
photoCamera.Initialized -= HandlePhotoCameraInitialized;
photoCamera.AutoFocusCompleted -= HandleAutoFocusCompleted;
photoCamera.CaptureCompleted -= HandleCaptureCompleted;
photoCamera.CaptureThumbnailAvailable -= HandleCaptureThumbnailAvailable;
photoCamera.CaptureImageAvailable -= HandleCaptureImageAvailable;
CameraButtons.ShutterKeyPressed -= HandleShutterKeyPressed;
CameraButtons.ShutterKeyHalfPressed -= HandleShutterKeyHalfPressed;
CameraButtons.ShutterKeyReleased -= HandleShutterKeyReleased;
photoCamera.Dispose();
photoCamera = null;
}
The viewmodel is instantiated in the PhotoCameraView page (see Listing 21.4). The page’s OnNavigatedTo method is used to call the Start method of the viewmodel, and the page’s OnNavigatedFrom method calls the viewmodel’s Stop method, thus ensuring that the PhotoCamera is disposed as soon as the user leaves the page.
Note
Although the approach taken in this section explicitly calls the Start and Stop methods of the viewmodel, it is feasible that this approach could be further abstracted by placing the infrastructure for handling navigation events in the ViewModelBase class. This is, however, outside the scope of this book. The Calcium SDK project (http://calciumsdk.com) has this infrastructure in place.
After the PhotoCamera has been instantiated by the viewmodel, it can be attached to a VideoBrush, which causes the initialization of the PhotoCamera.
LISTING 21.4. PhotoCameraView Class
public partial class PhotoCameraView : PhoneApplicationPage
{
readonly PhotoCameraViewModel viewModel = new PhotoCameraViewModel();
public PhotoCameraView()
{
InitializeComponent();
DataContext = viewModel;
}
PhotoCameraViewModel ViewModel
{
get
{
return (PhotoCameraViewModel)DataContext;
}
}
protected override void OnNavigatedTo(NavigationEventArgs e)
{
ViewModel.Start();
videoBrush_Preview.SetSource(ViewModel.Camera);
base.OnNavigatedTo(e);
}
protected override void OnNavigatedFrom(NavigationEventArgs e)
{
ViewModel.Stop();
base.OnNavigatedFrom(e);
}
}
The view contains a Rectangle whose Fill property is set to the VideoBrush connected to the viewmodel’s PhotoCamera (see Listing 21.5).
The viewmodel contains an EffectImage property of type ImageSource. As you see in a moment, this image is used to display the video in grayscale.
An Image control is bound to the EffectImage property in the view, and a Windows Phone Toolkit ToggleSwitch is used to switch the effect on and off.
When the PhotoCamera is performing an automatic focus, the Image named image_Focus is made visible.
A ListBox is bound to the CapturedImages property of the viewmodel and displays each captured image as a thumbnail on the left side of the page.
A ListPicker control is bound to the list of FlashModes in the viewmodel. Selecting a flash mode causes the viewmodel’s FlashMode property to be updated and, in turn, the PhotoCamera.FlashMode.
LISTING 21.5. PhotoCameraView Page (excerpt)
<Grid x:Name="LayoutRoot" Background="Transparent">
<Rectangle Width="800" Height="480">
<Rectangle.Fill>
<VideoBrush x:Name="videoBrush_Preview" />
</Rectangle.Fill>
</Rectangle>
<Image x:Name="image_Effect"
Source="{Binding EffectImage}"
Visibility="Collapsed" Stretch="Fill" Width="800" Height="480" />
<Image x:Name="image_Focus" Source="/Sensors/Camera/Images/Focus.png"
Margin="314, 197.5" Visibility="Collapsed"/>
<ListBox ItemsSource="{Binding CapturedImages}">
<ListBox.ItemTemplate>
<DataTemplate>
<Border BorderThickness="2,2,2,8" BorderBrush="White">
<Image Stretch="Uniform" Width="80" Source="{Binding}"/>
</Border>
</DataTemplate>
</ListBox.ItemTemplate>
</ListBox>
<StackPanel Style="{StaticResource PageTitlePanelStyle}">
<TextBlock Text="Windows Phone Unleashed"
Style="{StaticResource PhoneTextAppTitleStyle}" />
<TextBlock Text="{Binding Title}"
Style="{StaticResource PhoneTextPageTitleStyle}"/>
</StackPanel>
<StackPanel Width="200"
HorizontalAlignment="Right" VerticalAlignment="Bottom">
<TextBlock Text="effect"
FontSize="{StaticResource PhoneFontSizeMediumLarge}"/>
<toolkit:ToggleSwitch IsChecked="{Binding EffectEnabled, Mode=TwoWay}"
FontSize="{StaticResource PhoneFontSizeExtraLarge}" />
<TextBlock Text="flash mode"
FontSize="{StaticResource PhoneFontSizeMediumLarge}"/>
<toolkit:ListPicker ItemsSource="{Binding FlashModes}"
SelectedItem="{Binding FlashMode, Mode=TwoWay}" />
</StackPanel>
<VisualStateManager.VisualStateGroups>
<VisualStateGroup x:Name="FocusStates">
<VisualState x:Name="Focussing">
<Storyboard>
<ObjectAnimationUsingKeyFrames Duration="0"
Storyboard.TargetProperty="Visibility"
Storyboard.TargetName="image_Focus">
<DiscreteObjectKeyFrame KeyTime="0">
<DiscreteObjectKeyFrame.Value>
<Visibility>Visible</Visibility>
</DiscreteObjectKeyFrame.Value>
</DiscreteObjectKeyFrame>
</ObjectAnimationUsingKeyFrames>
</Storyboard>
</VisualState>
...
</VisualStateGroup>
<VisualStateGroup x:Name="EffectStates">
...
</VisualStateGroup>
</VisualStateManager.VisualStateGroups>
</Grid>
Apart from one of the VisualStateGroup elements, all have been omitted from the excerpt to reduce its length.
The VisualStateGroup is set according to the VisualState property of the viewmodel. When the VisualState of the viewmodel changes to Focusing, for example, the VisualStateManager is directed to that state. This is all orchestrated using the custom VisualStateUtility class and an attached property named VisualState. For more information on the VisualStateUtility class, see Chapter 18, “Incorporating Map-Based Positioning.”
The attached property is set on the phone:PhoneApplicationPage element of the view, as shown:
u:VisualStateUtility.VisualState="{Binding VisualState}"
When the viewmodel’s VisualState property changes, the HandleVisualStateChanged method of the VisualStateUtility class is called, which calls the built-in VisualStateManager.GoToState method.
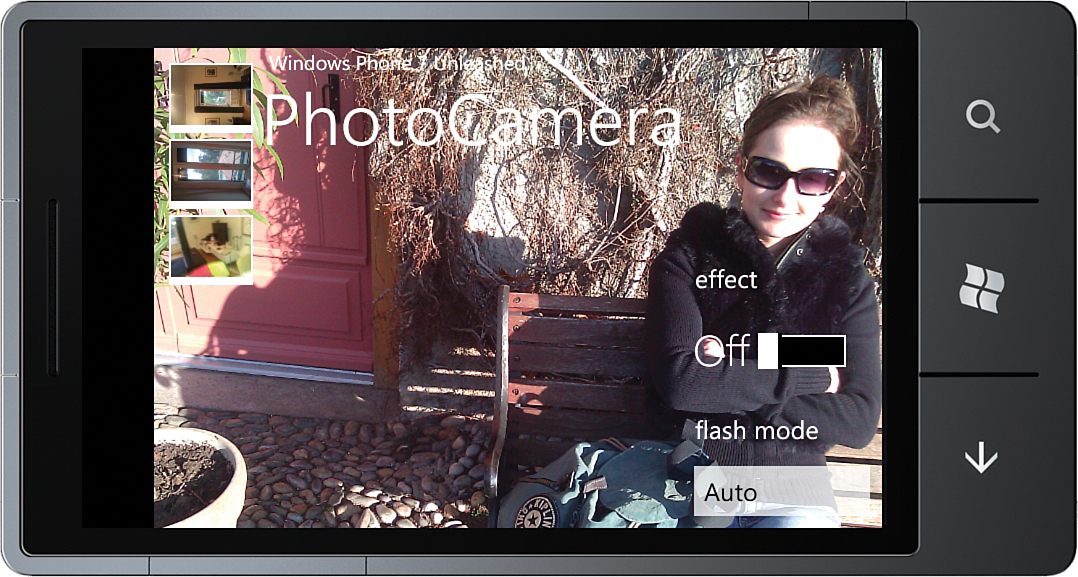
Figure 21.1 shows the PhotoCameraView page with a number of still captures displayed on the left and the flash mode selected as Auto.
The next section looks at enabling a grayscale effect for the video stream.
Adding a Video Effect
The viewmodel contains an EffectEnabled property to toggle the video effect on and off, shown in the following excerpt:
volatile bool effectEnabled;
public bool EffectEnabled
{
get
{
return effectEnabled;
}
set
{
if (Assign(ref effectEnabled, value) == AssignmentResult.Success)
{
SetEffectState(value);
}
}
}
When the EffectEnabled property is set, the SetEffectState method is called, which assigns the EffectImage property to a new WritableBitmap and begins updating the WritableBitmap as new frames are received on another thread. See the following excerpt:
void SetEffectState(bool enabled)
{
if (enabled)
{
EffectImage = new WriteableBitmap(
(int)photoCamera.PreviewResolution.Width,
(int)photoCamera.PreviewResolution.Height);
effectThread = new Thread(ProcessEffectFrames);
effectThread.Start();
}
VisualState = enabled ? VisualStateValue.EffectOn
: VisualStateValue.EffectOff;
}
Unlike Silverlight for the browser, Windows Phone XAML apps do not support custom pixel shaders. Consequently, image post-processing must be performed in custom code. This, unfortunately, does not provide for great performance, as you see when switching on the effect on your own phone device.
The viewmodel’s ProcessEffectFrames method, as you saw, is called from a non-UI thread. Its task is to retrieve an array of pixels from the PhotoCamera. It then converts each pixel (represented as an int value) to grayscale and uses the UI thread, via the apps Dispatcher, to write the pixels to the effectImage (see Listing 21.6). An AutoResetEvent is used to prevent a new frame from being processed until the current frame has been written to the effect image.
The GetPreviewBufferArgb32 of the PhotoCamera class copies the current frame into a buffer array so that it can be further manipulated. We use this to retrieve the frame pixels.
LISTING 21.6. ProcessEffectFrames Method
readonly AutoResetEvent frameResetEvent = new AutoResetEvent(true);
void ProcessEffectFrames()
{
try
{
while (effectEnabled)
{
frameResetEvent.WaitOne();
int width = (int)photoCamera.PreviewResolution.Width;
int height = (int)photoCamera.PreviewResolution.Height;
int[] pixelArray = new int[width * height];
photoCamera.GetPreviewBufferArgb32(pixelArray);
int[] effectPixels = new int[pixelArray.Length];
for (int i = 0; i < pixelArray.Length; i++)
{
effectPixels[i] = ConvertColorToGrayScale(pixelArray[i]);
}
Deployment.Current.Dispatcher.BeginInvoke(
delegate
{
/* Copy pixels to the WriteableBitmap. */
effectPixels.CopyTo(effectImage.Pixels, 0);
effectImage.Invalidate();
frameResetEvent.Set();
});
}
}
catch (Exception ex)
{
Debug.WriteLine("Unable to process effect frames." + ex);
EffectEnabled = false;
frameResetEvent.Set();
}
}
Two other preview related PhotoCamera methods are not shown in the example: GetPreviewBufferYCbCr and GetPreviewBufferY. Both also copy the current frame from the camera, yet do so without transforming the pixels to 32-bit ARGB values. GetPreviewBufferYCbCr provides the frame expressed using the YCbCr color space, whereas GetPreviewBufferY copies only the luminance data.
By avoiding the conversion to ARGB, retrieving the preview can be done much faster. According to René Schulte (http://kodierer.blogspot.com/2011/05/why-is-y-in-windows-phone-mango-camera.html), GetPreviewBufferYCbCr not only excludes the alpha channel in the YCrCb buffer, but in addition the Cr and Cb color components are stored with reduced resolution, keeping the buffer size substantially smaller and making the method approximately four times faster than GetPreviewBufferArgb32. Extracting the color components and brightness when using the YCbCr methods requires some more effort, however, and is outside the scope of this book.
Converting a pixel to grayscale involves first extracting the ARGB color components, as performed by the viewmodel’s ConvertColorToArgb method, shown in the following excerpt:
void ConvertColorToArgb(
int color, out int alpha, out int red, out int green, out int blue)
{
alpha = color >> 24;
red = (color & 0x00ff0000) >> 16;
green = (color & 0x0000ff00) >> 8;
blue = (color & 0x000000ff);
}
The red, green, and blue components are averaged to provide the grayscale value, as shown:
int ConvertColorToGrayScale(int color)
{
int alpha, red, green, blue;
ConvertColorToArgb(color, out alpha, out red, out green, out blue);
int average = (red + green + blue) / 3;
red = green = blue = average;
int result = ConvertArgbToColor(alpha, red, green, blue);
return result;
}
Finally, the color components are converted back to a color value using the viewmodel’s ConvertArgbToColor method, as shown:
int ConvertArgbToColor(int alpha, int red, int green, int blue)
{
int result = ((alpha & 0xFF) << 24)
| ((red & 0xFF) << 16)
| ((green & 0xFF) << 8)
| (blue & 0xFF);
return result;
}
Figure 21.2 shows the result of the video effect, with the video displayed in grayscale.

Using the PhotoCamera’s preview buffer is a way to produce live video effects. It does, however, suffer from suboptimal performance when each frame is redrawn. For improved performance, we must wait until Windows Phone XAML apps support custom pixel shaders.
Viewing Thumbnails
Earlier in the chapter you saw that the PhotoCamera.CaptureThumbnailAvailable event can be used to save a thumbnail image to isolated storage. This section looks at materializing those thumbnails on a page so that the user can tap a thumbnail and retrieve its associated full-size image from the phone’s media library, all from within your app.
Recall that within the PhotoCameraViewModel, when the user releases the hardware shutter button, the PhotoCamera.CaptureImage method is called, which raises the PhotoCamera’s CaptureThumbnailAvailable and CaptureImageAvailable events.
The CaptureImageAvailable handler saves the image to the media library, whereas the CaptureThumbnailAvailable handler saves the thumbnail version of the image to isolated storage. Both images share the same name, however, which allows the retrieval of the corresponding media library image using the name of the thumbnail image.
The PhotoCameraViewModel saves all full-size images to a default PhotoCameraImages directory in isolated storage. The task of the ThumbnailsViewModel is to provide the names of these image files to the ThumbnailsView page, via an ObservableCollection of custom ImageInfo objects.
The ImageInfo class has two properties, which identify the location of the thumbnail in isolated storage and the name of the media library image (see Listing 21.7).
public class ImageInfo
{
public string MediaLibraryUrl { get; private set; }
public Uri ThumbnailUri { get; private set; }
public ImageInfo(Uri thumbnailUri, string mediaLibraryUrl)
{
ThumbnailUri = ArgumentValidator.AssertNotNull(
thumbnailUri, "thumbnailUri");
MediaLibraryUrl = ArgumentValidator.AssertNotNullOrEmpty(
mediaLibraryUrl, "mediaLibraryUrl");
}
}
The ThumbnailsViewModel.Populate method creates an ImageInfo object for each JPG image it finds in the isolated storage directory (see Listing 21.8).
The viewmodel’s Populate method is called in the OnNavigatedTo method of the ThumbnailsView page. This causes new images present in the directory to be detected immediately after returning from the PhotoCameraView page.
LISTING 21.8. ThumbnailsViewModel.Populate Method
public void Populate()
{
string imageDirectory = PhotoCameraViewModel.ImageDirectory;
ObservableCollection<ImageInfo> tempImages
= new ObservableCollection<ImageInfo>();
using (IsolatedStorageFile storageFile
= IsolatedStorageFile.GetUserStoreForApplication())
{
string[] fileNames = storageFile.GetFileNames(
imageDirectory + @"*.jpg");
foreach (string fileName in fileNames)
{
ImageInfo info = new ImageInfo(
new Uri(imageDirectory + "/" + fileName, UriKind.Relative),
fileName);
tempImages.Add(info);
}
}
Images = tempImages;
}
The ThumbnailsViewModel contains a ViewImageCommand, whose task is to navigate to the MediaLibraryImageView page. The name of the image is provided as a querystring parameter, allowing the MediaLibraryImageView to retrieve the image from the phone’s media library. See the following excerpt:
public ThumbnailsViewModel() : base("photos")
{
viewImageCommand = new DelegateCommand<string>(ViewImage);
}
void ViewImage(string name)
{
Navigate("/Sensors/Camera/MediaLibraryImageView.xaml?image=" + name);
}
Thumbnails are presented by binding to the viewmodel’s Images property, as shown:
ObservableCollection<ImageInfo> images
= new ObservableCollection<ImageInfo>();
public ObservableCollection<ImageInfo> Images
{
get
{
return images;
}
private set
{
Assign(ref images, value);
}
}
To convert a path to an image stored in isolated storage, a custom IValueConverter is used (see Listing 21.9).
Note
It would be useful if the URI prefix isostore, which is used when working with local databases, worked with the Image.Source property. This would make the custom IValueConverter unnecessary. Unfortunately, though, the isostore prefix does not work with images.
LISTING 21.9. StringToImageConverter Class
public class StringToImageConverter : IValueConverter
{
public object Convert(
object value, Type targetType, object parameter, CultureInfo culture)
{
if (value == null)
{
return null;
}
using (IsolatedStorageFile storageFile
= IsolatedStorageFile.GetUserStoreForApplication())
{
using (IsolatedStorageFileStream stream
= storageFile.OpenFile(value.ToString(), FileMode.Open))
{
BitmapImage image = new BitmapImage();
image.SetSource(stream);
return image;
}
}
}
public object ConvertBack(
object value, Type targetType, object parameter, CultureInfo culture)
{
throw new NotImplementedException();
}
}
Within the ThumbnailsView page, thumbnail images are presented using a ListBox in combination with a Windows Phone Toolkit WrapPanel, as shown in the following excerpt:
<Grid x:Name="ContentPanel" Grid.Row="1" Margin="12,0,12,0">
<ListBox ItemsSource="{Binding Images}">
<ListBox.ItemsPanel>
<ItemsPanelTemplate>
<toolkit:WrapPanel ItemHeight="150" ItemWidth="150" />
</ItemsPanelTemplate>
</ListBox.ItemsPanel>
<ListBox.ItemTemplate>
<DataTemplate>
<Image Source="{Binding ThumbnailUri,
Converter={StaticResource StringToImageConverter}}"
c:Commanding.Command="{Binding Content.ViewImageCommand,
Source={StaticResource bridge}}"
c:Commanding.CommandParameter="{Binding MediaLibraryUrl}"
Width="120" Height="120" Margin="10" />
</DataTemplate>
</ListBox.ItemTemplate>
</ListBox>
</Grid>
The data context of each Image control is an ImageInfo object.
To reach out of the DataTemplate and execute the viewmodel’s ViewImageCommand, a ContentControl whose content is set to the page is defined as resource and serves as a bridge between items in the DataTemplate and the viewmodel. See the following excerpt:
<phone:PhoneApplicationPage.Resources>
<ValueConverters:StringToImageConverter
x:Name="StringToImageConverter" />
<ContentControl x:Name="bridge"
Content="{Binding Path=DataContext, ElementName=page}" />
</phone:PhoneApplicationPage.Resources>
The custom Command attached property (introduced in Chapter 2, “Fundamental Concepts in Windows Phone Development”) is used to execute the ViewImageCommand when the user taps a thumbnail image. The path to the image in the media library is passed as the command parameter.
ThumbnailsView also contains an AppBar with a single AppBarHyperlinkButton that, when tapped, navigates to the PhotoCameraView page:
<u:AppBar>
<u:AppBarHyperlinkButton
NavigateUri="/Sensors/Camera/PhotoCameraView.xaml"
Text="PhotoCameraView"
IconUri="/Sensors/Camera/Icons/TakePhoto.png" />
</u:AppBar>
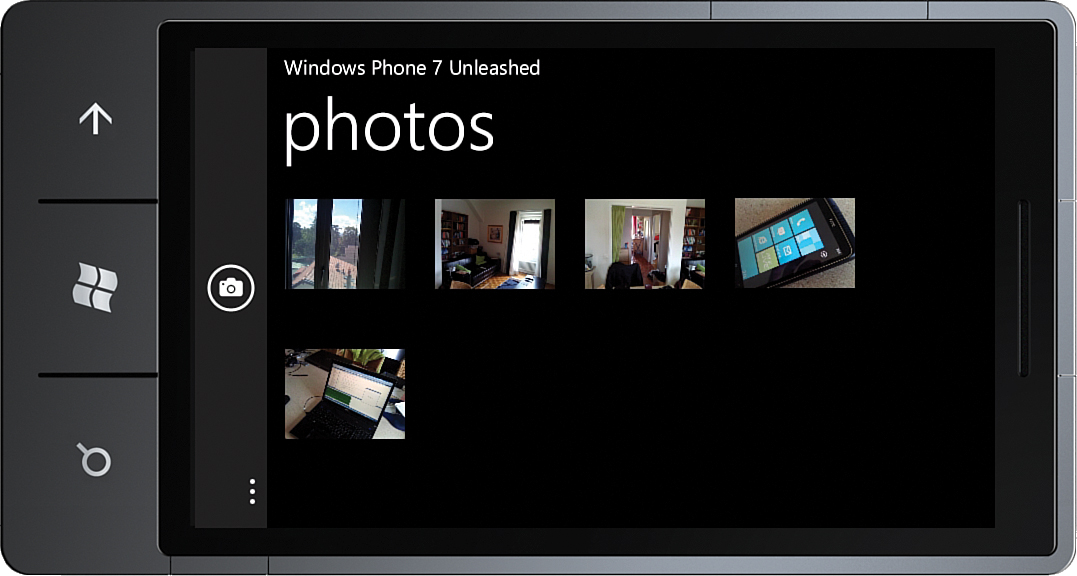
Figure 21.3 shows the ThumbnailsView page populated with several images.
When the user taps a thumbnail image, the app is directed to the MediaLibraryImageView page. The name of the image to display is supplied as a querystring parameter. The MediaLibraryImageViewModel retrieves the specified image from the phone’s media library and exposes it via its Image property. The viewmodel’s LoadImageCommand calls its LoadImage method, in which the Picture object is retrieved from the media library (see Listing 21.10).
Picture.GetImage is used to retrieve a Stream object, which then becomes the source of a BitmapImage.
In addition, the Title property of the viewmodel is set to the name of the Picture, which is subsequently displayed in the view.
LISTING 21.10. MediaLibraryImageViewModel.LoadImage Method
void LoadImage(string name)
{
MediaLibrary mediaLibrary = new MediaLibrary();
Picture picture = mediaLibrary.SavedPictures.Where(
x => x.Name == name).FirstOrDefault();
if (picture == null)
{
MessageService.ShowError(
string.Format("The picture {0} was not found.", name));
return;
}
BitmapImage bitmapImage;
using (Stream stream = picture.GetImage())
{
bitmapImage = new BitmapImage();
bitmapImage.SetSource(stream);
}
Image = bitmapImage;
Title = name;
}
The view contains an Image that is bound to the viewmodel’s Image property, as shown:
<Grid x:Name="ContentPanel" Grid.Row="1" Margin="12,0,12,0">
<Image Source="{Binding Image}" />
</Grid>
As with most examples throughout this book, the page’s title container includes a TextBlock that is bound to the Title property of the ViewModelBase class. By following this pattern, it provides the viewmodel the ability to change the title of the page. As you saw in the LoadImage method, the Title property is set to the name of the image. See the following excerpt:
<StackPanel Grid.Row="0" Style="{StaticResource PageTitlePanelStyle}">
<TextBlock Text="Windows Phone Unleashed"
Style="{StaticResource PhoneTextAppTitleStyle}" />
<TextBlock Text="{Binding Title}"
Style="{StaticResource PhoneTextPageTitleStyle}"
FontSize="{StaticResource PhoneFontSizeMediumLarge}" />
</StackPanel>
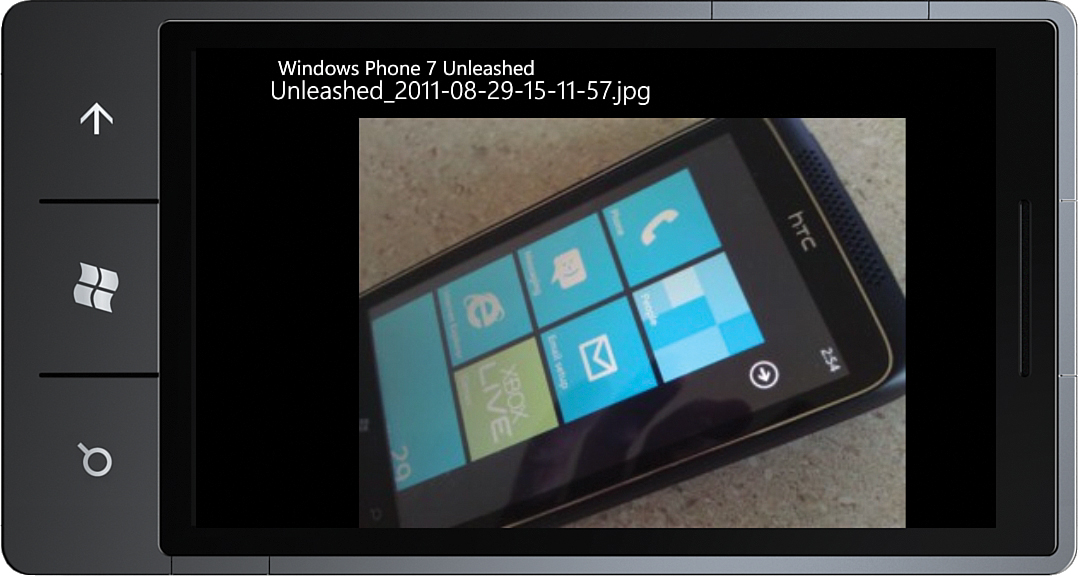
Figure 21.4 shows the MediaLibraryImageView page displaying an image from the media library.
By using the PhotoCamera class combined with the Media Library API, you can create a full-featured camera app. The PhotoCamera class is, however, not suitable for apps that need to capture audio and video. The next section explores the Silverlight webcam API and how it is used to save audio and video to isolated storage.