
Much of what is visible to end-users exists on the reporting layer and the development of those underlying components has already been discussed in previous chapters. This is all targeted at delivering business analytics to end-users by enabling them to cut through complex datasets in order to discover new insights about their business. These insights are often best realized when they can be acted upon. This chapter reviews a few concepts and functions on how to take the next step after the reports or dashboards are developed in order to create call-to-action analyses in OBIEE and how to further deliver data to individuals in the organization.
Oracle BI 12c has functionality that allows Oracle BI to be integrated into business processes to make the information more actionable directly from the Oracle BI system. In legacy versions of Oracle BI, there was the Delivers portion of OBIEE where you could invoke basic Actions, such as the delivery of reports via e-mail (also known as bursting) or to signal a dashboard alert. Oracle BI 12c uses Delivers concepts and enhances this capability through the Action Framework, where we are able to initiate a multitude of Actions; for example, calling web services, launching business processes workflows, or chaining delivery of other analyses and reports based on conditions or other logic.
The vision going forward for OBIEE is that it will provide a system that can deliver process interaction as well as analyses and reporting. This can often be described as a closed-loop system in that the Oracle BI platform moves a user from a transactional reporting mindset to an analytical one and the Action Framework moves Oracle BI further into an actual decision making processes initiator. This chapter looks at a few functions that Oracle BI provides in an attempt to help organizations succeed at this goal.
As said in the introduction, legacy versions of OBIEE, prior to Oracle BI 11g, contained functionality to deliver analyses to a targeted set of end-users. So delivery of reports through e-mail and alerts is not new. The object that was created to provide the Delivers method of delivery in those legacy versions was described as an iBot. This functionality has been retained and iBots have been renamed as Agents. To support this functionality, we need to have the Scheduler metadata tables (created by the RCU) and Oracle BI services running as we have covered previously as part of the start up process in order for the full process and following examples to work. So let's go through the process of creating an agent.
The example that we will go through involves e-mailing one of our previously created analysis reports to a user. To do this, we initially have to set up OBIEE with details of a mail server. If you do not have your organization's mail server information or do not wish to set up a sandbox mail server on your server you can skip to the Creating the Agent section, directly after the following Mail server setup section.
To configure e-mail settings for delivering functionality, conduct the following process:
Open Enterprise Manager and expand the Target Navigation left panel to expose the list of folders.
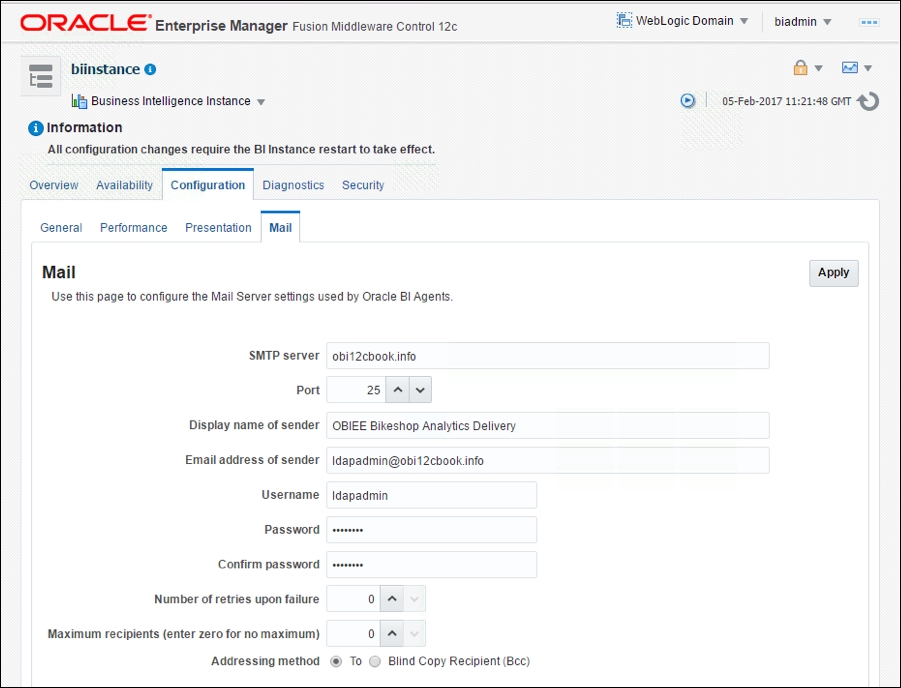
Then expand the Business Intelligence folder and click on the biinstance option. When the biinstance area opens, click on the Configuration tab and then the Mail sub-tab for our application:
Note
You can send a scheduled report as an alert without setting up the mail server. However, in order for a user to receive an e-mail, the mail server configuration must be completed in order for OBIEE to know how to send an e-mail. To get a basic mail server configured, you can use either a combination of freeware and open source tools such as hMailServer and Apache Directory Service or just hMailServer to handle the Simple Mail Transfer Protocol (SMTP) functions required for sending e-mails on a local server. To receive mail, install the Thunderbird mail client. All setup of the additional software mentioned for setting up capability on the server is beyond the scope of this book. If using the WebLogic Server LDAP users in combination with the SMTP server, you will need to modify each user's account profile Delivery options with corresponding e-mail addresses created for your testing to actually receive e-mails. Lastly, updating the hosts file on the server will allow you to create a mock DNS such as obi12cbook.info that references the localhost server.
- Lock and Edit the page.
- Input the details of an SMTP server, including user and password details, and SSL information if required.
- Click Apply.
OBIEE will use this mail routing server when sending out analyses via e-mail. We can also change the display name of the sending party.
For our example, we will use OBIEE Bikeshop Analytics Delivery:
- Click the Apply button.
- Expand the lock icon menu again and click on Activate Changes.
Once we have applied these changes, as learned in previous chapters, we can move to actually creating an Agent. You should stop and start all Oracle BI service components after applying this change to the mail tab.
Access the /analytics Oracle BI portal home page and view the Actionable Intelligence options on the left side of the page to notice the Agent and Action options. Just view this area for now, as you'll use a more direct method to create the Agent in the following steps:

Next, navigate to the Catalog page.
Expand the Shared Folders and Book folders where the exercises you have created from the previous chapters now reside. Locate the analysis report, Analysis Ten. This is the analysis that we will send out to one or more users through a dashboard alert and via e-mail if e-mail bursting is configured. On the Analysis Ten analysis row, right-click on the analysis and select the Schedule item from the options menu:

Selecting the Schedule option will take you to the new Delivers Agent form. On this new form with the name Untitled Agent, you will first encounter the General tab:

You can set the Priority for an Agent, which is analogous to the priority levels you might typically see in e-mails. This priority also relates to how each user has configured their Delivery Profile settings for how they wish to receive Delivers Agents based on level of priority. For example, they may stipulate that High priority Agents are sent to their mobile phone, while Normal ones are sent to their e-mail.
More importantly, in this tab, we can decide which user OBIEE will run this Agent as. In our example, we have stipulated our admin user. This means that every recipient of this Agent will receive the same report. However, if we had a report with some type of data-security, we could set the Agent to Run As the Recipient. This means that the content that is delivered will be filtered or personalized by that recipient user's or their respective security group's data visibility as defined in the RPD.
Note
Be aware that much of what a user is able to configure in the Delivers Agent areas are controlled by security privileges defined by the Oracle BI Administrator in the Administration page. Several restrictions prevent users by default from gaining full control of Agent functions and/or attributes that can be selected.
For example, in this Agent we will be sending out the information from analysis report Analysis Ten showing Brand Revenue by Year. If we had a set of users with access to only BizTech data, and another set of users with access to only FunPod data, then using the Run As Recipient option would enact the relevant data-security, which would ensure that users only receive the appropriate Brand data when the Agent is executed.
Next, click on the Schedule tab:

This tab is pretty self-explanatory in that, as well as ensuring that the Agent is turned on (Enabled checkbox), we can set a schedule for an Agent. We can decide whether the Agent runs once or is recurring, and on which days/times it occurs. This is useful, for example, if we have a sales report that needs to be sent out monthly with updated data. Changing the Frequency dropdown from Never to another option will enable the other attributes to become enabled. For now, change the Frequency dropdown value to Once by selecting it from the list.
Next, click on the Condition tab:
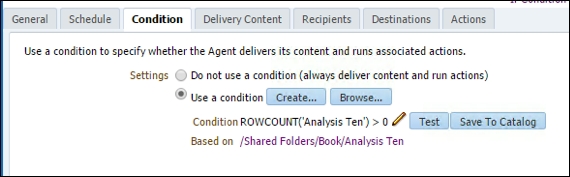
This is another tab that adds greatly to the flexibility of an Agent. A condition in this context is a check or validation run by OBIEE to determine if the Agent should be sent on its schedule frequency. This validation often is in the form of referencing another analysis, not just the one being sent. In this example, we'll use the default, which is using the actual analysis that we will be sending out, as a condition. It checks whether or not it produces a row count greater than 0, that is, whether it is producing any data at all. If the analysis has not produced any data then it is not worth sending out, so this is a handy condition. If it is true, in that the row count is greater than 0 (true), then it will be sent. If it is less than zero (false), it will not be sent. Note that we can save conditions and reuse them in other Agents. Also we can check the current status of a condition by clicking on the Test button:

We can see that for our condition, our analysis currently does have a row count greater than 0, so when we run this Agent, the process will complete and send out our information in the format that we'll configure in the next tab, Delivery Content.
In the Delivery Content tab you decide what content and format will be used by this Agent to send out the information:

There are several attributes in the Delivery Content tab:
- Subject: Firstly we can set the Subject, this will show in the subject header of our e-mail.
- Content: If we created an Agent from the Schedule option of an analysis, then the Content will already show that analysis and the path from which the analysis resides. Otherwise you can change the dropdown to Analysis and browse the catalog to choose one. Note that our content dropdown shows the value Condition Analysis. This is due to the fact that we are using the default condition check in the previous Condition tab.
- Format: You can keep the Device Default format of the delivery Format option or override it and choose another value as we have done here by selecting HTML. We also have the choice of sending the content out as CSV data, an Excel document, a PowerPoint slide, PDF, or plain text.
- Delivery: Selecting the Deliver results directly option will place the output of the analysis or message that you are sending directly into the resulting medium (that is, e-mail, dashboard alert, and so on) rather than as an attachment, which is how most users will want to receive the content.
- If Condition is False: If our previous condition, via the Condition tab, proves false, then our Agent will not run. However, our users may think that something has gone wrong if they do not receive the delivered Agent one day, if having received it on a previous frequency such as on a daily basis when a condition was true. Using this option, we can send them a message, in this case, to allay these fears and tell them that there simply is no data currently for this analysis.
The next tab is for detailing the Recipients who will receive the Agents output:

In this tab, one can choose individual users, or Application Roles. In the preceding screenshot, we have an example of both. Your username as the author of the Agent should appear already by default in the list of recipients.
Click the green + plus button to add a new recipient to add additional users or application roles to receive the information to be distributed from this Agent.
In this Recipients tab we also have the option to Publish for Subscription. This means that we can open Agent objects up to users and allow them to pick and choose which Agents they want to receive, or subscribe to, based on publishing this Agent to a group of users to select what information they'd wish to receive via whatever automated Agent bursting frequency. This centralizes report bursting, but also enables owners of data to have more control over how information is distributed and to whom.
Additionally, by clicking on the envelope icon, we can type in actual e-mail addresses for individuals who should also receive the Agent's output. E-mails here could include users that are outside the network such as third-party recipients.

The last major tab is the Destinations tab:

The main options here are to do with devices delivery selection. Again, we can allow users to choose their own methods of receiving data through their delivery profile (that is, My Account > Delivery Options tab), or we can override and choose a specific device option ourselves. Keep the User Destinations options set as the defaults to have Home Page and Dashboard and Devices > Active Delivery Profile selected for now.
There is, obviously, another tab labeled Actions. Clicking on this tab reveals a different set of attributes for evaluating a condition and based on the validity of that condition executing or rather invoking another Agent or executing some script, web service, or Java program. There is a decent amount of programming and setup required to execute an action within an Agent. However, the Oracle documentation on the matter is rather good, and the technical integration of this advanced aspect goes beyond the scope of this book:

At this point we are ready to run the Agent you've been creating thus far. Click the Save button icon to save the Agent.
Create a new folder under the Shared Folders > Book folder structure and name the new folder, Agents. Save the Agent as an object named, Chapter 9. The Agent, if scheduled to run on the frequency of once, will begin to execute once the Save button is clicked.
If you are ever impatient when creating the Agent and you don't want to wait for the schedule frequency to kick in, you can run the Agent immediately by clicking the Agent icon, a robot with a green arrow, in the Agent form that resides next to the Save button.Once you click on the Execute now button you should get a message saying that the Agent is running. If the Agent cannot run, for example, to a mail server issue, then you will receive an appropriate message. Otherwise you should receive a successful message:

In this example, there should be no errors, so let's look at the result. One could receive errors if the mail server is incorrectly configured. But if not using a mail server and only sending the Agent to the Homepage and Dashboard option there should be no errors at all.
Because we configured the mail settings for our full example, we can see the analysis has been sent to us in an e-mail (we are checking the e-mail associated with our recipient user list that was created with the previously mentioned mail server):
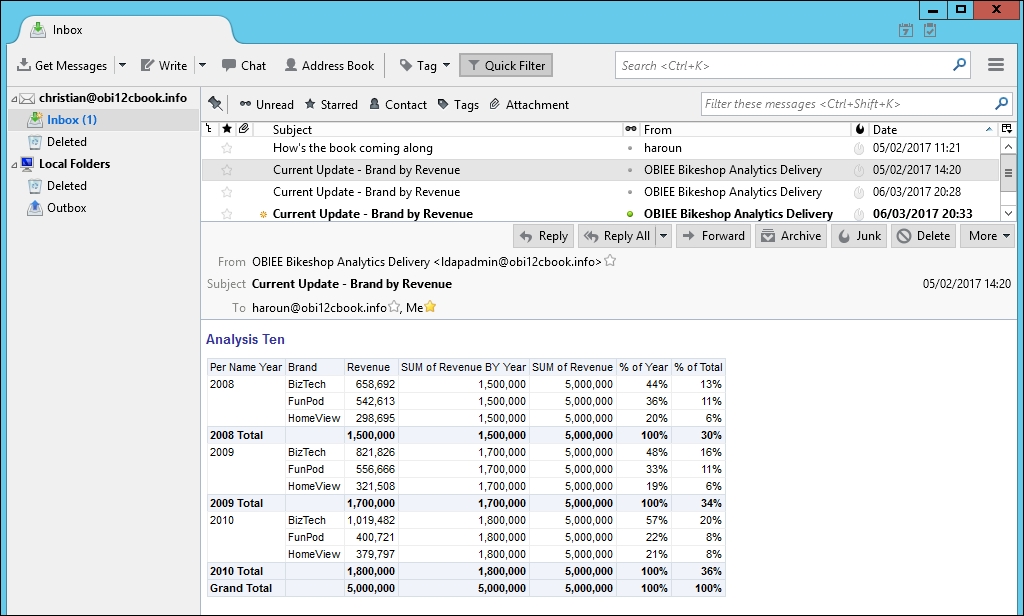
Note that the From and Subject fields are as we stipulated earlier in the example, and that the analysis is showing in an HTML format within the e-mail as we requested. We did not select the option for having the analysis show as an attachment so there isn't one in the e-mail. The content is embedded in the e-mail itself.
Before we move on, let's see how this looks as a dashboard alert, which was one of the default checkboxes that we kept checked when creating the Agent.
Navigate to the Home page screen and observe the global header:

You can see that we have a new Alerts section in our home screen that has a link to the results of the Agent, that is, the analysis that was just run via the Agent. We also have a yellow bell icon in our toolbar that we can click on to see all of our current alerts, if more than one, or the content of the existing example alert by clicking the View link:

Agents can send notifications to both a device and to the home page screen of OBIEE. These can be useful options for enhancing a user's workflow, especially in conjunction with the conditions that we can add to an Agent as we've shown in the preceding example.