
Actions were introduced in OBIEE 11g. Actions are operations or processes initiated within OBIEE that provide extensible functionality to an end-user or the Oracle BI system. They can allow straightforward functionality such as providing a navigation option to other areas or reports in OBIEE or they can, with varying levels of complexity, invoke external systems. Using the most complex of capabilities, one could leverage OBIEE as part of a full business process workflow.
Let's go through a couple of examples for basic navigation using Actions. We will then briefly talk about the possibilities that exist in invoking other system functions.
The most basic Action is that of navigating from one OBIEE object to another. We have already covered drilling using RPD hierarchies and Master-Detail linking in one of the previous chapters. Navigation Actions can be changed for an analysis column heading or value area via the Interaction option on a column's Column Properties in the Criteria tab for an analysis.
Let's create an example using the analysis, Analysis Ten, created in a previous chapter.
Navigate to the Catalog page and locate the Analysis Ten analysis object.
Open the Analysis Ten analysis and then click the Save As... icon button to save the report as a new report called Analysis Ten - Original.
Return to the Catalog page and once more locate and open the Analysis Ten analysis object that you opened before.
We simply made a backup copy of this file in the previous step and we want this Analysis Ten object to be updated as it is already used in the dashboard page layout to avoid having to change the dashboard layout again.
Let's set it up so that an Action Link will appear if you click on a particular Brand in that report, allowing for navigation to another analysis that has a different detail or alternate variety of metrics.
Locate the Brand column and then access its Column Properties. Next, click on the Interaction tab:

In the Interaction settings (for the Brand column), override the choice of interaction for the output Value > Primary Interaction dropdown by choosing Action Links . You are then presented with a table of action links that is currently empty.
Note that Action Links is a table where you can add a variety of links if desired. The end-user would then have a menu of Action Links to choose from when clicking on a value for the Brand column.
In our example, we are only concerned with adding the one navigation action. To add a new Action Link action, click the green + sign, and you are then shown the New Action Link... prompt:

We can input the Link Text, which acts as a label description that the user sees when picking this action. Enter in the Link Text field, Other Details
.
Click the green gear icon to add a new action. Choose Navigate to BI Content .
You are then prompted to choose another analysis from the Presentation Catalog. Let's choose our Analysis Seven analysis from the Shared Folders/Book folder:

Once we have chosen the analysis that we want to navigate to, we can click OK at the Create New Action confirmation prompt shown previously. Click OK again to close the New Action Link... prompt. And click OK once more to close the Column Properties prompt.
Save the Analysis Ten analysis that you are currently working on by clicking the Save icon button.
Navigate back to the Oracle BI Catalog page and locate the Analysis Ten analysis in the list and click on the Open link, which is shown under the analysis title of the object.
Click on BizTech for one of the top years when the report opens and notice what happens:

You can see an Action Link menu pop up with one option for our Other Detail link. If we click on that, we are transported to the Analysis Seven report:

You can see that this is a very straightforward process that brings potential business value. You can expound upon this example by adding multiple links in a menu to give a user greater flexibility in navigating to other reports and representations of data.
Having covered our first basic action link, let's cover another type, specifically navigating to a web page. As our starting analysis, let's build a basic report that contains some details about the company's brands, office locations, and so on. Our users want to be able to link to current information or search the web about the business, and it would help them if they could quickly do it from the report, rather than having to open a browser and type in a web address and search for that data as a separate step.
To modify the analysis we've been working on in this chapter, Analysis Ten, in the Catalog page find the analysis and click edit to edit the report. In the Criteria tab, expand the Offices folder of the Sample Sales Lite subject area. Double-click the Office column to add it to the Selected Columns area.
Next, remove the Per Name Year column by clicking on its respective properties menu and selecting the Delete option.
Click the Results tab to see the results of the change.
Now drag the Office column of the table view to the first position column of the table to the left of the Brand column.
Also remove the Brand column, deleting it from the Criteria tab selected columns.
Save the report:

Now we will edit the Office column properties to add a parameterized Action Link. We follow the same process as the previous edit of interaction functionality, but this time we choose the Navigate to a Web Page option when doing so.
Click on the Criteria tab and then click the Column Properties option from the Office column's properties menu. Click on the Interaction tab and expand Value > Primary Interaction to select the Action Links option.
Click the green + button to add a new action link. Click the green gear icon button and select Navigate to a Web Page. This opens a prompt where we can define the web address and parameters that we may want to pass.
Enter the following web address, in the URL field:
https://www.google.co.uk/search?q=@{1}
Next click the Define Parameters button:

On the Create New Action prompt we should review a few elements. Firstly, you specified the URL
, which defines the web page by which to navigate. Next, we wanted to be able to dynamically pass in the Office name of any item we select from our tabular analysis results so we need to set up a Parameter. Luckily, a parameter is automatically defined for you denoted by the @{1} characters that were added to the end of the URL that you entered after you clicked the Define Parameters button.
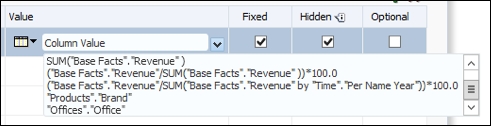
Check the Fixed and Hidden checkboxes. Uncheck the Optional checkbox for the row.
Remove any values from the Prompt column field for the row as we don't want to prompt the user, we simply want this to be a transparent experience when they click on the Office name.
The syntax, @{1}, for passing a parameter is straightforward. The numeric (can be alphanumeric) value in this case, 1, identifies the parameter entry in the Name column of the Define Parameters area. You can also add more parameters by yourself to identify more dynamic or static parameters as needed.
The Define Parameters
table is where we define the IDs (Name column) and the Value that we are passing. Note that we are passing the actual value of the column selected at runtime, but we could pass a static value or a variable.
We could also prompt the user for a value, but we do not need this in our example, so we have left the Prompt label column empty and marked the prompt as Fixed (the value passed cannot be changed) and Hidden (the user does not need to see the value passed as we already have it in the column they are clicking).
Having chosen that we are passing dynamically a column value, let's choose the actual column, Offices.Office, which we need to pass in by clicking on the Column Value option and then from the little down arrow to the right of the value field column selecting the "Offices"."Office" option:
Click the OK button.
Now in the Link Text field enter the value, Search Google for Latest News, so this will be the name of the Action Link that users see when they click on the row value of the column.
Before closing the prompts, let's add some conditionality to the Action Link.
You may have noticed in our first example that we had the option to conditionally show a link. Our current example will use the Conditionality option shown in the New Action Link... prompt.
Click the Conditionality option of the Show Link section and then click on the filter icon image and select the Revenue item:

Like any filter, we need an operator and a value to provide the scenario, which qualifies to prove true in order to show the desired result. In this case, we will set the value to 250,000 and the operator to is greater than or equal to.
Click OK to complete the condition:

Click the OK button to close the New Action Link prompt.
Note
There is a checkbox option on the Column Properties, Interaction tab Do not display in a popup if only one action link is available at runtime, which enables a user to click on a link value and immediately trigger the action link if only one action exists, instead of showing the action link description to then be clicked.
Now click OK again to close the Column Properties prompt.
Save the analysis.
Note that we can also save and store an action in the presentation catalog, just like a filter or Agent. This is useful if we commonly need to use the same action in multiple reports.
Run the report by clicking on the Results tab and then clicking on the Preview icon in the results editor toolbar, selecting the Default option:

We have modified the report slightly, but note that the Conditionality works and that only the Office names having revenue of $250,000 or greater have links associated with them.
Let's test the link by clicking on an Office name, for example Spring Office, and then click the Search Google for Latest News option Action Link:

We are sent to the Google search site with the Spring Office as the main search criteria. Note in the URL that our column value for the Office name has been passed as a parameter, as we had set up and envisioned.
In addition to the navigate type of Actions, we can also Invoke Actions. Invoked Actions are those that allow you to manipulate functions and processes outside of OBIEE via a variety of methods. You can create Actions that invoke the following:
- Web Service
- Java method
- Browser script
- HTTP request
This is an advanced topic and beyond the scope of this book. But if your organization or client is interested in truly incorporating OBIEE into their workflow with products such as E-Business Suite, Oracle Process Manager, and so on, then you should take some time to look into these options via Oracle documentation https://docs.oracle.com/middleware/1221/biee/BIEUG/actions.htm#BIEUG644.
These Actions can be used to simply bring back information from an external system into a dashboard for a user to reference, or even to update an external system directly as a result of an analysis being executed in OBIEE. For example, you may have noticed that when creating an Agent, there is a tab for adding an action. We could create an Agent that periodically runs and if it produces a certain result, feed that into an invoke action to update an external system. We can also create Actions that can be invoked directly from a dashboard. The potential for automating your workflows as a central step inside of an analytics system have increased greatly with this release.